
How to shoot and export a stop motion video using your webcam
Stop motion brings objects to life one frame at a time. This tool turns your webcam into a capture station, with onion skinning to see where the last frame ended, keyboard shortcuts to keep your hands near the model, and a built-in export. This guide covers every setting, explains the frame math, walks through a clay figure example, and lists the mistakes that ruin a first attempt.
What stop motion is and who uses it
Stop motion is a technique where you photograph an object, move it a tiny bit, photograph it again, and repeat. When the photos play back at speed the object appears to move on its own. The technique is older than film itself and still used in professional work, from animated features to product ads.
Hobbyists use it for clay figures, paper cutouts and toy scenes. Teachers use it for science demonstrations where a slow process needs to be shown in seconds. Social media creators use it for cooking videos where ingredients assemble themselves. The appeal is that anyone with a camera and some patience can make something that looks genuinely magical.
This tool provides the two things that separate a decent stop motion setup from pointing a phone and hoping: onion skinning to guide each move, and consistent framing from a fixed camera feed.
Starting the camera and setting the stage
Press the Open the camera button. The browser asks for permission to use your webcam. Once granted, the live feed appears in the main panel. The camera must not move during the entire shoot. Even a small bump shifts every frame after it and the animation will jolt.
Tape the laptop lid in place, or prop the phone against something solid. A cheap tripod is the best investment for stop motion. Close the curtains and use a desk lamp instead of daylight, because clouds passing over change the brightness and the finished video flickers as a result.
The workspace should be within arm's reach of the keyboard. You will press the spacebar hundreds of times, and reaching across the desk for each capture slows the work and risks bumping the camera or the set.
Capturing frames and using onion skinning
Press the Capture button or hit the spacebar to grab a frame. A brief flash confirms the capture. The frame appears as a thumbnail in the strip at the bottom of the screen. Press the spacebar again after moving the model, and a second thumbnail appears beside the first.
Onion skinning is the feature that makes precise animation possible. When the checkbox labelled Onion skin is ticked, a faint copy of the last captured frame appears over the live camera view. You can see exactly where the model was and place it exactly where you want it for the next shot. Without this, every move is a guess.
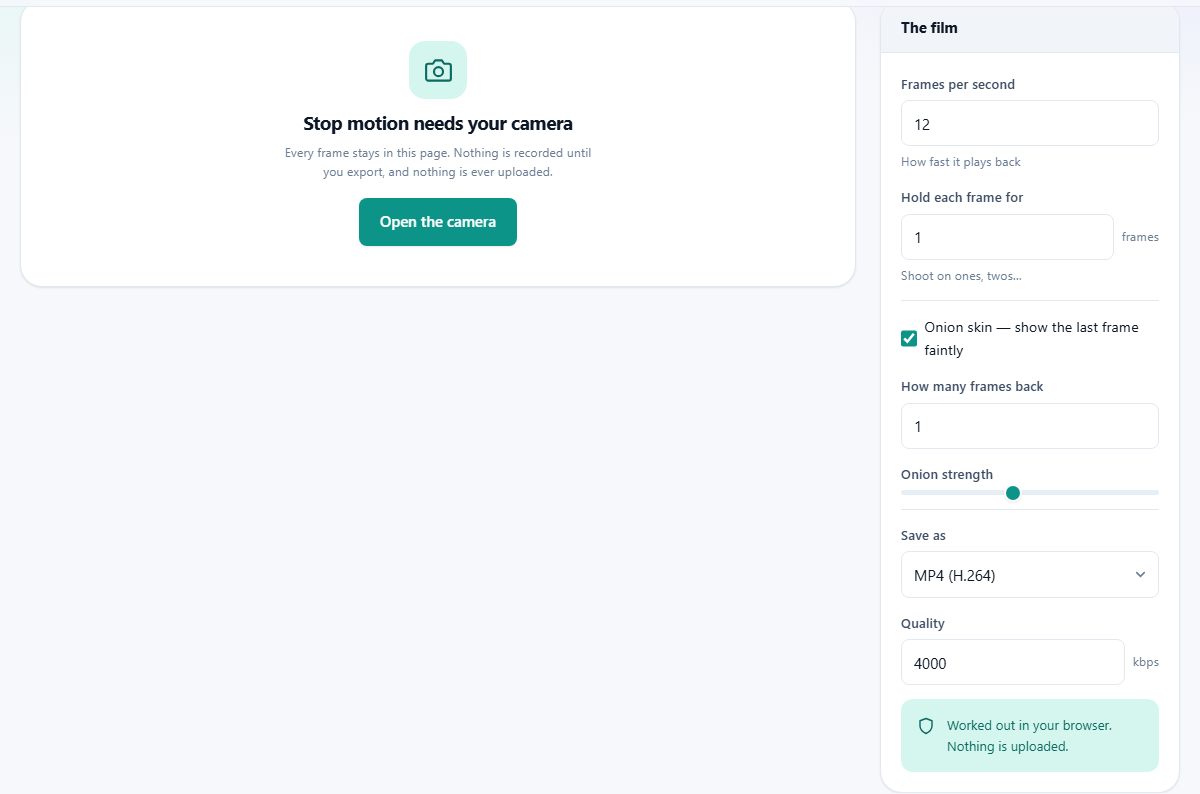
The field labelled How many frames back controls how many previous frames show through, from 1 to 5. The default of 1 is right for most work. Set it to 2 or 3 when you need to track a longer arc of motion, like a figure swinging its arm.
The slider labelled Onion strength runs from 10 to 80 per cent and defaults to 40. Higher values make the ghost image easier to see but harder to see the live feed underneath. Lower values fade the ghost but keep the live view clear. Adjust it until you can see both comfortably.
Frame rate, hold and how to count your shots
The field labelled Frames per second in the side panel sets how fast the animation plays back. The default is 12, which is the traditional rate for hand-drawn animation and stop motion. It gives a slightly choppy feel that suits the medium. Higher values like 24 look smoother but need twice as many photographs for the same length.
The field labelled Hold each frame for controls how many output frames each photograph occupies. The default is 1, meaning each capture plays for one frame. Set it to 2 and each capture holds for two frames, which halves the number of photos you need to shoot. This is called shooting on twos and it is what most professional animation uses.
The arithmetic is simple. At 12 frames per second with a hold of 1, one second of film needs 12 captures. At 12 frames per second with a hold of 2, one second needs 6 captures. A ten-second film at those settings needs either 120 or 60 photographs. Plan something short for a first attempt.
Undoing mistakes and previewing the result
Press the Undo frame button or hit backspace to remove the last captured frame. This is safe to do at any point. If you bumped the model or the camera, undo the bad frame, fix the position and capture again.
Press Preview to watch the captured frames play back as an animation. A checkbox labelled Loop keeps the preview repeating so you can study the motion. Look for jumps where the model moved too far between frames, or frozen spots where it barely moved at all.
The summary line above the frame strip shows how many frames you have captured and how long the film will be at the current frame rate and hold setting. Check this often. It is easy to lose track of how many frames you have shot, and discovering after two hundred captures that you are only at four seconds of film can be discouraging.
Exporting the finished animation
Press Export the video when you are happy with the preview. The Save as dropdown in the side panel picks the format. The Quality field sets the bitrate in kilobits per second, defaulting to 4000. Stop motion frames tend to be simpler than live footage, so 4000 is more than enough for a clean result.
The export assembles every captured frame into a video file at the chosen frame rate and hold. When it finishes, the video appears in a player below the frame strip. Press Download to save it to your computer.
The exported video has no sound. Stop motion is normally scored afterwards in a separate editor where you add music, sound effects and dialogue. This keeps the capture tool simple and avoids the complexity of syncing audio to a frame-by-frame workflow.
Worked example: a clay ball rolling across a desk
You have a ball of modelling clay and a clear desk. Set the laptop on a stack of books so the webcam looks down at the desk surface. Tape the laptop lid so it cannot move. Turn on a desk lamp and close the blinds.
Open the camera. Set Frames per second to 12 and Hold each frame for to 2. That means 6 captures per second of film. You want three seconds, so you need 18 photographs.
Place the ball at the left edge of the desk. Capture. Move it about one centimetre to the right. Check the onion skin to make sure the new position overlaps correctly with the ghost of the old one. Capture. Repeat seventeen more times. The ball should cross about 18 centimetres of desk.
Press Preview. The ball rolls smoothly across the desk in about three seconds. If any frame shows a jump, undo back to that point and reshoot from there. When it looks right, press Export the video. Set Quality to 4000. The export finishes in a few seconds and you download the clip.
Mistakes that ruin a first attempt
Moving too much between frames is the most common problem. What feels like a small move to your hands shows up as a large jump at playback speed. Move less than you think you need to. Half a centimetre per frame is plenty for small objects at 12 frames per second.
Bumping the camera shifts every subsequent frame and breaks the illusion that the model is moving on its own. This is why taping the laptop or phone in place matters so much. If it happens, you may need to undo back to the bump and reshoot everything after it.
Changing lighting mid-shoot causes the film to flicker. Daylight shifts as clouds pass, and the camera adjusts its exposure to match. Use a lamp with consistent output and block natural light from the set.
Refreshing the page or closing the tab loses all captured frames. The frames live in memory only and are not saved to disk. On a long shoot, export a partial result every so often as a safety measure. There is no autosave by design, because saving your camera frames would mean writing them somewhere, which conflicts with the promise that nothing leaves the page.
When this tool is not enough
If you need to import photos you already took with a separate camera, this tool cannot help. It captures from the live webcam only. For pre-shot photos, use the photo slideshow maker with a very short hold time instead.
If you need audio synced to specific frames, or if you need to composite multiple layers, you need a desktop stop motion application. This tool covers the basic capture, onion skin and export workflow, which is all most people need for short clips and experiments.
Your camera feed stays private
The webcam feed is drawn inside the browser tab and never sent anywhere. Captured frames are held in page memory, not written to disk or uploaded. The export assembles them into a video locally and gives you the file as a download.
You can prove this by disconnecting your internet after opening the camera. The tool keeps working. Capture, preview and export all function with no connection at all, because no part of the process depends on a remote server.