
How to record your screen or webcam straight from the browser
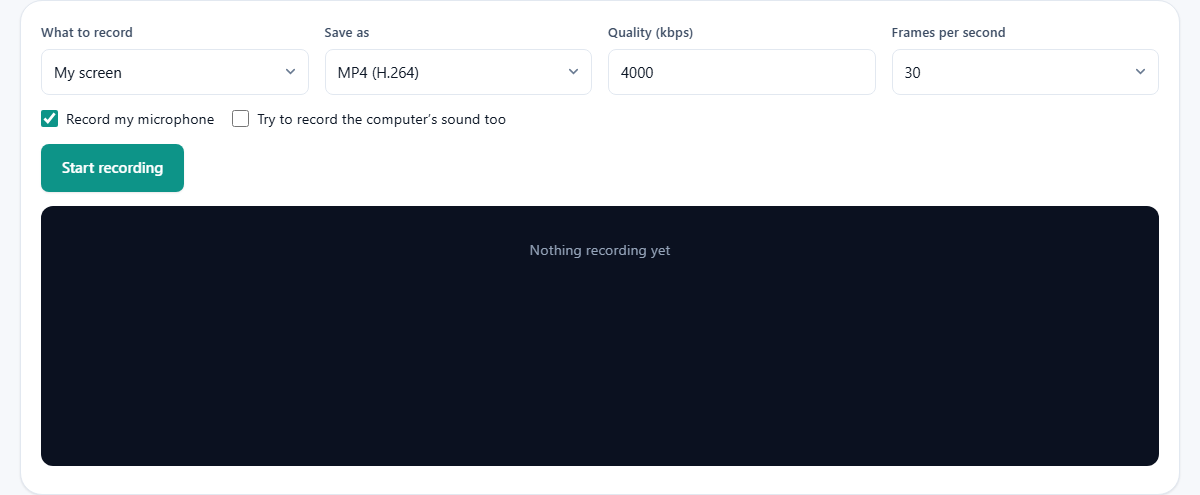
This article walks through the free screen and webcam recorder that runs entirely inside your browser. You will learn how every control works, what each source option does, how to capture system audio, and how to save the result before the tab closes. A worked example records a software demo from start to download.
Who needs a browser-based screen recorder
Teachers recording a quick walkthrough of an assignment. Developers showing a colleague how to reproduce a bug. Support agents capturing the steps a customer describes. Freelancers making a product demo for a client who asked for a video instead of written notes.
In all of these cases, the recording is short, the audience is small, and nobody wants to install dedicated software for a two-minute clip. A tool that opens in a tab and saves a file is enough. There is no account to create, no watermark stamped on the result, and no time limit counting down while you talk.
Choosing what to record with the source selector
The dropdown labelled What to record has three options. My screen captures whatever is on your display. My camera turns on the webcam and records only that. Screen with my camera in the corner does both at once, with the camera picture floating in a small box at the bottom of the frame.
When you pick My screen, the browser itself asks which screen, window, or tab to share. That prompt belongs to the browser, not to the tool, so it looks slightly different in every browser. You cannot bypass it, and the tool cannot pre-select what to share on your behalf.
My camera opens your webcam feed and nothing else. This works well for a quick personal message or a selfie-style clip. The combined option is the one most people use for tutorials, because the viewer sees the screen and the speaker at the same time.
Setting the camera overlay size
When you choose the combined mode, a new field appears labelled Camera size (%). It accepts any value from 8 to 50 and defaults to 22. This number sets how much of the recording frame the webcam overlay occupies.
A value around 20 to 25 keeps the camera picture visible without blocking too much of the screen. If you are recording a large dashboard and the camera is just for presence, drop it to 10. If the recording is mostly a conversation and the screen is secondary, push it to 40 or higher. The camera sits in the bottom corner, so plan which corner holds the least important part of your screen.
Sound options and platform differences
Two checkboxes handle audio. Record my microphone is ticked by default and does what it says. Try to record the computer's sound too is a separate tick that attempts to capture whatever the speakers are playing.
System audio capture depends on your operating system and browser. On Windows, it generally works. On macOS, the operating system blocks direct access to system audio, so the tick box may have no effect unless you have installed third-party audio routing software.
There is a useful middle ground. When the browser asks what to share, choosing a specific browser tab rather than a whole screen usually lets you include that tab's audio. So if you need to record a video playing in another tab, share that tab instead of the full screen. It is the most reliable way to get computer sound into the recording.
Quality, format, and frame rate controls
The Save as dropdown lists the video formats your browser supports. The available options vary by browser, but you will usually see WebM and sometimes MP4.
Quality (kbps) sets the video bitrate. It ranges from 500 to 20000 and defaults to 4000. For a screen recording of mostly static content like slides or a text editor, 2000 to 3000 is more than enough and keeps the file small. For fast-moving content like a game or a video call, raise it to 6000 or higher so individual frames stay sharp. A higher number always means a larger file, so pick the lowest value that still looks good to you.
Frames per second offers 15, 30, or 60. The default of 30 is right for almost everything. Choose 15 if you are recording a mostly static screen and want a smaller file. Choose 60 only if smooth motion matters, such as recording gameplay, and you are willing to accept double the file size.
Starting, stopping, and downloading the recording
Press Start recording. The browser presents its sharing prompt. Once you pick a screen, window, or tab, the recording begins and a red dot with a running clock appears on the page so you know it is working.
When you are done, press Stop and save. The recording appears below the controls, ready to download. You can also press the browser's own Stop sharing button in the address bar, and the recording finishes properly rather than being lost.
This is the critical step: download the file before you close the tab. The recording is held in the page's memory. It is never sent to a server. If you close the tab, reload, or navigate away before downloading, the recording is gone and cannot be recovered. The page tries to warn you, but browsers do not always allow that warning. Press download as soon as you stop.
Worked example: recording a software demo
Suppose you need to show a colleague how to use a reporting dashboard. Set What to record to Screen with my camera in the corner. Leave Camera size (%) at 22. Tick Record my microphone. Leave Quality (kbps) at 4000 and Frames per second at 30.
Press Start recording. The browser asks what to share. Pick the window that has the dashboard open. The red dot and timer appear. Walk through the dashboard for about ninety seconds, pointing out each section while you narrate.
Press Stop and save. The recording appears as a playable clip on the page. The timer shows 1:32. Press the download button. A WebM file lands in your downloads folder, roughly 6 MB. Send that file to your colleague. The whole job took under three minutes, no software to install, no account to sign up for.
Common mistakes and how to fix them
The most common problem is closing the tab before downloading. There is no server copy, no cloud backup, and no undo. Always download first.
Another frequent issue is forgetting what is visible on screen. Notifications, bookmark bars, open tabs, and desktop icons all appear in the recording. Close anything private or distracting before you press start. If you only need one application, share that specific window rather than the whole screen.
Very long recordings can exhaust your device's memory. The recording sits in the page while you work, and a machine with limited RAM may discard the tab under pressure. If you need to record for more than about twenty minutes, break it into shorter clips.
When this tool is the wrong choice
If you need to edit the recording afterwards, cut scenes, add titles, or stitch clips together, you need a video editor. This tool records and saves. It does not trim, split, or rearrange anything after the fact.
If you need a polished production with transitions, lower thirds, and branded intros, desktop software will serve you better. If you need to live-stream to an audience in real time, this is not a streaming tool. And if your recording will be longer than about thirty minutes, a desktop application that writes directly to disk is safer than one that holds everything in browser memory. The browser approach is ideal for short, one-take recordings that need nothing beyond a clean capture.
Privacy and where the recording lives
The recording is written into the page as you go. It stays on your device the entire time. Nothing crosses the network. There is no server receiving frames, no cloud storage, and no analytics on what you record. When you press download, the file goes from the page to your local disk.
That local-only design is the reason the tool cannot recover a lost recording. There is simply nowhere to look it up after the tab is gone. It is also the reason there is no sign-up, no login, and no account. There is nothing to sign into, because nothing is stored anywhere but your own browser tab.