
How to Make an Audiogram Video From a Podcast or Voice Clip
This article explains what an audiogram is, why podcasters and creators use them, and how every control on the Audiogram Maker works. You will walk through a complete example, learn which shape to pick for each platform, and find out how to get the export looking its best.
What an audiogram is and why it matters
An audiogram is a short video made from an audio clip. It shows cover art, a title, and a waveform that bounces in time with the sound. The point is simple: most social platforms will not play a bare audio file in a feed. Some will not even show it. But they will all play a video. Wrapping your audio in a video gives it a visual presence, an autoplay chance, and a thumbnail that stops the scroll.
Podcasters are the biggest users. A 60-second clip from a strong episode, turned into a square or portrait video, gets far more engagement than a link to the full show. Musicians, voice actors, teachers, and journalists use the same trick whenever they want spoken audio to show up in a visual feed.
Loading a clip and choosing a shape
Drop an audio file onto the page. MP3, WAV, M4A, FLAC, OGG and other common formats all work. Keep the clip short. 30 to 90 seconds is the range that performs best on social media. Most platforms cap feed videos at one or two minutes, and attention runs out well before that.
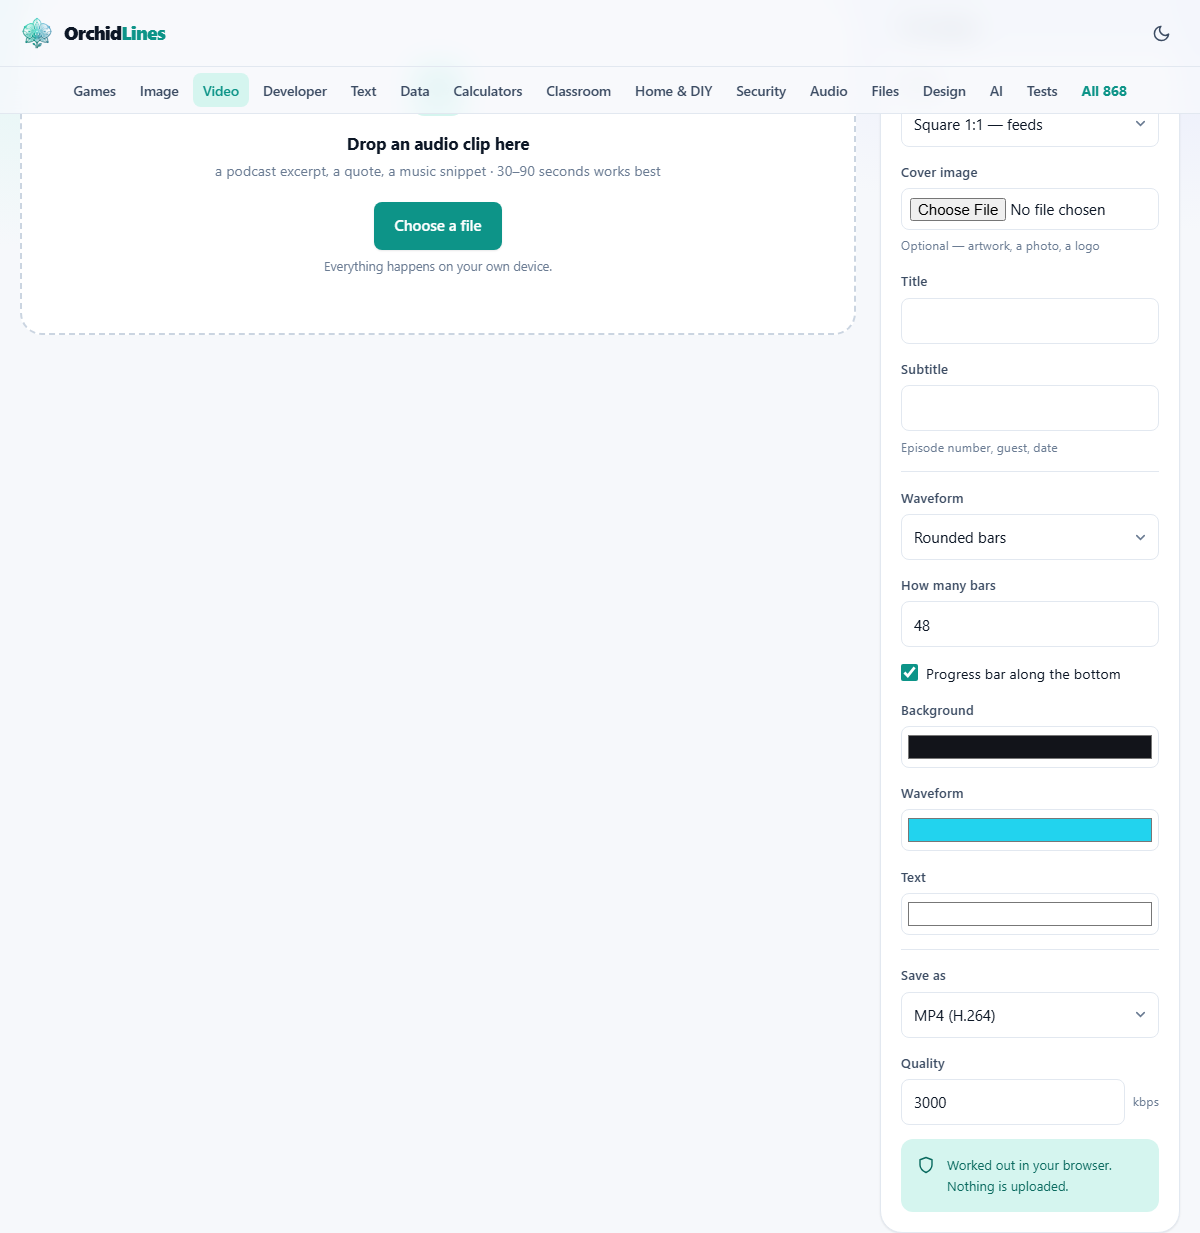
The Shape dropdown in the settings rail offers four options. Square 1:1 works for most feed posts. Portrait 4:5 takes up more screen space on a phone and tends to perform better in feeds that favour tall content. Story 9:16 fills a full phone screen and suits story formats. Wide 16:9 is the standard for YouTube and is rarely the best choice anywhere else, because it looks small on a vertical phone screen.
Cover image, title and subtitle
The Cover image field is optional. You can load a photo, a logo, or your podcast artwork. The image is resized and centred to fill the top portion of the frame. If you leave it empty, the video uses only the background colour and the waveform.
Title and Subtitle are printed on the video frame. The title should be the hook - a sentence or phrase that makes someone want to listen. The subtitle is for context: the episode number, the guest name, or a date. Keep both short. They will be seen at thumbnail size in a feed, and small text disappears. Bold statements in a few words carry further than a long description.
Waveform style and colour settings
The Waveform dropdown gives you three styles. Rounded bars is the default. Each bar has soft ends and a polished feel. Square blocks uses hard-edged rectangles. Dots replaces each bar with a circle, giving a lighter, more modern look.
How many bars sets the number of bars visible at any moment, from 16 to 120 in steps of 4, with 48 as the starting value. Fewer bars produce thick, bold shapes. More bars give finer detail but can look busy at small sizes. For a square 1:1 video, 36 to 60 bars usually look best.
Progress bar along the bottom draws a thin line that crawls from left to right as the audio plays. It tells the viewer how far through the clip they are and adds a subtle sense of motion even when the waveform is quiet.
Three colour pickers control the Background, the Waveform bars, and the Text. The defaults are dark blue, cyan, and white, which is a high-contrast combination that reads well at any size. You can match your podcast branding or pick anything that looks clear at thumbnail scale. Avoid light colours on a light background. What looks fine on your monitor disappears in a feed.
Export format and quality
The Save as dropdown offers the video formats your browser supports. WebM is the most common. The Quality field sets the bitrate in kilobits per second, with 3000 as the default. Higher values mean better picture quality and bigger files. For social media uploads, 3000 to 5000 kbps is a good range. The platform will re-encode the video on its end anyway, so going beyond 6000 kbps rarely improves what the viewer actually sees.
The export runs in real time. A 60-second clip takes about 60 seconds to export. The browser plays the audio, records the animated canvas frame by frame, and mixes the result into a video file. A progress bar tracks the work. Once it finishes, a preview player appears with a Download button.
Worked example: a podcast teaser for a feed post
You have a two-minute podcast episode highlight saved as an MP3. Drop it onto the page. The waveform appears on the preview canvas.
Choose Portrait 4:5 from Shape. This will take up more of the viewer's screen in a scrolling feed. Upload your podcast logo into the Cover image field. Type a punchy quote from the clip into the Title field. Put the episode number into the Subtitle field.
Leave Waveform on Rounded bars and How many bars at 48. Make sure Progress bar along the bottom is ticked. Set Background to a dark colour that matches your brand. Set Waveform to a bright contrasting colour. Set Text to white.
Drag the Preview position slider to about 50 percent to check what the video looks like at the middle of the clip, where the audio is likely loudest. The bars should bounce noticeably. If they look too small, try raising the bar count to 60.
Press Export the video. Wait about two minutes while the browser records. When it finishes, press Download. The video file is ready to upload to your social feed.
Getting better results
Pick a clip with energy. A stretch of quiet speech produces flat bars that barely move. A moment with laughter, emphasis, or a music bed underneath gives the waveform real bounce, which is what catches the eye in a feed.
Design for silence. The majority of social media videos are watched with the sound off. The title text is doing the selling, not the audio. Write a line that makes someone curious enough to tap and unmute. If you can, add subtitles in a video editor after export. Many platforms will also auto-caption the video once you upload it.
Test at thumbnail size. Shrink the browser window and see if the title is still readable. If the text is too small or the colours are too close, the post will be invisible in a crowded feed. Big type and strong contrast survive shrinking.
Common problems and fixes
The waveform barely moves. The clip is too quiet or too even. Try a different section of the episode, one with more dynamic range. Or normalise the audio first using a volume tool before loading it here.
The export seems stuck. It is not stuck. The browser is recording in real time, so there is nothing to speed up. A 90-second clip takes 90 seconds. Let it run and watch the progress bar.
The video looks blocky or blurry. Raise the Quality value to 4000 or 5000 kbps. If the platform still shows a rough result, the platform itself is compressing the video further, and there is nothing you can do on your end beyond uploading at the highest quality you have.
The cover image looks cropped oddly. The image is centred and scaled to fill the frame. If important content sits at the edges, it may be cut off in certain shapes. Use an image that has the subject in the centre and plenty of safe space around it.
When this tool is not the right choice
If you want subtitles burned into the video, this tool does not do that yet. Export the audiogram first, then bring it into a video editor and add the text there. Or use a subtitle tool to create a caption file and let the platform auto-display it.
If the clip is longer than two or three minutes, the export time becomes awkward and the engagement drops. Long-form audio belongs as a direct upload to a podcast host, not as an audiogram in a feed.
If you need the waveform as a still picture rather than a moving video, the Waveform Art tool on the same site creates a printable PNG instead.
Nothing is uploaded
The audio is decoded, the animation is drawn, and the video is recorded entirely inside your browser. No file is sent to any server. You can load the page, disconnect from the internet, and the export still works. That matters when the episode is unreleased, when the clip contains something private, or when you simply do not want your content passing through a third-party service before it reaches your audience.