
How to Make Audio Louder or Quieter and Normalise Levels
This article covers everything the Volume and Normalise tool can do: raising or lowering the level of a recording, normalising it to a target, adding fades, and silencing unwanted sections. You will learn what the measured numbers mean, which settings to choose for different jobs, and how to avoid the traps that ruin a good take.
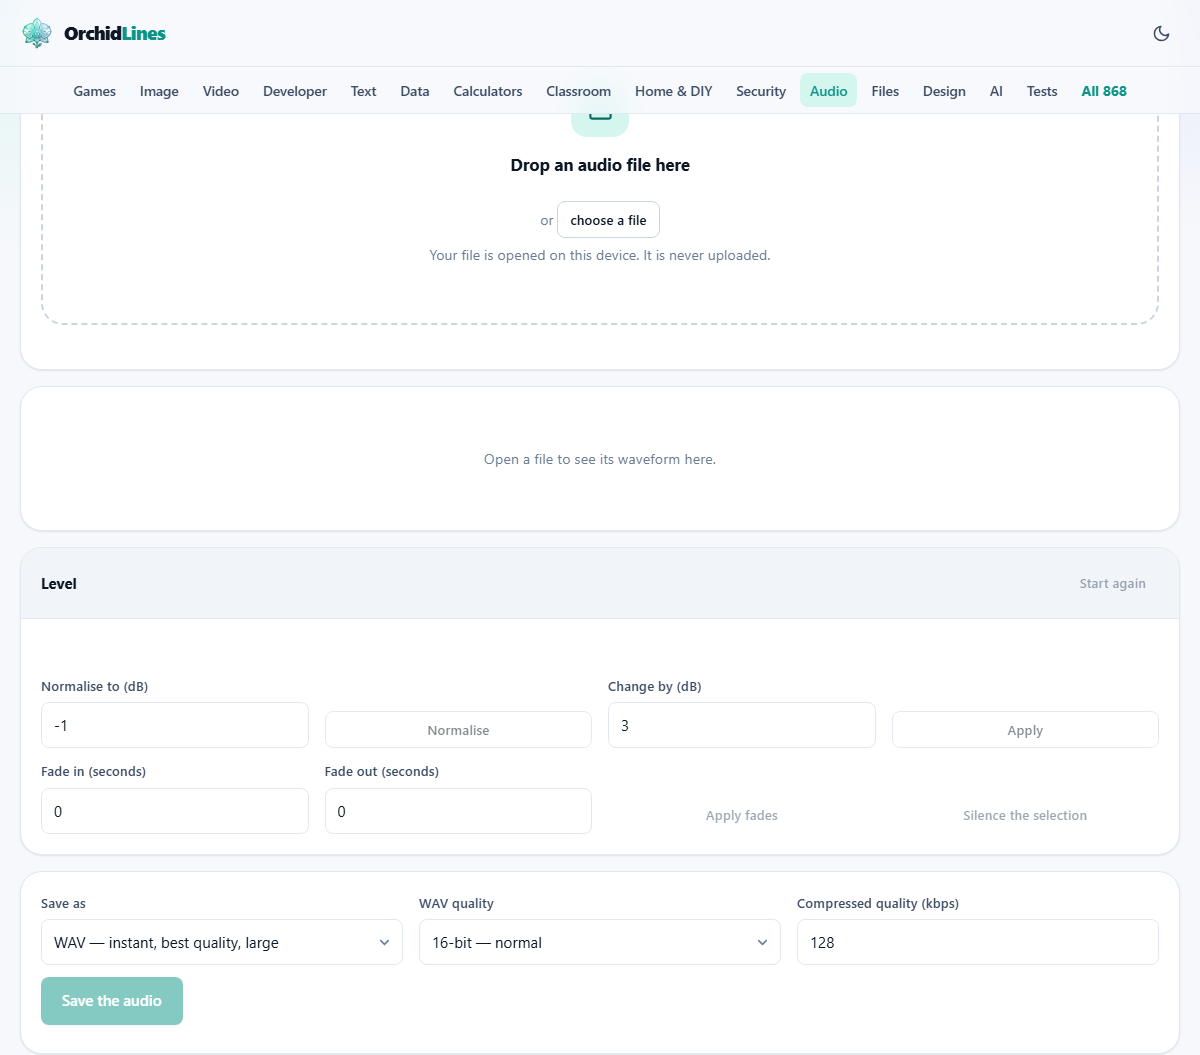
What the tool does to a recording
At its simplest, the tool makes audio louder or quieter by multiplying every sample by the same amount. That is all gain adjustment is. Normalising is the same operation with the multiplier worked out for you. The tool finds the single loudest point in the file, calculates how much to scale the whole recording so that peak reaches a target you set, and applies that scale in one pass. Nothing is squashed, rebalanced or compressed. The loud parts and the quiet parts keep their original relationship.
Beyond level changes, the page also lets you fade the start or end of a recording in or out over a number of seconds, and it lets you silence a selected stretch of audio. These are simple edits that turn up constantly when you are preparing a voice-over, a podcast intro, or a clip for a presentation.
The numbers you see after loading
As soon as you drop a file in, two measurements appear. The first is the peak level, which is the single loudest sample in the whole recording. The second is the average level, measured as a root-mean-square value, which tells you how loud the audio actually feels over time.
These two numbers can be very different. A recording of someone talking may have an average level of minus 18 dB but a peak of minus 2 dB, because one loud cough or door slam pushed the peak up while the rest of the speech sat much lower. Normalising that file would only raise the level by about 1 dB, because the peak is already close to maximum. The speech would still sound quiet. That is the situation where normalising alone is not enough and you need a compressor, which is a different kind of tool.
If the peak is already at 0 dB, a warning appears in red. That means the audio is clipped. The loudest moments hit the ceiling and were cut flat. Making it louder will only push more of the audio into that ceiling. Turning it down will not repair the clipping either, because those flat tops are permanent.
Normalising to a target level
The Normalise to field accepts a value in decibels from minus 30 to 0, with minus 1 as the default. Press the Normalise button and the tool scales the entire file so the peak lands at that number. Minus 1 dB is a safe all-purpose target. It leaves a small cushion below maximum, which matters because compressed formats like M4A can push peaks slightly higher during encoding. At 0 dB, those extra peaks would clip.
For a voice recording that will sit under music in a video, minus 3 dB gives the music room to breathe. For a podcast that listeners will play on its own, minus 1 dB is ideal. For audio going into a professional mixing session, the engineer may ask for minus 6 or minus 12, and you can type that number in directly.
Changing the level by a set amount
The Change by field takes a value in decibels from minus 60 to plus 30, with 3 as the default. Press Apply and the tool adds or removes that much gain from the whole file, or from just the selected portion if you have dragged across part of the waveform.
Decibels are not like percentages. Adding 6 dB roughly doubles the perceived loudness. Subtracting 6 dB roughly halves it. A change of 1 dB is barely noticeable. A change of 10 dB sounds about twice or half as loud to most listeners. Small numbers make bigger differences than they appear to.
You can apply this more than once. Each press adds the same amount on top of whatever you did before. The levels update after every change so you always know where you stand. If you go too far, press Start again to get back to the original.
Fades and silence
The Fade in and Fade out fields each take a time in seconds from 0 to 60, in steps of a tenth of a second. Press Apply fades and the audio ramps smoothly up from silence at the start or down to silence at the end over the time you set. A fade of 0.5 to 1 second is typical for a voice clip. Longer fades of 3 to 5 seconds work well on music.
The Silence the selection button replaces whatever you have selected on the waveform with dead silence. Select a stretch by dragging across the wave, then press the button. This is the fast way to kill a cough between sentences, blank out a name someone said by accident, or remove a stretch of noise between takes without cutting the file shorter.
The waveform, selection and zoom
The waveform draws itself as soon as a file loads. Drag across it to select a range, and drag the edges of the selection to fine-tune. The times below show where the selection starts, where it ends, and how long it is.
Play starts playback from the beginning of the selection, or from the start of the file if nothing is selected. Press the space bar as a shortcut. Select all highlights the entire recording.
Zoom in and out with the plus and minus buttons or by scrolling. Zoom to selection fills the display with just the selected area, which is useful for precise editing. Fit shrinks the view back so the whole file is visible. When zoomed in, a scroll bar appears so you can move along the audio.
Saving the result
The Save as dropdown offers M4A, WebM and WAV. MP3 is an option. No browser includes an MP3 encoder, so this page loads a small open-source one the first time you choose it. M4A is smaller than MP3 at the same quality and plays on every device made in the last two decades. It is the right pick for sharing and general use.
The Compressed quality field sets the bitrate in kilobits per second, with 128 as the default. For spoken word, 96 is usually enough. For music, 192 or higher keeps the detail that matters.
The WAV quality selector gives you 16-bit for standard playback, 24-bit for studio editing, and 32-bit float for technical work. WAV files are large but lose nothing. Saving to WAV is instant. Saving to a compressed format takes roughly as long as the audio runs.
Worked example: preparing a voice-over for a video
You recorded a 90-second narration on your phone. Drop the file onto the page. The peak reads minus 12 dB and the average reads minus 24 dB. The audio is very quiet.
Type minus 1 into the Normalise to field and press Normalise. The tool scales everything up by 11 dB, and the waveform grows to fill the display. Play the file to check. The voice is now full and clear.
At the start of the clip there are three seconds of room noise before you begin speaking. Drag across those three seconds on the waveform. Press Silence the selection. The noise is replaced with pure silence.
Set Fade in to 0.3 seconds and Fade out to 0.5 seconds. Press Apply fades. The opening syllable now ramps in gently instead of popping, and the ending trails off instead of cutting dead.
Choose M4A from Save as, leave the bitrate at 128, and press Save the audio. The file downloads ready to drop into your video editor.
Mistakes that come up often
Normalising to 0 dB instead of minus 1. The result sounds fine on the page, but after encoding to M4A it clips on the loudest peaks. Always leave at least 1 dB of headroom when saving to a compressed format.
Boosting a recording that is already clipped. The red warning is there for a reason. Making it louder drives more of the waveform into the ceiling. If the original is damaged, no amount of gain will repair it.
Applying gain without checking the selection. If you have a small section selected and press Apply, only that section changes. The rest stays where it was, and the join between the two levels may click. Press Select all first if you want the whole file to change.
Fading a silence section. If you silenced the opening seconds and then apply a fade in, the fade ramps up from silence into silence and the first real sound still starts abruptly. Apply the fade before silencing, or set the fade time to cover only the speech, not the silent part.
Your audio stays private
The entire process runs in your browser on your own device. The file is never sent to any server. You can load the page, disconnect from the internet, and carry on working. No account is needed and no copy is stored anywhere outside your machine. That is especially important when the recording contains private conversations, client calls or personal voice memos.