
Recording your voice in the browser and saving it cleanly
A quick voice recording should not need an app download, an account, or a trip through someone else's server. This article explains every step of the Voice Recorder, from the microphone permission prompt to the final saved file, and covers the settings that make the difference between a usable take and a noisy one.
What the recorder does
The Voice Recorder captures sound from your microphone directly inside the browser. Once you stop, the recording drops into a waveform editor on the same page. You can trim the start and end, pick a format, and save. The file goes straight to your downloads folder. Nothing is sent to any server at any point.
People reach for it when they need a quick voiceover for a slide deck, a spoken note while an idea is fresh, a sample to test a microphone, or a clip to attach to a message. It is not a multi-track editor or a music production tool. It captures one stream from one microphone, and it does that with the least possible friction.
Starting a recording and the microphone prompt
Press the Start recording button. The first time, your browser shows a permission dialog asking to use the microphone. That prompt comes from the browser itself, not from the page. Allow it, and the recording begins immediately. A red dot and a running timer appear next to the Stop button so you always know how long you have been going.
If you have more than one microphone connected, a dropdown labelled Microphone appears. Pick the one you want before pressing start. On a laptop with both a built-in microphone and a USB headset, choosing the headset usually gives a cleaner result because it sits closer to your mouth and picks up less room noise.
The level meter and how to read it
While recording, a horizontal bar shows how loud the signal is. Aim for the bar to reach about two thirds of the way across when you speak at a normal volume. If it barely moves, you are too far from the microphone or the wrong input is selected. If it pins at the far end and stays there, you are too close or the gain is too high and the sound will distort.
Getting the level right before you say anything important saves a retake. Speak a test sentence, watch the bar, then adjust your distance. At roughly a hand span from the microphone, most people find the sweet spot. Moving from an arm's length to a hand span is the single biggest improvement you can make, because the room noise stays the same while your voice gets much louder relative to it.
The three processing checkboxes
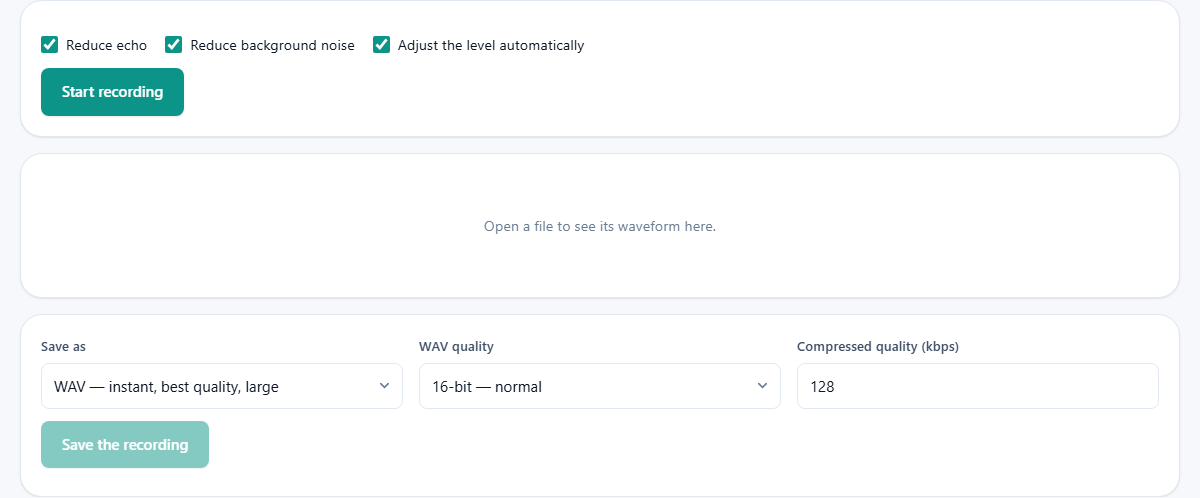
Three tick boxes sit above the record button. Reduce echo stops your speakers from feeding back into the microphone. It is handled by your operating system, and it works well for speech in a normal room. Reduce background noise targets steady sounds like fans, air conditioners and computer hum. It is also handled by the operating system and is worth keeping on for voice work. Adjust the level automatically raises or lowers the gain as you move around, so you stay at a usable volume without thinking about it.
All three are on by default, and they are the right choice for spoken recordings. For music the opposite is true. The noise gate treats sustained notes as background sound and tries to remove them. The echo canceller can create odd artifacts on pitched material. The auto gain rides the volume in ways that flatten musical dynamics. If you are recording an instrument, turn all three off before you begin.
Stopping and trimming the result
Press Stop and the recording appears as a waveform. You now have the same editor you would see in an audio trimming tool. Drag across the wave to select a section. The times below show the start, end and length of your selection. Only the selected part will be saved, so this is where you cut the dead air from the beginning and the fumble at the end.
Press Play to hear your selection. Drag the edges of the selection to adjust. If you need a closer look, scroll to zoom in or use the Zoom to selection button. The Fit button scales the entire recording to the width of the screen. The space bar starts and stops playback, which is faster than clicking when you are checking several trims in a row.
Choosing a format and saving
The Save as dropdown offers the formats your browser can produce. WAV is always available and keeps every detail, but the files are large. M4A gives good quality at a fraction of the size and plays on all modern devices. The page can save as MP3. No browser includes an MP3 encoder, so it loads a small open-source one the first time you ask for it. M4A is the better choice anyway, since it produces smaller files at the same quality.
When WAV is selected, a WAV quality dropdown appears with three choices. 16-bit is normal CD quality and fine for speech. 24-bit is studio quality and only matters if the file will be processed further. 32-bit float preserves the full internal precision and is useful if you plan to edit in another tool. For compressed formats, the Compressed quality field sets the bitrate, defaulting to 128 kilobits per second. Raising it to 192 or 256 gives more detail at the cost of a bigger file.
Press Save the recording. The file appears in your downloads folder with a name based on the date and time. Your original recording remains in the page in case you want to try a different trim or format.
A worked example - recording a voiceover
You need a thirty second voiceover for a presentation slide. Plug in a USB headset and select it from the Microphone dropdown. Leave all three checkboxes ticked. Press Start recording and say a test sentence. Watch the level bar. It sits at about two thirds. Good.
Now read your script. Speak clearly, pause between sentences, and do not rush. After about forty seconds, press Stop. The waveform shows your recording with a few seconds of silence at each end. Drag across the wave to select from the first word to the last. The selection reads from 0:02.30 to 0:33.10 - about thirty seconds. Press Play to check. It sounds clean and the timing is right.
Choose M4A from Save as, leave the bitrate at 128, and press Save the recording. The file is about 500 kilobytes and ready to drop into your presentation.
Common problems and quick fixes
A handful of issues come up regularly.
- No sound at all in the recording. The wrong microphone is selected. Open the Microphone dropdown and pick the correct input.
- The recording is very quiet. You are too far from the microphone. Move to a hand span away. You can also normalise the result afterwards in a separate volume tool.
- Steady hiss throughout the take. The noise reduction checkbox is off, or the room is genuinely loud. Turn the checkbox on, and if the hiss remains, record in a quieter space.
- The recording sounds thin and wobbly. You are recording an instrument with the speech processing turned on. Untick all three checkboxes.
- The recording vanishes when you close the tab. The page holds the audio in memory only. It is not saved until you press the download button. Always save before closing.
- The browser asks for microphone permission every time. Some browsers reset the permission when you clear cookies. Grant it once and then do not clear site data for this page.
When a different tool is the right choice
This recorder captures one microphone input. It does not record system audio or the sound playing from another tab. If you need to capture what your computer is playing, a screen recorder in the video tools section can sometimes do that. If you need multiple tracks, effects like reverb or equalisation, or MIDI input, you need a full digital audio workstation.
The recorder is also not a transcription tool. It captures sound as audio, not as text. If you need the words written out, record here, save, and then run the file through a speech recognition tool.
Tips for getting a better recording every time
Record a few seconds of silence at the start. It gives you a clean lead-in to trim back to, and it lets you hear the background noise on its own so you know what you are working with.
Close windows and turn off fans if you can. Noise reduction handles steady hums well, but it cannot remove a barking dog or a slamming door. Intermittent noise is the enemy of clean speech.
Use headphones while recording if you are listening to a reference at the same time. Without headphones, the reference audio leaks into the microphone and the echo canceller has to fight it, which never sounds as good as simply not letting it through in the first place.
Your audio never leaves your device
The entire process runs locally. Your browser accesses the microphone, captures the audio, and holds it in the page. When you save, the file goes from the page to your downloads folder without touching any network. You can verify this by disconnecting from the internet after the page loads. Recording, trimming and saving all continue to work.
That privacy matters because voice recordings are inherently personal. They contain your voice, your words, and sometimes information you would not post publicly. Processing them here means there is no upload, no cloud storage, no account, and no one else in the chain.