
Sticking several recordings into one clean file
How to load a set of clips, put them in the order you want, choose a gap or a smooth blend between them, and save the result. You will also see how the page copes when the files do not match each other, and where the finished audio ends up.
What the joiner is for
The Audio Joiner takes a handful of separate sound files and lays them end to end, so they play as one. Nothing is re-recorded. Each clip is opened, and the page writes out a single new file with all of them in a row.
This comes up more often than you might think. The parts of a thing get made at different times, and then they need to become one thing.
- Three parts of a podcast: a short intro, the main talk, and a sign off.
- A set of voice notes that together make one long message.
- A backing track that has to loop twice before a song can use it.
- Chapters of an audiobook that a shop wants as a single file.
- A few sound effects that a game needs played one after another.
Adding your clips and reading the list
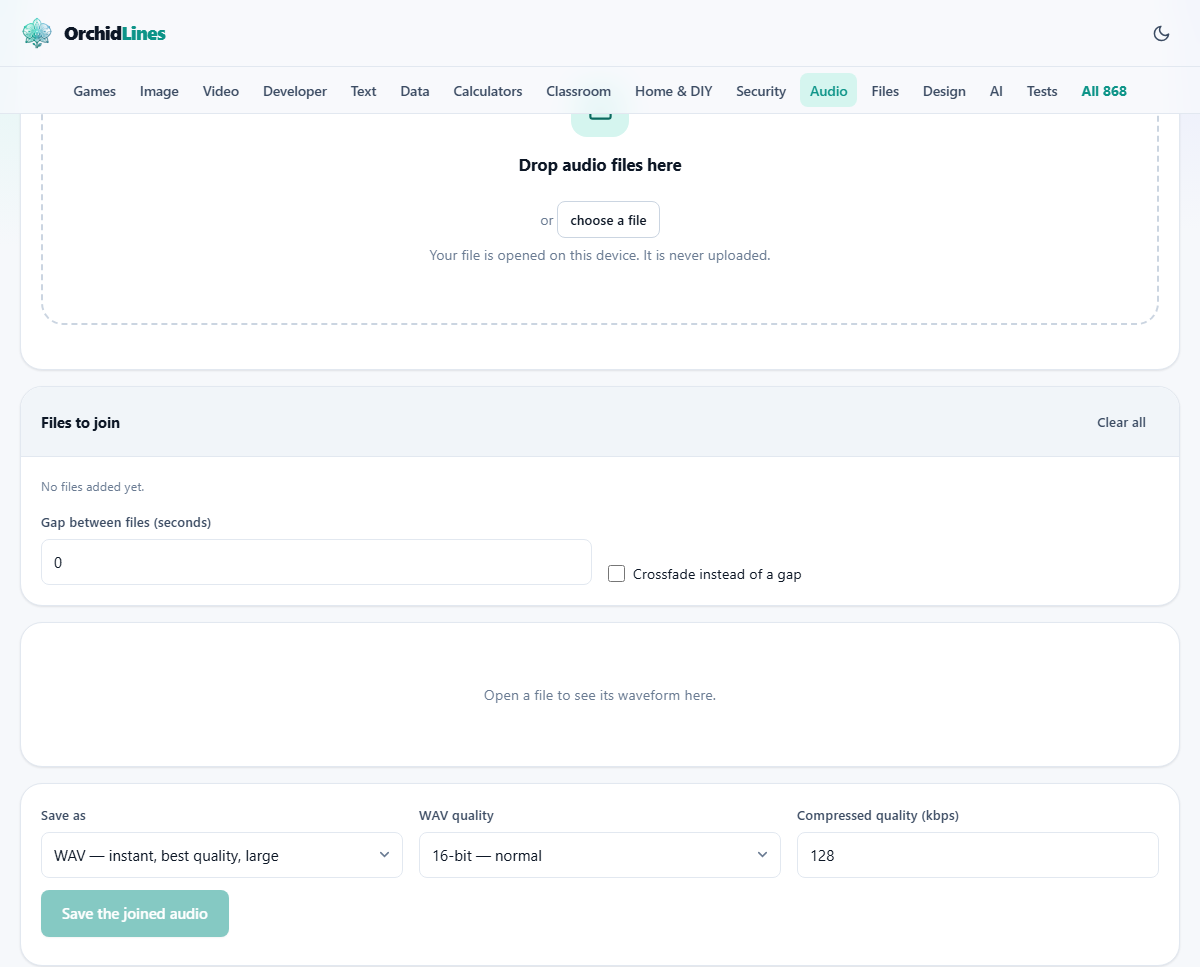
Drop your files onto the box, or press choose a file to pick them. You can add many at once, or a few at a time, and each new batch is added to the end of the list.
The panel called Files to join shows every clip you have added. Down the left is a number, and that number is the order the clips will play in. Next to it sits the file name, the length of the clip, whether it is mono or stereo, and its sample rate in kHz.
Two of those words are worth a moment. Mono means one channel of sound, the same on both sides. Stereo means two channels, a left and a right, which is how music holds its sense of space. Sample rate is how much detail each second of sound was stored with, and kHz simply means thousands of steps per second.
Each row carries an up arrow, a down arrow and a cross. The arrows move a clip earlier or later. The cross drops it. The Clear all button empties the whole list, so you can start over.
When the clips do not match
Sound files can disagree with one another. One might be mono at a low rate, and the next stereo at a high one. Glue them together without care and the join goes wrong. A clip can play too fast, too slow, or out of only one side.
The joiner heads that off. It looks across all your clips, finds the highest sample rate and the widest channel count, and brings everything else up to match. A mono clip is copied into both sides, so it stays in the middle rather than leaning left. A lower rate clip is rebuilt at the higher rate rather than just relabelled.
The whole idea is that nothing good is made worse. When you join a crisp recording to a rough one, the crisp part is left exactly as it was.
A gap between clips, or a blend
Two controls shape the joins. Gap between files (seconds) adds silence between one clip and the next. It starts at zero and runs up to thirty, in small steps. A short gap of about half a second gives spoken parts room to breathe, so a talk does not feel rushed.
Crossfade instead of a gap changes what that number does. A crossfade fades one clip down while the next fades up, so they overlap for a moment and slide into each other with no hard edge. Tick the box and set the gap to one or two seconds, and that gap becomes the length of the overlap.
The two ideas do not stack on top of each other. With the box ticked you get an overlap. With it clear you get silence, or nothing at all when the gap is zero. A crossfade needs a gap above zero to have anything to blend.
Hearing the result before you save
Every change you make shows up in the waveform panel in the middle of the page. That picture is the joined result, not any single clip, so it is the thing you are about to save. A small line beside it counts your clips and gives the total length.
Press Play, or tap the space bar, to listen from the start. The parts worth the most attention are the seams, where one clip meets the next, because that is where a wrong gap or a mismatched level shows itself. You can drag across the picture to mark a stretch and play just that part, and the plus and minus buttons zoom in for a close look at one seam.
Fixing a problem here is quick, since nothing has been written yet. Change the gap, move a clip, or drop one out, and the picture and the sound both update straight away.
Choosing how it is saved
Below the waveform sit three saving controls. Save as picks the file type. WAV is at the top, and it is instant and lossless, which means no detail is thrown away. Under it are whatever compressed types your browser can write, often an M4A and a WebM. Those are smaller, but they have to be recorded as they play, so they take about as long as the finished audio runs.
WAV quality only matters when you save a WAV. Sixteen bit is the normal choice and opens everywhere. Twenty four bit is for studio work, and thirty two bit float is for material heading back into an editor. Compressed quality (kbps) sets how much room the smaller formats get for each second, from thirty two up to three hundred and twenty. Around one hundred and twenty eight is fine for most jobs.
There is no MP3 in the menu, and there is a plain reason for that. No browser carries the code needed to create one, so this site supplies it: a small open-source encoder is loaded the first time you save an MP3. M4A is the swap to reach for. It has much the same size and much the same quality, and it plays on the same phones, cars and players.
Press Save the joined audio. A Result panel appears with a small player and a Download button. The file is named joined-audio, with the ending that matches your choice. Play it there first, and only then download it.
A worked example: a three part podcast
Say you have intro.mp3, a two second sting; episode.wav, forty minutes of talk; and outro.m4a, a ten second close. Drop all three onto the box. The list shows them as 1, 2 and 3, but the order they landed in is not always the order you had in mind, so check the numbers.
Suppose the outro has landed above the talk. Press its up or down arrow until the run reads intro, then episode, then outro. Set Gap between files to 0.5, so each part gets a small breath before the next one starts.
Leave Save as on WAV and press Save the joined audio. The Result panel shows joined-audio.wav almost at once. It plays as one smooth episode of about forty minutes and twelve seconds.
If that WAV is too large to send to your host, change Save as to the M4A entry and save again. This time a progress bar runs for roughly forty minutes, because the small file is being recorded in real time. What you get back is a fraction of the size, ready to upload.
Common mistakes, and the fix
- Trusting the order that files landed in. Dropping several at once does not sort them for you. Read the numbers down the left, and use the arrows before you save.
- Expecting a crossfade while the gap is set to zero. There is nothing to overlap, so you just get a hard cut. Give it one or two seconds first.
- Joining a loud clip to a quiet one and disliking the jump. Even them out in the Volume tool before you bring them here.
- Waiting on an M4A save and thinking it has frozen. It has not. A compressed save takes the length of the audio, and the bar is moving the whole time.
- Hunting for an MP3 in the Save as menu. It is not there and cannot be. Pick M4A, which does the same job.
When a different tool suits better
- To keep only part of one recording, the Audio Cutter trims it first, so you are not joining more than you need.
- To pull the sound out of a video before joining it, take the audio out of the video first, then bring that file here.
- To even out clips that were recorded at very different levels, the Volume tool sets them straight before the join.
- To change a single file from one type to another, without joining anything at all, the audio Converter is the simpler page.
The work happens on your own device
There is no upload step. Your browser reads each file straight from your disk, decodes it in memory, builds the joined version right there, and hands it back as a download. No clip is sent to a server at any point in the process.
You can see this for yourself. Once the page has loaded, switch off your network and carry on. Every part of the tool still works, because nothing was ever talking to another machine.
The one real limit is your device's memory, since every clip is held there while you work. A total length up to about an hour is comfortable on most computers. When you close the tab, both the clips and the joined file are gone.