
How to cut dead air from a podcast or voice recording
Long pauses in a spoken recording make it drag. This guide walks through every control on the Silence Remover page, shows how the threshold, gap length and padding settings work together, and gives a step-by-step example of tightening a ten-minute voice note down to seven. By the end you will know what each slider does, which output format to pick, and how to avoid the two mistakes that ruin an otherwise clean edit.
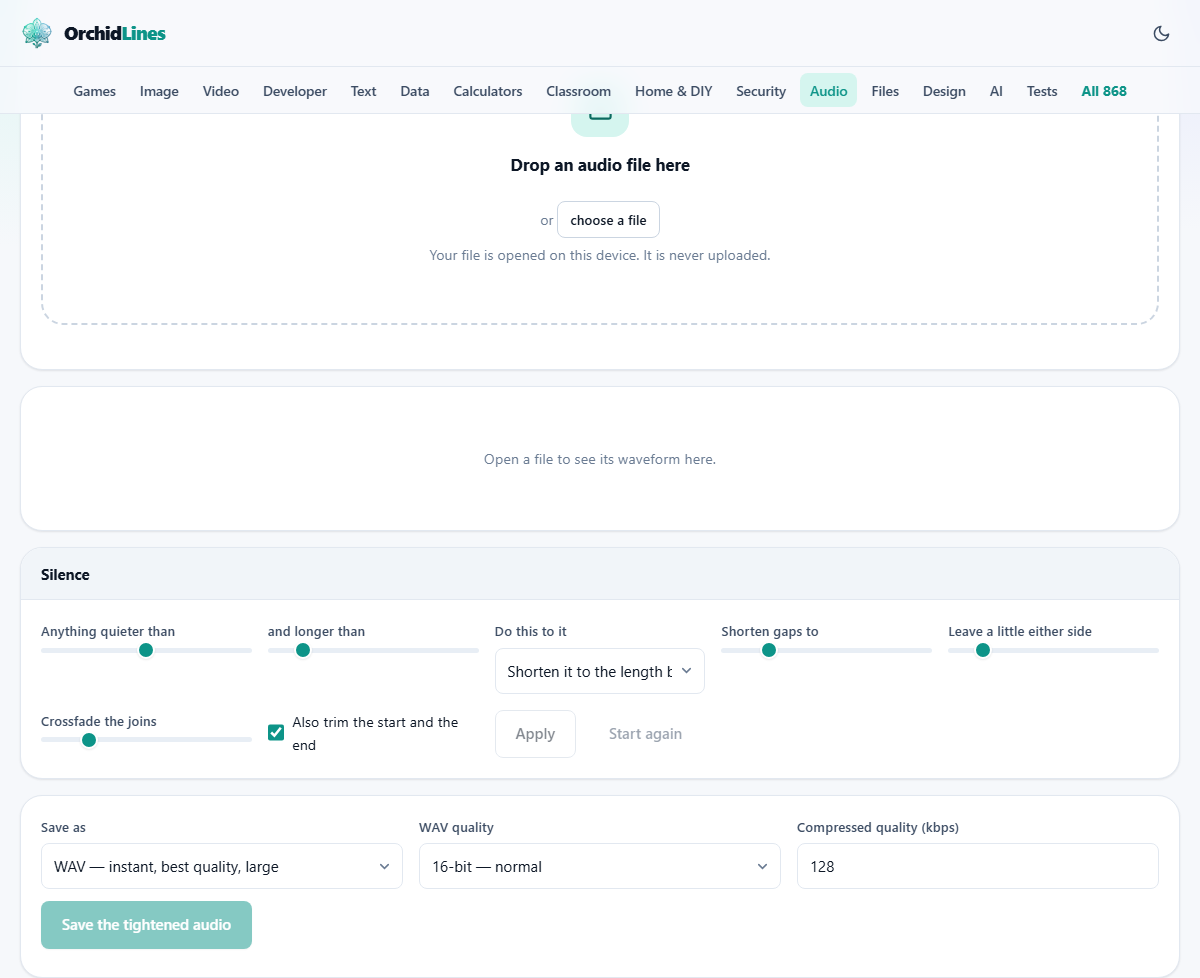
What the tool does in one sentence
It scans the full waveform of your recording, finds every stretch that sits below a volume level you choose and lasts long enough to count, and then shortens or removes those stretches. The result is a tighter file with the same speech, the same pitch and the same quality, just fewer empty spots between the words.
Podcasters, teachers, students reviewing lecture captures, and anyone who records voice memos on a phone all run into the same problem. A five-second pause while you check your notes is fine in the room but painful on playback. Cutting each pause by hand in an editor is accurate but slow. This page does the same job in a few seconds, with controls that let you fine-tune how aggressively it cuts.
Opening a file and reading the waveform
Drop an audio file onto the page, or press the button to browse for one. The formats it accepts include MP3, WAV, M4A, AAC, OGG, OPUS, FLAC, and WebM audio. Once the file loads, a waveform appears. The flat, low sections are the gaps. The tall spikes are the loud parts - speech, music, or sound effects.
Below the waveform you will see two time stamps and a selection length. You can drag across the wave to pick a region, or press Select all to work on the whole recording. A Play button lets you listen before and after any change, and a zoom indicator shows how far in you are.
The six controls that shape the cut
All the settings sit in the panel labelled Silence. Each one has a slider and a live readout so you can see the value as you drag.
- Anything quieter than sets the threshold. It runs from minus 70 dB to minus 20 dB, with the default at minus 45 dB. Any audio that stays below this level counts as silence. If the tool misses obvious gaps, raise this value. If it clips into speech, lower it.
- and longer than sets the minimum gap length. It runs from 100 ms to 3000 ms, with the default at 500 ms. A short breath pause of 200 ms will not be touched at the default setting. Raise this to skip small gaps and only target the long dead spots.
- Do this to it offers three choices. Shorten it to the length below keeps a little pause in place of the original gap. Remove it entirely cuts every gap out. Leave it alone - just show me where it is marks the gaps on the waveform without changing anything, which is useful for a first pass.
- Shorten gaps to controls how long each gap becomes after the cut. The range is 0 to 1000 ms, and the default is 200 ms. Setting it to zero is the same as removing the gap altogether.
- Leave a little either side adds padding before and after each cut. The range is 0 to 300 ms, and the default is 40 ms. This protects the tail end of one word and the start of the next from being clipped.
- Crossfade the joins blends the audio at each edit point. The range is 0 to 60 ms, with 12 ms as the default. Without a crossfade, each join can produce a tiny click. Even 10 ms is enough to smooth it out.
The trim checkbox and the Apply button
Below the sliders is a checkbox labelled Also trim the start and the end. It is ticked by default. When active, any silence at the very beginning and very end of the file is cut in the same pass. Untick it if your recording needs a clean lead-in or tail.
Press Apply to run the detection. The waveform redraws to show the result, and a status line tells you how many gaps were found, how many seconds were removed, and what percentage of the total that represents. Press Start again at any time to undo everything and return to the original waveform.
Choosing a format and saving the result
The bottom panel has three controls for the output file. Save as lists the formats your browser can encode. M4A and WebM are compressed choices that keep file sizes small. WAV is lossless but much larger. MP3 is an option. Browsers can play MP3 files but cannot write them, so this page loads a small open-source encoder from this site the first time you choose MP3. Your audio is still never uploaded anywhere.
WAV quality offers 16-bit for normal use, 24-bit for studio work, and 32-bit float for further editing. Compressed quality sets the bitrate for M4A or WebM, from 32 to 320 kbps, with 128 as the default. Press Save the tightened audio and the processed file downloads to your device. A progress bar tracks the encoding.
A worked example with real numbers
Say you have a ten-minute interview recorded on a phone. The room is quiet but there is a faint hum from an air conditioner. Drop the file in. The waveform shows clear peaks where someone speaks and flat valleys between answers.
Start with the defaults: threshold at minus 45 dB, minimum gap at 500 ms, shorten mode with gaps kept at 200 ms, 40 ms of padding, and 12 ms of crossfade. Press Apply. The status bar says it found 23 gaps totalling 2 minutes and 48 seconds, or about 28 percent of the file.
Play the result. The speech flows well, but one join sounds rushed because the speaker took a deliberate breath before a long answer. Raise the minimum gap from 500 ms to 800 ms and press Apply again. Now only the truly dead spots are caught, and the natural pauses remain. The total cut drops to 2 minutes and 12 seconds. That feels right. Set Save as to M4A and press Save the tightened audio. The file downloads at about 1 MB per minute of audio.
What to do when the threshold seems wrong
The most common problem is that gaps are not found at all. This happens when the background noise in the room is louder than the threshold. An air conditioner, a computer fan, or street noise can push the floor above minus 45 dB. The fix is to raise the threshold toward minus 30 dB until the tool starts catching the gaps. Move in steps of 5 dB and check after each one.
The opposite problem is that speech gets clipped. This usually means the threshold is too high, or the padding is too low. Lower the threshold by 5 dB and raise the padding from 40 ms to 80 ms. Between the two changes the ends of words should survive. Recordings with a very high noise floor sometimes have no threshold that works, because the room is audible throughout and there is never a true gap to find.
Shorten versus remove, and why it matters
Removing all gaps completely can make speech sound frantic. A person who pauses between thoughts sounds natural. A person with every pause deleted sounds like they are rushing through a script. Shortening each gap to 200 ms keeps a small beat between phrases. The listener still feels the rhythm of the original recording, even though two or three minutes of dead air are gone.
The mark option is worth trying before you commit to any cut. It tells you how many gaps your current settings would find and how much time they add up to, without changing a single sample. If the count is higher than you expected, adjust the minimum gap length before you apply.
When this tool is not the right choice
If the background noise is the problem rather than the silence, this page will not help. It only finds quiet stretches and cuts them. It does not reduce hiss, hum, or fan noise. A noise reduction tool is what you need in that case.
If the audio has music underneath the speech, the music fills the gaps with sound and the detector will not find anything to cut. The same goes for recordings with two or more speakers who overlap regularly. In both cases, manual editing in a full audio editor is the more reliable path.
Your recording stays on your machine
The entire process runs inside your browser. The file you drop in is decoded locally, the gaps are found locally, and the output is encoded and saved locally. Nothing is sent to a server at any point. You can test this yourself by loading the page, opening a file, turning off your internet connection, and running the full edit. It works exactly the same way.
That privacy matters here more than it might for other tools. Voice recordings often contain names, phone numbers, business discussions, or personal conversations. Knowing that the audio never left your device means there is nothing to worry about on that front.