
Layering voice and music into a single file
Putting a voice recording over a piece of music sounds like a job for big, expensive software. It does not have to be. This article walks through every control on the Voiceover and Music Mixer, explains ducking in plain terms, shows what each slider does to the sound, and works a real example from two raw files to one finished piece.
Reading the voice ten milliseconds at a time
The dip in the music is not made by a compressor. A compressor only reacts to sound that passes through it, and the music track has no way of knowing the voice exists. So the page works the dip out in advance. It measures the voice, builds a list of volume values, and writes that list onto the music track before a single sample is rendered. That is why the bed starts falling on the first syllable rather than a moment after it.
The measuring grid is fixed at 100 steps a second, which makes each step 10 milliseconds long. For every step the page takes the matching slice of the voice file and works out its root mean square. That means squaring each sample, taking the average of those squares, then taking the square root. An average is used rather than the single loudest sample, so one stray click cannot yank the music down for half a second. To keep it fast, only every fourth sample is read. At 48 kHz a 10 millisecond slice holds 480 samples per channel, so 120 of them per channel still go into the average, which is plenty.
Two things are folded into that reading. The first is the row's own level slider: the measurement is multiplied by the same amplitude the track will play at, so a voice pulled down to minus 10 dB really does look quieter to the detector. The second is the start time, since the voice is placed on the finished timeline before it is measured. If you mark two files as the voice, the page keeps the louder of the two readings at every step.
Then the curve itself. The threshold slider is turned into an amplitude, and any step whose average sits above it counts as speech. The bottom of the dip, called the floor here, is the amplitude for minus the pull-down amount. The attack slider is converted into a whole number of steps, and each step the volume moves toward the floor by the gap between one and the floor, divided by that number of steps. The release does the same with its own step count. Both ramps are straight lines, so a 600 millisecond release really is 600 milliseconds until the music is fully back, not a curve that creeps toward it forever. The hold slider becomes a countdown: every speaking step reloads it, and while it is still ticking the target stays at the floor.
Roles decide who is affected. Only rows set to the voice feed the detector, and only rows set to music get the curve written onto them. A row set to Something else does neither: it plays at its own level and is left alone. If the playing files include no voice, or no music, the whole duck is skipped even with the box ticked.
- The 100 steps a second grid is fixed in the code and has no control on the page.
- Pull it down by runs from 3 to 30 dB in whole steps, and starts at 12.
- The threshold runs from minus 60 to minus 15 dB in whole steps, and starts at minus 35.
- Time to duck runs from 10 to 500 milliseconds in tens, and starts at 120.
- Time to come back runs from 50 to 2000 milliseconds in fifties, and starts at 600.
- The hold runs from 0 to 1500 milliseconds in fifties, and starts at 350.
- The first file you add arrives as the voice at 0 dB. Every later file arrives as music at minus 6 dB.
- Each level slider spans minus 40 to plus 12 dB in half decibel steps. Each position slider spans full left to full right in twentieths.
Two files, the default sliders, and the sums in between
Here is a full pass with real figures. Take a voice recording made at 44.1 kHz, two minutes long, given a start time of 4 seconds. Take a music bed at 48 kHz, three minutes long, starting at zero. Nothing is silenced and no ducking slider is touched.
First the render settings. The page uses the highest sample rate among the playing files, never below 8 kHz and never above 96 kHz, so this mix renders at 48 kHz. The length is the furthest end point: the voice ends at 124 seconds, the music at 180, so the timeline is 180 seconds. That works out as 8,640,000 frames of audio and 18,001 volume values for the curve. The result is always two channels, even when both sources are mono.
Now the dip. Pulling down by 12 dB gives a floor of 0.2512, since that is the amplitude 12 dB below full. The minus 35 dB threshold becomes 0.0178, and a slice of voice counts as speech once its average passes that figure. The 120 millisecond attack is 12 steps, so the volume drops by 0.0624 each step, because the gap from 1 to 0.2512 is 0.7488 and 0.7488 shared over 12 steps is 0.0624. Twelve steps later it lands exactly on the floor. The 600 millisecond release is 60 steps, so it climbs back by 0.01248 a step. The 350 millisecond hold is 35 steps.
Put those together and the shape of the dip is easy to state. The music takes 120 milliseconds to reach the bottom. It stays there while the talking lasts, then for another 350 milliseconds, then takes 600 milliseconds to climb home. So the bed is fully back 950 milliseconds after the last word. Music added straight from the drop zone sits at minus 6 dB, an amplitude of 0.5012. Multiply that by the floor of 0.2512 and you get 0.1259, which is minus 18 dB. In plain terms: minus 6 dB in the gaps, minus 18 dB under the speech.
Last comes the peak. Once the render is done the page scans every sample and keeps the largest. Say it comes back as 1.35. The summary line turns that into decibels and prints 2.6 dB, and the red notice appears, because anything past 1.0 gets sliced flat when the file is written as 16 bit. Tick the box and the whole mix is multiplied by 0.6602, which is the amplitude for minus 1 dB divided by 1.35. The new peak is exactly minus 1 dB. Voice and music keep the same balance, since one number was applied to everything.
Now the parts worth knowing before you trust it with a job.
- It never looks ahead. The volume only starts moving on the first slice that crosses the threshold, so the opening 120 milliseconds of a word still sits over a bed that is on its way down.
- The threshold is judged on a 10 millisecond average, not on peaks. A voice whose peaks just touch minus 35 dB will not set it off, because its average is well under that.
- The voice level slider moves the detector as well as the sound. Drag the voice far enough down and the ducking can quietly stop firing, which looks like a broken feature but is the threshold doing its job.
- Start times are rounded to the nearest 10 millisecond step for measuring, while playback begins at the exact figure you typed. The two can sit up to 5 milliseconds apart.
- The average is plain and unweighted. There is no loudness weighting and no split by frequency, so a deep hum and a bright voice of the same size read the same to the detector.
- A finished timeline longer than 40 minutes is refused, with a message asking you to mix it in parts. The start time box will happily take 7200 seconds, but any mix that long will not render.
- Only two things are done to the sound: the ducking and the final lift to just under full scale. Nothing here compresses, equalises, adds reverb or removes noise.
- The mix is rebuilt a quarter of a second after you stop moving a control. Change something while a render is still running and that change waits until you touch another control.
- The summary line only mentions the ducking when the bed spends more than 0.05 seconds pulled down at all.
What the mixer does and who it helps
The mixer takes two or more audio files and plays them at the same time, not one after another. Each file gets its own volume, its own position between the left and right speakers, and its own start time. The result is rendered into one file you can share or publish.
Podcast hosts use it to drop theme music behind an intro. Teachers record narration over background sound for lesson videos. Small business owners put voice announcements over hold music. Anyone who has a speaking track and a music track and wants them combined can do the whole job here without installing anything.
Loading the files
Drag your voice and your music into the drop zone together, or click the button to browse. The page reads MP3, WAV, M4A, AAC, OGG, OPUS, FLAC and WebM audio. The first file you add is treated as the voice and every file after it as music. If the page guesses wrong, each row in the track list has a control to change its role.
You can add more files at any time. Press Clear all to empty the workspace and start fresh. The files never leave your device. They are decoded inside your browser and held in memory until you close the tab.
The track list and its controls
Once loaded, each file appears as a row under the heading The tracks. Every row shows its name, its length and a handful of settings. The level control sets how loud that track is in the final mix. Bringing the music down by six to twelve decibels below the voice is a solid starting point. The pan control slides the sound between the left and right speakers. Leave the voice in the centre and push the music gently wide if you want some separation.
Each row also has a start time. Setting the music to zero and the voice to three seconds means the listener hears music alone for three seconds before the talking begins. You can stagger as many tracks as you like this way. There is no fixed limit on the number of files, though past about forty minutes of finished length a browser runs out of memory.
Ducking - pulling the music down under the voice
Ducking is the trick that radio has used for decades. The music gets quieter while someone is speaking and comes back up in the gaps. The tool does this automatically, and a panel full of sliders lets you fine tune how it sounds.
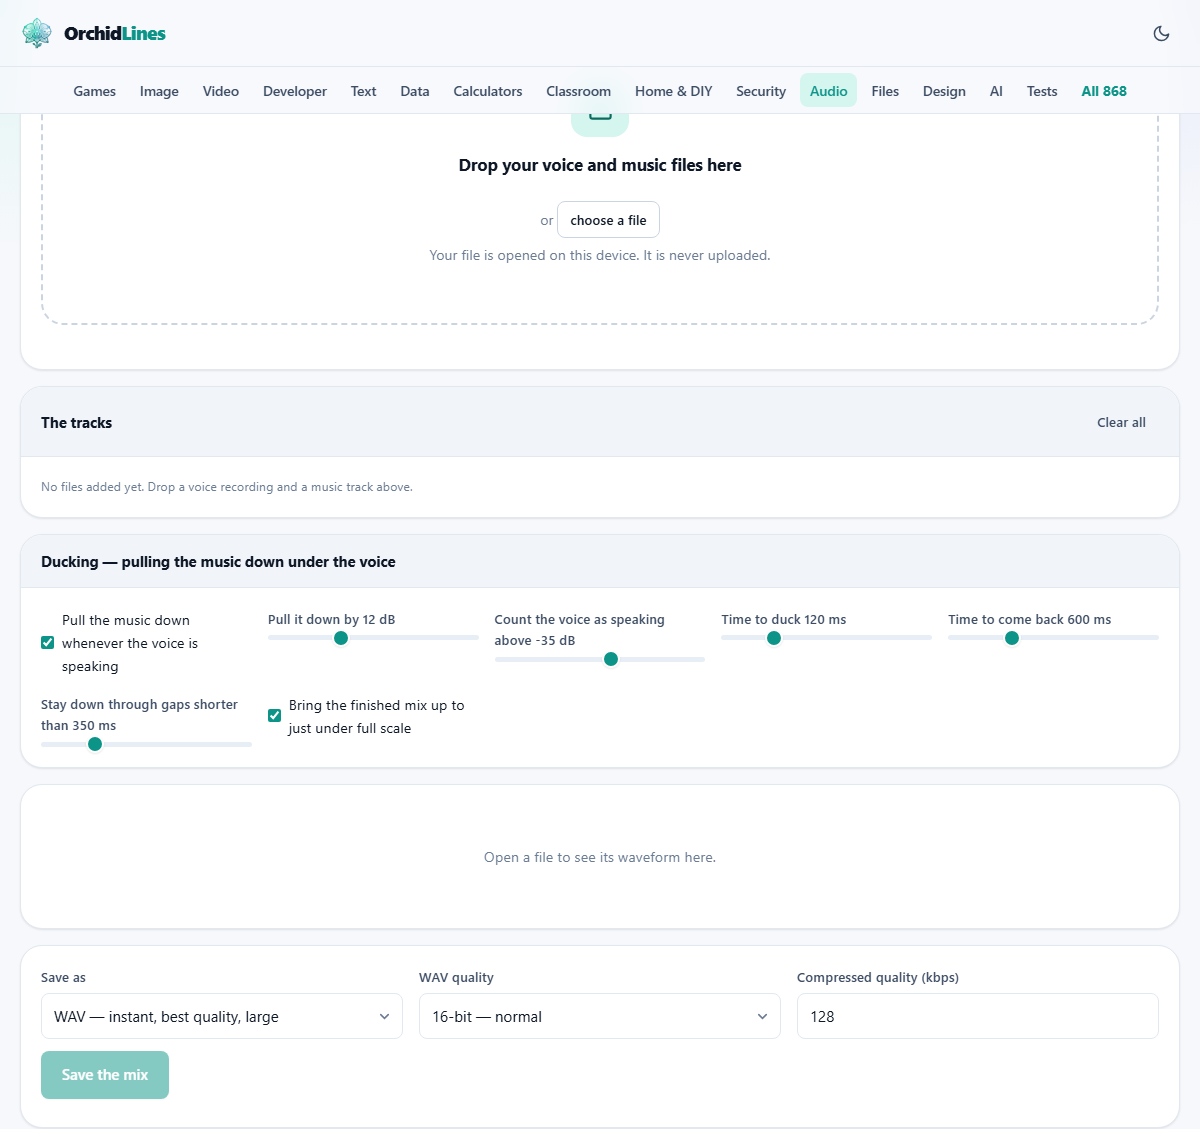
The checkbox labelled Pull the music down whenever the voice is speaking turns ducking on or off. Below it, Pull it down by sets how many decibels the music drops. The range is 3 to 30, and the default of 12 works for most spoken content. A value of 6 is gentle, barely noticeable. A value of 20 or more nearly silences the bed.
Count the voice as speaking above sets the threshold. It runs from minus 60 to minus 15 decibels. If the voice track has quiet room noise, that noise might sit above the threshold and trick the detector into thinking someone is always talking. Lower the threshold until the music rises again in the silent gaps.
Timing the duck with attack, release and hold
Three more sliders control how fast the ducking moves. Time to duck is the attack. It sets how quickly the music drops once the voice starts. The range is 10 to 500 milliseconds. A short attack means the very first syllable lands on quiet music. A long attack lets the music take its time fading down, which sounds smoother but can leave the opening word fighting with the bed.
Time to come back is the release. It controls how fast the music returns after the voice stops. The range is 50 to 2000 milliseconds. A slow release, around 600 milliseconds, keeps the music from pumping up between every sentence. A fast release makes the bed bounce back quickly, which can draw attention to the ducking itself.
Stay down through gaps shorter than is the hold. It runs from 0 to 1500 milliseconds. Natural speech has tiny pauses between words and phrases. Without hold, the music would try to creep back up during those pauses and drop again a moment later, creating a choppy ride. A hold of 350 milliseconds tells the duck to stay down through short silences and only release when the gap is genuinely long.
Normalising and the clipping warning
When two signals play at once, their samples add up. Two tracks that each peak near the maximum can combine into a total that goes past full scale. The page detects this and shows a warning: the loudest moments will be chopped flat and will crackle.
The checkbox Bring the finished mix up to just under full scale is the fix. It measures the highest point in the entire mix and scales everything so that peak sits just below the ceiling. This is called normalising. It keeps the relative loudness between voice and music the same while preventing any crackle. Leave it ticked unless you plan to process the file further in another tool.
Listening, selecting and saving
Below the settings, a waveform shows the actual mixed result. Press Play to hear it, or drag across the wave to select a region and play just that. Scroll to zoom in, and use the bar underneath to move along the timeline. The space bar starts and stops playback.
When you are happy, choose a format from Save as. The options depend on your browser but typically include WAV and M4A. WAV quality offers 16-bit for normal use, 24-bit for studio work, and 32-bit float for further editing. When a compressed format is selected, the Compressed quality field lets you set the bitrate in kilobits per second, defaulting to 128. Press Save the mix and the file drops into your downloads folder.
A worked example from raw files to finished piece
Suppose you have a two minute voice recording of a product demo and a three minute piece of background music. Drop both in. The voice appears first, so it is already marked as the voice track. The music sits below it.
Set the music level to minus 10 decibels. Give the voice a start time of four seconds so the music plays alone as an intro. Leave ducking on with the default 12 decibel pull, 120 millisecond attack, 600 millisecond release and 350 millisecond hold. Press Play and listen for where the music returns between sentences. If it pumps up too fast, push the release to 900 or raise the hold to 500. If the voice is hard to hear over the bed, pull the music down another two or three decibels.
Check the clipping warning. If it is showing, tick the normalise box. Set the format to M4A at 128 kilobits per second, press Save the mix, and the finished demo lands on your machine.
Common mistakes and how to fix them
A few problems come up again and again.
- The music never comes back up. The threshold is too high and the room noise on the voice track triggers it constantly. Lower the threshold until the music rises in the gaps.
- The duck sounds choppy between sentences. The hold is too short. Raise it to 400 or 500 milliseconds so the music stays down through natural pauses.
- The output crackles on the loud parts. Two loud tracks added together have gone past full scale. Tick the normalise box or turn one of the tracks down.
- The voice arrives too late or too early. Adjust the start time on the voice row. Zero means it plays from the very beginning of the mix.
- The music sounds lopsided on headphones. The pan on the voice is off centre. Leave it at zero unless you have a good reason to move it.
When to use a different tool instead
This mixer is built for layering. It plays tracks at the same time. If you want to join files end to end, one after the other, that is a concatenation job and a different tool handles it. If you need to cut a section out of a single file, that is trimming. And if you want to change the speed or pitch of a track before mixing, do that first in the relevant tool and bring the processed file back here.
The mixer also has no effects beyond ducking and normalising. It does not add reverb, equalisation or compression. For those, use a full editor. The strength of this page is that it does one thing well: it combines files with proper ducking, right here in the browser.
Your files stay on your machine
Every step runs inside your browser. The audio is decoded, mixed and saved on your own device. Nothing is uploaded to any server. You can confirm this by turning off your internet connection after the page loads. The mix carries on working, because the page has no reason to talk to anyone.
That matters for voice recordings especially. A narration might contain company information, personal details or unreleased material. Mixing it here means the raw files were never in anyone else's hands, and the finished output goes straight into your downloads without passing through a queue, an account or a watermark.