
Ten sliders, and how to move them without wrecking the sound
An equaliser turns parts of the sound up or down by pitch: deep, middle or high. This page gives you ten of those controls, a set of ready-made shapes, and a way to write the change into a new file. Read on for what each band covers, what every preset really contains, a full worked session, and the traps that catch people the first time.
The jobs people bring to it
Sound is a mixture of low, middle and high pitches happening at once. Change how much of each you keep and the whole character changes. That idea fixes a surprising number of everyday problems.
A phone recording of a talk comes back thin and hard to follow. A song sounds fine at home and vanishes in the car. A guest on a call has a boomy desk under the microphone. None of these need re-recording. They need a few pitches turned up and a few turned down.
Some words first. Hertz counts vibrations per second and is written Hz; a thousand of them is a kilohertz, written kHz. Low numbers are deep sounds, high numbers bright ones. A band is one slice of that range. A decibel, written dB, says how much louder or quieter something has become, and 6 dB up is roughly twice as loud.
Opening a file and reading the facts
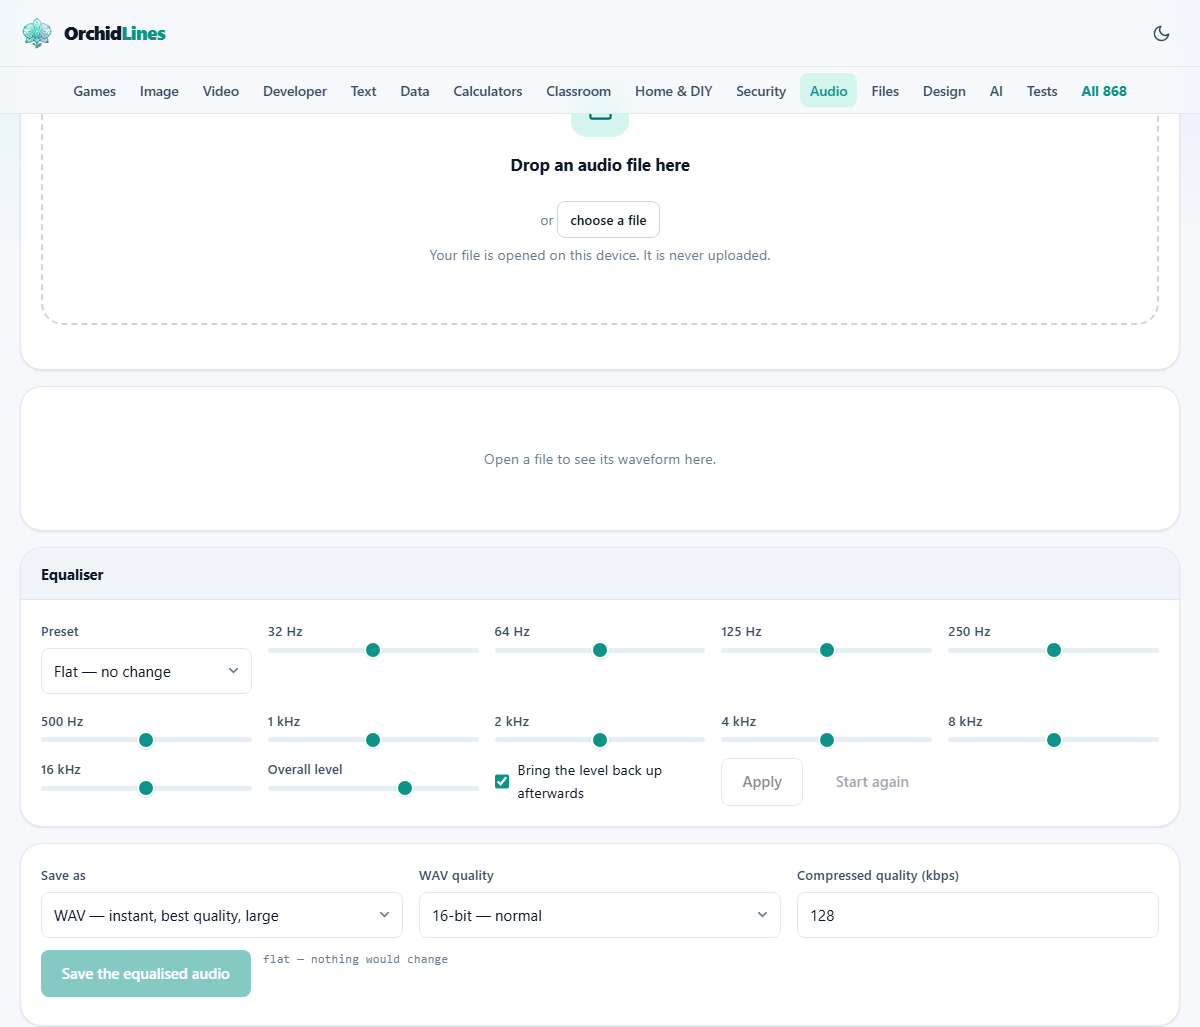
Drop an audio file on the top panel, or use the choose a file button. The picker offers MP3, WAV, M4A, AAC, OGG, Opus, FLAC and WebM audio. Whether one opens depends on the decoders inside your browser rather than on this page, and Chrome and Edge cover the most ground. When a file cannot be read you get a short red message suggesting MP3, WAV, M4A or OGG instead.
Once it loads, a line of small facts appears: file name, length, mono or stereo, sample rate in kHz, and peak level in dB. That last figure is worth a look first. A peak near 0 dB means the recording is already close to the top and has almost no room for boosting.
Below sits a drawing of the sound with a time ruler. Play starts it, Select all marks the lot, and the space bar starts and stops. Rolling the wheel over the drawing zooms in, and the percentage on the right says how far. Note that marking part of the wave only changes what you hear on Play. The filters and the save button always cover the whole file.
The ten bands, and what lives in each
Each slider carries the pitch it works on as its label, and each runs from minus 15 to plus 15 dB in whole steps, starting at zero. Zero everywhere means no change at all.
32 Hz and 64 Hz are the deepest bass, felt more than heard, and mostly rumble on a voice recording. 125 Hz holds the weight of a bass guitar and the bottom of a low voice. 250 Hz is where a boomy room lives, so it is the first place to cut when something sounds boxy. 500 Hz turns honky if it is too strong.
1 kHz and 2 kHz carry the part of a voice that makes words readable. 4 kHz is where consonants live, so a lift there helps speech cut through. 8 kHz adds crispness but sharpens the hiss on letters like s. 16 kHz is air and sparkle, and many recordings have nothing up there worth lifting.
Why the two end sliders behave differently
The eight middle sliders are bells. Each raises or lowers a hump centred on its own number and leaves the neighbours largely alone. Move 500 Hz and 250 Hz barely notices.
The two on the ends are shelves instead. The 32 Hz slider takes everything at and below that pitch and moves it together, and 16 kHz does the same at the top. That is deliberate: a bell at 32 Hz would leave the very lowest notes untouched, which is not what anyone means by bass boost.
One quiet limit is worth knowing. A recording can only hold pitches up to half its sample rate. A 22.05 kHz voice file holds nothing above about 11 kHz, so there the 16 kHz slider has nothing to work on.
The ten presets, in real numbers
The Preset menu is a shortcut, not a mode. Choosing one writes its ten numbers onto the sliders and then gets out of your way, so you can nudge any of them afterwards. Once your set no longer matches a built-in shape, the menu goes back to showing Flat while the sliders keep the values you gave them.
Flat is all zeros. Bass boost lifts the bottom hard and leaves the middle alone: plus 8, 7, 5 and 2 across the four lowest bands. Deep bass goes further, up to plus 12 at 32 Hz, and dips the middle to make room. Warm is a gentler version, plus 4 at the bottom with a small dip around 2 to 4 kHz.
Vocal clarity and Podcast both cut the low end and lift the speech range, Podcast being the stronger: minus 6 and minus 5 at the bottom, then plus 4 through 500 Hz and 1 kHz. Bright and airy pushes only the top, up to plus 8 at 16 kHz. Loudness lifts both ends and leaves the middle, which is what the ear wants when listening quietly. Small speaker cuts minus 10 at the bottom and minus 8 at the top while pushing the middle up. Scooped mids hollows out the centre by 5 dB.
Overall level, and the tick box under it
Below the bands sits Overall level, from minus 12 to plus 6 dB. It moves everything at once. Its real job is to make room: before adding 10 dB of bass to a loud recording, drop this to minus 6 so the peaks have somewhere to go. Pushing past the top flattens peaks into a harsh crackle that cannot be undone.
Under it is a tick box, on by default, marked to bring the level back up afterwards. With it ticked, the tool finds the loudest moment in the finished result and scales the file so that moment sits just under the maximum. You get a sensibly loud file without guessing. It cannot repair peaks that were already squashed, so pull down first and boost second.
Beside the save button a small line keeps score. With nothing moved it says the settings are flat and nothing would change. Otherwise it counts the bands you moved and names the biggest change, such as plus 8 dB at 32 Hz.
Apply, listen, start again
Moving sliders does nothing to the audio on its own. Apply is what runs the filters. When it finishes, the drawing is replaced by the filtered version and a message invites you to press Play. Even a long recording takes a second or two, because the sound engine built into the browser does the work.
Two things follow. Pressing Apply twice stacks the same change on itself, which is rarely wanted. And Start again throws away everything applied, bringing back the file exactly as you opened it. The habit that keeps you out of trouble: adjust, apply once, listen, and press Start again before trying different numbers.
What leaves the page, and how long it takes
The bottom panel decides the file you get. Save as opens on WAV, written straight from the numbers and ready the moment you ask, at the cost of being large. Under it are whatever compressed formats your browser can write, usually WebM with Opus and M4A with AAC. Those are made by playing the audio through a recorder, so each takes about as long as the clip lasts.
WAV quality only applies to the WAV choice: 16-bit for normal use, 24-bit for studio work, 32-bit float for further editing. Compressed quality in kbps only applies to the others, running from 32 to 320 in steps of 16 and starting at 128. For speech, 96 is plenty; for music, 192 upwards.
Press Save the equalised audio and a Result panel appears with a small player, the file name, the size and a Download button. The name is your original with -eq added, so history-lecture becomes history-lecture-eq.wav.
A boomy lecture, put right
The file is history-lecture.m4a, 41 minutes, mono, 44.1 kHz, peak minus 2.3 dB. It was recorded from a table in a stone hall, so the voice is muddy and the words are hard to catch.
Start with the Podcast preset. It cuts the deep rumble the hall added and lifts the range where speech becomes readable. Then fix what a preset cannot know: this room is boomy, so pull 250 Hz down to minus 4 by hand. The menu now shows Flat, which is only the label letting go; your sliders are untouched.
Press Apply, wait a moment, press Play. The voice steps forward. If the s sounds are now sharp, do not apply again. Press Start again, ease 8 kHz down to minus 2, and apply once from the original.
For the save, weigh time against size. WAV at 16-bit is ready instantly and comes to roughly 220 MB. M4A at 96 kbps is about 30 MB but takes 41 minutes to write, since that kind of file has to be recorded in real time.
Things that catch people out
- Moving sliders and going straight to the save button. Nothing is baked in until Apply has been pressed, so you save the file you opened.
- Pressing Apply a second time to hear it again. That doubles the change. Press Play instead.
- Boosting when cutting would work better. Lowering 250 Hz cleans up mud better than raising the treble, and it costs no headroom.
- Lifting 32 Hz for phone or laptop speakers. They cannot produce those pitches, so the headroom is wasted.
- Marking a section of the wave and expecting only that part to change. The selection is for listening.
- Waiting for an MP3 option. Browsers play that format but cannot write it, so the compressed choices are M4A, WebM or OGG.
When another page suits the job better
If the recording is simply too quiet or too loud, no band needs moving; Volume and Normalise does that in one step. If a steady hiss or fan noise is the real complaint, the Noise Reducer removes it far more cleanly than any cut here. If you are chasing a broadcast loudness target, the Loudness Meter measures it.
Two more sit next door. The Spectrogram Viewer draws which pitches your file actually contains, which takes the guesswork out of deciding what to cut. The Audio Converter shrinks a finished WAV without making you sit through a real time save here.
The filtering happens on your own machine
Nothing is sent anywhere at any point. Your browser reads the file from your disk, turns it into plain numbers held in one tab, and runs the ten filters with the sound engine already built into it. The saved file is assembled in memory on your computer and handed to your downloads folder.
That is why the page keeps working with the network switched off, and why a private recording stays private. Close the tab and the copy in memory goes with it.