
OrchidLines Image Studio

100%

Drop a photo here

or press Open image · paste a screenshot with Ctrl V ·

Everything happens on your device. Your photo is never uploaded.

In depth

Finding your way around a layered editor

Image Studio gives you the working method of a desktop photo editor inside a browser tab: layers stacked like sheets of glass, masks that hide instead of delete, and adjustments you can reopen and retune. This guide walks the interface from the top bar down, then through a complete edit, and finishes with the limits worth knowing before you start something ambitious.
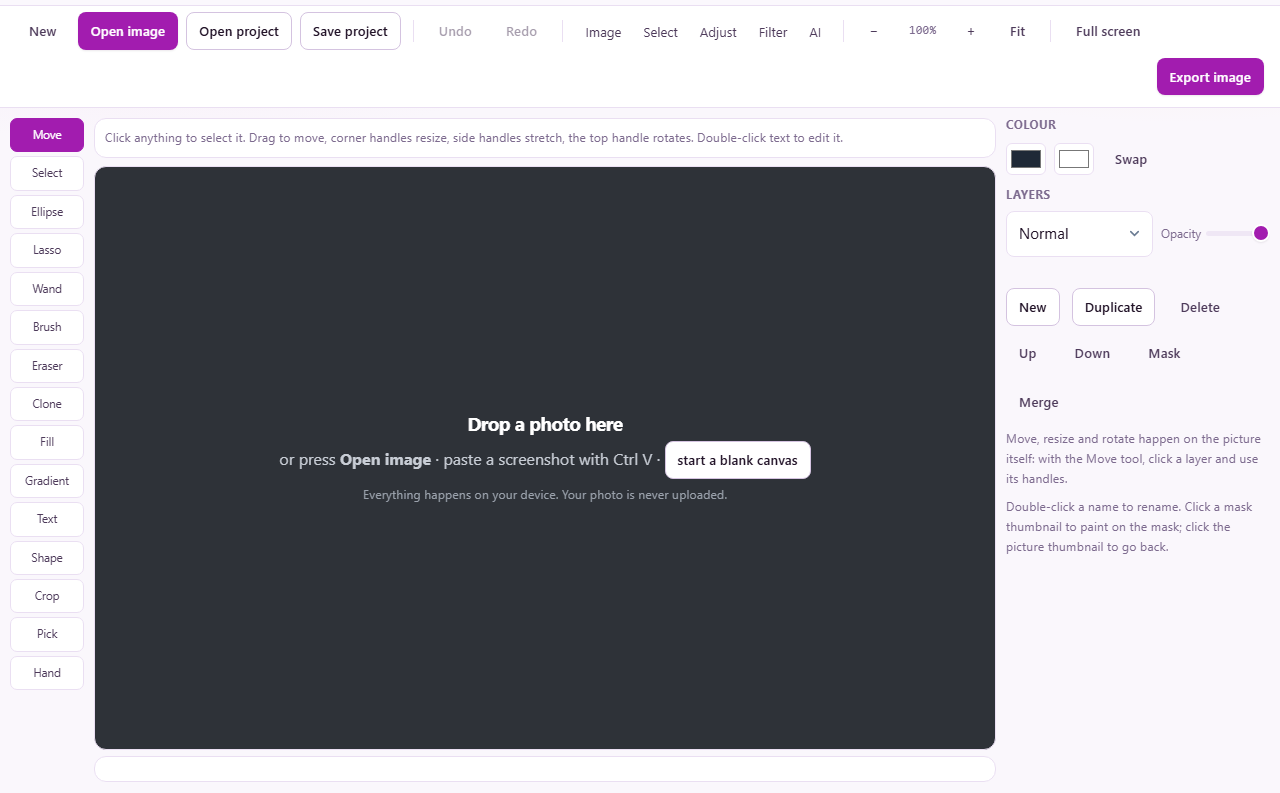
Screenshot: How Image Studio works
How Image Studio works as it appears when the page opens.

Who this editor suits

There is a gap between a filter app and a professional desktop program, and this sits squarely in it. If you have ever wanted to brighten only the face in a photo, place one product onto a cleaner backdrop, add a caption that you can still move tomorrow, or repair a picture without wrecking the original, you need layers, selections and masks. Those are exactly the machinery here.

It is also the editor for machines you cannot install software on: a locked-down work laptop, a borrowed computer, a spare tablet. The page is the program. Open it, edit, close it, and nothing was installed anywhere.

Getting a picture onto the canvas

Three roads in: drop a photo anywhere on the editor, press Open image and browse for a file, or paste a capture from the clipboard with Ctrl V. There is also a button to start a blank canvas when you are building something from nothing.

Very large photos are handled with a compromise you should know about up front. Anything beyond 4096 pixels on its long side is scaled down on opening, because a browser tab is granted only a slice of the machine's memory and several full-resolution layers would exhaust it. The editor tells you when this has happened. For screen use, social posts and ordinary prints the reduced size is still generous; for poster-sized print work, a desktop program remains the right tool.

The top bar, left to right

New starts a fresh document and Open project brings back earlier work. Save project, also on Ctrl S, writes the entire layered state to a file on your machine. Undo and Redo sit on Ctrl Z and Ctrl Y, and a small dot appears when changes have not been saved yet.

The five menus carry the heavyweight commands: Image for the document itself, Select for selection commands, Adjust for tone and colour, Filter for effects, and AI for the two model-driven helpers. Beyond them sit the zoom buttons with a readout between them, Fit on the 0 key to frame the whole picture, and Full screen on F, which takes the entire workspace including the panels. Export image, on Ctrl E, is the way finished pictures leave the editor.

Layers: the stack that makes everything safe

The Layers panel lists your document top to bottom, and whatever sits higher covers whatever sits lower. New adds an empty transparent layer, Duplicate copies the current one, Delete removes it, and Up and Down shuffle its position. Double-click a name to rename it, which stops a six-layer job becoming a guessing game.

Two controls above the list apply to the selected layer only. Opacity fades the whole layer, and the blend menu changes the arithmetic where its pixels meet the stack below, which is how darkening, lightening and tinting effects are mixed rather than painted. Merge folds the current layer into the one beneath when a stack is getting unwieldy.

Two shortcuts do more than their size suggests. With a selection active, Ctrl J lifts just the selected area onto its own new layer, and Ctrl Shift J cuts it out instead, leaving a hole behind. Lifting a region to its own layer before working on it is the single safest habit in this kind of editing.

Selections first, masks second

A selection is a fence: while one is active, brush strokes, fills and adjustments land only inside it. The toolbar offers a rectangle, an ellipse and a point-by-point polygon tool that closes a clicked outline into a selection, and the AI can outline a subject for you in one step. Which to use depends on the shape of the thing you are fencing, and they can be combined across several passes.

A mask turns that fence into something permanent but reversible. Press the Mask button while a selection is active and the selection becomes the layer's mask: the fenced area stays visible and the rest of the layer hides. Nothing is deleted. Click the mask's small thumbnail and paint on it, white where the layer should show, black where it should not, grey for a soft in-between, and click the picture thumbnail to return to normal painting. Feathered edges on a mask are what make a composite look assembled by hand rather than cut with scissors.

Two ways to apply an adjustment

Pick anything from the Adjust menu, brightness, levels, curves, hue and saturation, or black and white, and a panel opens with its controls and a live preview. At the bottom sit three buttons that represent a real fork in the road.

Apply to layer commits the change into the pixels. It is final once the history runs out. Add as layer instead creates an adjustment layer, a floating instruction that recolours everything beneath it while touching nothing. You can select it again next week and retune it, lower its opacity to soften it, or delete it to take the change back out entirely. Cancel walks away. When in doubt, add as layer; the only cost is one more row in the panel, and the benefit is that no decision is ever locked in.

The two colour wells

The Colour group in the right rail holds a foreground and a background swatch. The foreground feeds brushes and fills; the background is what certain erasing and clearing operations leave behind. The Swap button, or the X key, flips the pair, which is constantly useful when painting a mask, since mask work is an endless alternation between white and black.

A complete edit, start to finish

Take a phone photo of a ceramic bowl, shot on a cluttered kitchen table, that needs to become a tidy listing picture. Open the photo. In the AI menu choose Select subject, and after a short wait the bowl is fenced by a selection that would have cost ten minutes of careful outlining. Press Ctrl J to lift the bowl onto its own layer.

Add a new empty layer, fill it with a warm off-white using the foreground colour, and drag it below the bowl layer in the panel. The table clutter is now gone from view. The bowl looks dim against the fresh backdrop, so open curves from the Adjust menu, lift the middle of the curve, and press Add as layer so the brightening stays retunable. Paint black on that adjustment layer's mask over the bowl's shadow so the shadow keeps its depth.

Save the project so the layered version survives, then press Export image, choose JPG at a sensible quality, and the flattened result is ready to upload. Tomorrow, when the marketplace wants a squarer crop, open the project and everything is still separate and editable.

Projects, recovery copies and exports

Three different save ideas coexist and do different jobs. Save project writes a project file to your machine holding every layer, mask and setting; it reopens later exactly as it was, and it is the only way to move work between computers. Export image flattens the stack into a normal PNG, JPG or WebP at the size you choose, which is what other people and other websites can actually display.

Between those two, the editor quietly keeps a recovery copy in the browser as you work. Close the tab mid-edit, reopen the page tomorrow, and the layers return on their own. That copy lives only in that browser on that machine, so treat it as a safety net rather than a filing system, and use real project files for anything you care about.

Limits, honestly stated

It opens ordinary image formats and its own project files, and nothing else; project files from desktop editing programs are a different format it cannot read or write, so bring a flattened JPG or PNG from such programs instead. The 4096-pixel ceiling on opening is real, and so is the general memory budget of a browser tab, which a tower of twenty full-size layers will eventually test.

The two AI commands, selecting the subject and removing the background, are driven by a model file served from this same site. It downloads once on first use, is cached from then on, and runs locally, so even that step sends nothing away. That is the general shape of the whole editor: your photo is decoded, edited, saved and exported entirely on your own device, and you can cut the internet connection after the page loads and keep working to prove it.

Help

How Image Studio works

A full photo editor that runs inside your browser. Pictures are edited in layers, so every change sits on its own sheet: paint on one layer, put text on another, fix the colours with an adjustment layer on top, and nothing underneath is harmed. Selections, masks, brushes, curves and blend modes all work the way a desktop editor taught you — and the photo itself never leaves your device.

Open a photo

Drop it on the page, paste a screenshot with Ctrl V, or start a blank canvas. Big photos are sized down to fit in browser memory, and the editor says so when it happens.

Select what you want to change

Drag a rectangle or an ellipse over the part you want, or pick the Poly tool and click point by point around anything irregular — close the outline and it becomes a selection you can delete, copy or cut to its own layer. Every brush stroke, fill and adjustment then stays inside the selection, and AI Select subject will outline a person or object for you in one step.

Work in layers

Each picture, brush stroke session and piece of text can live on its own layer with its own opacity and blend mode. Place image drops another photo on top as its own layer, From selection lifts whatever you have selected onto a layer of its own, and every shape you draw arrives as a layer you can move or restyle later. Tick several layers with Ctrl-click and Merge selected joins them into one. The Light, Contrast, Saturation and Hue sliders under the layer list change just the layer you are on. A mask hides part of a layer without deleting anything. The background layer is always position-locked — paint on it freely, but it will not slide out from under you; the padlock beside any other layer locks or unlocks its position.

Fix the colours

Brightness, levels, curves, hue and saturation, black and white. Apply them to the pixels, or add them as an adjustment layer you can retune or switch off later.

Save and export

Save project keeps every layer editable in a file on your machine. Export image flattens to a PNG, JPG or WebP at the size you choose.

It also saves itself

The editor keeps a recovery copy in this browser as you work. Close the tab, come back tomorrow, and your layers are still there. That copy lives on your device like everything else here - to move work between machines, use Save project.

Good to know

Your photos never leave the device

Every other free online photo editor uploads your picture to a server to work on it. This one cannot: load the page, turn off your internet, and everything still works - including the AI cut-out once it has been fetched.

Adjustment layers beat direct edits

Applied straight to a layer, a curve change is permanent. Added as an adjustment layer, the same change stays editable forever - select it again to retune, drag its opacity down to soften it, or switch it off to compare.

The AI does the tedious selecting

AI, then Select subject, and the person or object in the photo becomes a selection without a minute of careful outlining. Remove background does the same and clears everything else in one step. The first use fetches the AI once; after that it works offline.

Very large photos are scaled to fit

A browser tab gets a fraction of the memory a desktop app gets, and a 24-megapixel photo with five layers would sink it. Photos over 4096 pixels on the long side are sized down on opening - plenty for screens and ordinary prints.

No watermark, no account, no daily limit

Nothing is stamped on your picture and nothing is held back for a paid tier. There is no paid tier.

Common questions

Is my photo uploaded anywhere?
No. The editor is a page of JavaScript served from this site and it runs entirely in your browser. Nothing about your picture is sent anywhere - you can disconnect from the internet after the page loads and keep editing.
Can it open Photoshop files?
No. It opens ordinary images - JPG, PNG, WebP and the other formats your browser can read - and its own project files, which keep all your layers. It cannot read or write PSD files.
What do the blend modes do?
They change the arithmetic used where a layer meets what is underneath it. Multiply darkens, Screen lightens, Overlay adds contrast, and Color paints hue onto the detail below. The fastest way to learn them is to put a photo on a layer above another and walk through the list.
How do masks work?
A mask hides part of its layer instead of deleting it. Press Mask with a selection active and the selection becomes the mask. Click the mask thumbnail and paint: white reveals, black hides, grey is in between - and nothing is ever lost, because the pixels are still there behind the mask.
Why can't I move the background layer?
Its position is locked on purpose, and permanently: the background is the canvas everything else sits on, and one stray drag with the Move tool used to slide the whole picture out from under your work. You can still paint, fill and run adjustments on it. If you need a version you can move or rotate, press Duplicate in the Layers panel and work on the copy. The padlock beside any other layer locks or unlocks its position.
How do I rotate or flip a layer?
Turning always happens on the layer you have selected — the canvas itself never rotates, because the canvas is the background everything sits on. The Image menu gives exact quarter turns, flips, and a Rotate layer by any angle command that takes a number in degrees; the Layers panel has two quarter-turn buttons and an angle button beside them. For a freehand turn, pick the Move tool and drag the round handle above the layer — hold Shift to snap to 15-degree steps.
Can I use my own fonts and outline text?
Yes. Select any text layer and a Text panel appears in the right-hand rail, whatever tool you are using: the words themselves, a font menu, a Load font button that takes a .ttf, .otf or .woff file from your machine — it is read on your device like everything else here, never uploaded — size, bold, italic, colour, line alignment, underline, curve, a drop shadow, and outline width and colour. Alignment lines up the rows of a multi-line caption against each other — the block itself stays where you put it. Curve bends the words round an arc, the way a badge or a seal is set: it treats the caption as one run, so alignment and underline do not apply while it is bent. The same controls sit in the options bar while the Text tool is chosen. A custom font is embedded in your project file, so the text still looks right when you reopen the project later. Outline draws a coloured edge around the letters, which keeps captions readable on busy photos.
How do I change the light or colour of just one layer?
The Layers panel has Light, Contrast, Saturation and Hue sliders under Adjust this layer. They act on whichever layer is selected and nothing else: drag to see the change on the picture, let go to keep it. Each change is a single undo step and the sliders go back to zero afterwards, so you can keep nudging. For finer control - curves, levels, black and white, or a change you can retune later - use the Adjust menu, where Add as layer keeps the adjustment editable forever instead of changing the pixels.
How do I combine a few layers into one?
Ctrl-click (or Shift-click) the layers you want in the Layers panel - each one you tick gets a highlight - then press Merge selected. They become a single pixel layer where the lowest of them sat, and the picture looks exactly as it did before. Merge down is the quicker version for just two: it folds the current layer into the one underneath. Neither will merge a hidden layer, because pixels you had switched off would suddenly reappear, and an adjustment layer cannot be merged this way at all since it acts on everything below it - use Flatten image for that.
Can I put another photo on top of this one?
Yes - press Place image and pick one, or several at once. Each arrives as its own layer, centred, leaving your document size and everything already in it untouched. Open image is the other way round: it starts a fresh document from the file you choose. Dragging pictures onto the page works too.
How do I turn part of a picture into its own layer?
Select the part you want with any of the selection tools, then press From selection in the Layers panel (Ctrl+J). The selected pixels are copied onto a new layer and the original is left alone. Cut to layer (Ctrl+Shift+J) does the same but takes them out of the layer underneath, and both halves are one undo step, so you can never end up with a hole and no layer to show for it.
Where did my work go when I closed the tab?
Nowhere - open the page again and the editor restores its recovery copy automatically. That copy is kept in this browser on this machine, so on another machine or browser you will not see it; use Save project to carry work across.
Why did my photo shrink when I opened it?
Photos over 4096 pixels on the long side are sized down so several layers of them fit in the memory a browser tab is allowed. The editor tells you when it does this. For print-resolution work on huge files, a desktop editor is still the right tool.
Is the AI cut-out uploaded?
No. The AI is a file served from this site that runs inside your browser, fetched once the first time you use it and cached after that. Your photo is not sent anywhere for it to work.
Is it free to use commercially?
Yes - the editor and everything you make with it. The AI model is used under a permissive open-source licence that allows commercial use, and its licence text ships with the site.