
When your own photos refuse to open
Modern phones quietly switched their cameras to the HEIC format, and the files travel badly: a college portal rejects them, an old laptop shows a blank icon, a relative writes back asking what you sent. This article explains where the format came from, walks through every setting on the converter, follows a full camera roll through the process, and covers the cases where converting is not actually the right move.
The format problem in one minute
HEIC stores a picture in roughly half the space a JPG needs at the same visual quality, which is why phone makers adopted it: twice the holiday photos on the same storage. The catch is reach. JPG has three decades of universal support behind it, while HEIC support remains patchy across older computers, web forms, office software, printers and picture frames. The photo is fine. The world around it just has not caught up.
So the practical fix is not to fight the format but to translate it when it needs to go somewhere unfriendly. That is the whole job of this page: read HEIC and HEIF files on your machine, write out JPG, PNG or WebP copies, and optionally shrink them on the way through.
What the drop zone accepts
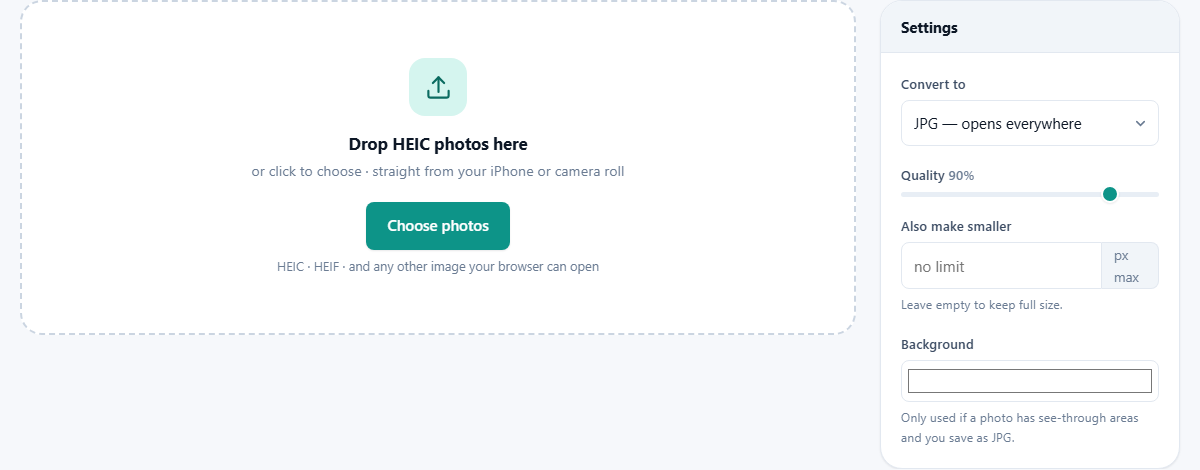
The file box takes .heic and .heif files first and foremost, but it also accepts any other image type your browser can decode, so a mixed folder of phone shots and screenshots can go in as one batch. Add everything in a single drag, or feed it in stages with the Add more button. Clear all wipes the list when you want to start over.
There is one honest dependency to know about: the browser itself does the HEIC decoding, and not every browser can. The page tests this the moment it loads. A green notice means you are fine. An amber notice means this particular browser cannot read the format, and it suggests alternatives rather than letting you drag files into silence. If you see the warning, switching browsers is usually faster than any other workaround.
Choosing the output format
The Convert to menu offers three targets, each with a one-line personality. JPG opens everywhere, and for photographs headed to other people it is the right answer ninety-five times out of a hundred. PNG is lossless, meaning it discards nothing, at the cost of files several times larger; pick it when the image will be edited again or when perfect fidelity beats convenience. WebP produces the smallest files of the three and suits your own web projects, but it inherits a milder version of the same compatibility question you are trying to escape, so avoid it for files you are sending to strangers.
The quality slider, honestly explained
Quality runs from 40 to 100 and starts at 90. It controls how aggressively the JPG or WebP encoder throws away detail your eye is unlikely to miss. At 90, side-by-side comparison with the original defeats nearly everyone. At 75, files shrink noticeably and most photos still look clean on a screen. Down at 40, compression artefacts crawl into skies and skin, and the saving stops being worth it.
Two things the slider does not do. Setting it to 100 does not make JPG lossless; the format always discards something, so use PNG when nothing may be lost. And raising quality cannot restore detail the phone never captured. A dim, shaky photo converts into a dim, shaky JPG at any setting.
Shrinking photos on the way through
The box labelled Also make smaller, with its px max suffix, is the sleeper feature of this page. Type a number and no photo will come out with its longest side over that limit. Leave it empty and every photo keeps its full resolution.
Why bother? Because a modern phone photo is around 4000 pixels wide, and almost nothing you do with it needs that. A photo attached to an email, posted to a forum, or dropped into a document displays at a fraction of the size while the file drags along the full weight. A limit of 1600 turns a 3 MB photo into a few hundred kilobytes with no visible cost at the destination. Keep your originals full size on the phone; shrink the copies that travel.
The background colour nobody notices until it bites
The Background picker looks out of place on a photo converter until you meet the case it exists for. Some images carry transparent regions, and JPG has no way to represent transparency, so something must fill those areas during conversion. This picker decides what. White suits documents and shop listings; a dark tone suits images headed for dark-themed pages.
Ordinary camera photos have no see-through pixels, so for a normal camera roll you can ignore the setting completely. It only wakes up when a graphic with transparency is saved as JPG.
A whole camera roll, start to finish
Here is a real shape of job: 214 photos from a two-week trip, needed as JPGs for a shared family album. Drag the entire selection into the drop zone at once. The summary line confirms the count. Set Convert to JPG, leave Quality at 90, and type 2048 into the px max box, since the album displays nothing larger anyway.
Press Convert and watch the progress bar walk through the set. The tool deliberately processes one photo at a time, which is why a modest laptop can chew through hundreds of files without running out of memory. When the bar finishes, take the single ZIP download rather than saving files one by one, unpack it, and upload the folder to the album. The whole exercise takes minutes, most of which is the unattended middle part.
A smaller job: three photos for an online form
Batches are not the only shape of work. Say a form asks for three photos of a damaged parcel, each under 500 kilobytes, and your phone shot them as HEIC at 4032 pixels wide. Drop just those three in. The summary line will say three files.
Set Convert to JPG. Pull Quality down to 80 rather than leaving it at 90, because a form only needs the damage to be visible. Type 1400 into the px max box. Press Convert. Three files that started near 2 MB each land somewhere around 250 kilobytes, well under the cap, and the dent in the box is still perfectly clear.
With only three files, skip the ZIP and save each one straight from the list. The ZIP earns its keep when the count runs into dozens; below about five it is an extra step and an extra unpacking.
Settings for the jobs that come up most
Four numbers cover almost every real request. Copy these and adjust from there.
- Sending by email: JPG, quality 85, px max 1600. Small enough that no mail service complains.
- Uploading to a photo book or print service: JPG, quality 95, no size limit. Printing wants every pixel.
- Putting pictures on your own web page: WebP, quality 80, px max 1920. Smallest files, and you control the audience.
- Handing a picture to a designer for more editing: PNG, no size limit. Nothing is thrown away on the way.
Where it sits among the other image tools
This page is a translator with a shrink option bolted on, and it stops there on purpose. Once the photos are JPGs, the rest of the image tools on this site will open them happily.
So the usual order is: convert here first, then move on. Send the results to the compressor if a size cap is still not met, to the resizer if particular dimensions are demanded, or to the cropper if a form wants a square. Doing it in that order means every later tool is working with a format it fully understands.
If nothing seems to happen
Failed conversions almost always trace back to one of a few causes, and each announces itself if you know where to look.
- The amber warning is showing. This browser simply cannot decode HEIC, and no setting on the page changes that. Use a different browser, or share the photos from the phone in a compatible format instead.
- Files were renamed along the way. A file whose extension says .jpg but whose insides are HEIC confuses every tool it meets. Convert from the untouched originals.
- The photos arrived through a chat app first. Many messaging services already convert and compress images on delivery, so the files may not be HEIC at all. Check one before assuming.
- You expect the tool to keep hidden data. Conversion writes a fresh file and drops embedded extras such as the location where the shot was taken. That is a privacy gain when sharing, but keep originals if the data matters to you.
When converting is the wrong move
Do not convert your archive. HEIC's whole advantage is squeezing the same quality into half the space, so bulk-converting your library to JPG doubles its footprint while gently reducing quality. Translate copies when a destination demands it, and let the originals stay as they are.
Also think about stopping the problem upstream. Every phone that shoots HEIC has a camera setting that switches new photos to the most compatible format, at the price of larger files. If you find yourself converting weekly for the same recipient, flipping that switch may serve you better than any tool.
Finally, if what you really need is editing rather than translation, go straight to an editing tool that reads your files. Converting first and editing second just adds one more generation of compression.
Two hundred family photos, zero passengers
It is fair to be suspicious of a website that asks for your entire camera roll. This one never receives it. The files are opened by your browser, decoded and re-encoded by your processor, and the ZIP is assembled in your machine's memory. No copy exists anywhere else at any point, there is no account tying the batch to you, and closing the tab leaves nothing behind. A converter is precisely the kind of tool that should work this way, because photo libraries are among the most personal files most people own.