
Hiding faces and details properly before a photo goes public
Redacting a photo is a security decision disguised as an editing task. This article compares the three hiding methods honestly, explains the strength setting, walks a complete example of preparing a car listing, and lists the checks worth doing before anything sensitive leaves your hands.
Why photos need censoring at all
You photograph your car to sell it, and the registration plate is readable. You share a picture from a party, and someone in the background never agreed to be online. You post a screenshot of a delivery mishap, and your address label is in focus. Photos carry passengers, and publishing them publishes the passengers too.
The fix is to destroy those regions before sharing, and destroy is the correct word. This page lets you mark any number of rectangles on a photo and obliterate what is inside each, choosing per session how the hiding should look.
Boxes: drawing, removing, starting over
Once your photo is loaded, press on the picture and drag. A rectangle appears, the effect fills it live, and a counter below tracks how many areas exist. Draw as many as the photo needs.
Corrections are cheap. Every box carries a small red cross on its corner, and clicking it deletes that single region. Undo last removes the most recent box, Clear areas empties them all while keeping the photo, and Start over abandons the image entirely. Because the preview always shows the finished effect, what you see is exactly what will be saved.
Three methods, three levels of certainty
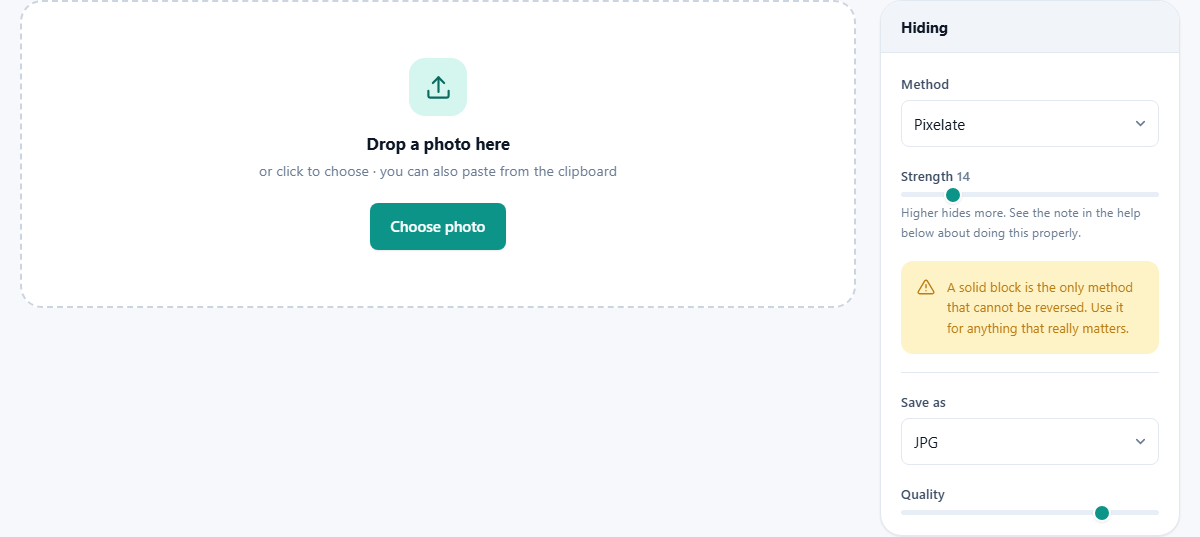
The Method menu offers Pixelate, Blur and Solid block, and they are not equally safe.
Pixelate averages the region into large squares. Blur smears it smoothly. Both look gentle and photographic, and both merely scramble the original values rather than deleting them. Researchers have shown that lightly pixelated text can sometimes be reconstructed, because the possible characters that could produce a given pattern are few. A solid block is different in kind: every pixel is overwritten with one flat colour, so the information no longer exists in any form.
A sensible rule: faces of bystanders and house numbers can take pixelate or blur, since the stakes are recognition rather than theft. Account numbers, signatures, addresses and anything financial get the block, no exceptions.
How strong is strong enough
The Strength slider, running 4 to 60, scales how coarse the pixelation or how deep the blur becomes. The default of 14 suits an average face at typical photo sizes, but resolution changes everything: a face occupying a quarter of a 4000 pixel photo needs far heavier treatment than the same face in a small web image.
Ignore the number and use your eyes. Raise the slider until you genuinely cannot recognise the person or read the text in the preview, then go a step further. For pixelated writing, each letter should span several blocks. If you can squint your way to a digit, so can everyone else.
Block colour and the export settings
Choosing Solid block reveals a colour well, black by default. Black reads as deliberate censorship, which is sometimes exactly the message. Matching the block to a wall colour makes the edit quieter, though slightly less obviously intentional.
Below that, Save as offers JPG, PNG and WebP, with a Quality slider from 60 to 100 for the compressed formats, preset to 92. JPG at the default is right for photographs headed to listings and social posts. Pick PNG when the source was a screenshot, since flat interface graphics stay cleaner without compression.
Worked example: the car listing
You have a driveway photo for a sale ad, and three problems in it: the number plate, the house number on the door behind, and a neighbour walking past.
Load the photo. Set Method to Solid block with black, and drag a box across the plate with margin on every side. Switch to Pixelate at strength 22, and box the house number until it is pure mosaic. Box the neighbour's face the same way. The counter reads three areas. Zoom your eyes over the preview once more, click Save redacted photo, and upload the JPG to the listing. Elapsed time, under two minutes, and nothing in the ad identifies where the car sleeps at night.
Habits that prevent regrets
Redaction fails at the edges, not the centre, so a little paranoia goes a long way.
- Draw boxes larger than the target. A sliver of visible edge can be enough to identify a plate or a name.
- Hunt the background. Mirrors, window reflections, letters on a desk and open screens are where secrets hide.
- Open the saved file and zoom in before sharing it, rather than trusting the thumbnail.
- When choosing between more hiding and prettier, choose more hiding. Nobody ever regretted an oversized block.
Doing more than one photo
This page holds one picture at a time. That is a deliberate limit, because boxes are drawn by hand and the right places are different in every frame. There is no way to apply one set of rectangles to a folder.
So a batch is a rhythm rather than a button. Load a photo, draw the boxes, save it, then press Start over and drop the next one in. The settings in the side panel stay where you put them, so the method, the strength and the format only need choosing once for the whole set. Ten photos of a house you are letting take a few minutes this way, and each one gets your actual attention.
A second job: a screenshot of a letter
Photos and screenshots need different handling, and this is the case that catches people out. Say you want to show a support agent a bill, but the page holds your account number, your address and a partial card number.
Text behaves differently from a face. A face only has to stop being recognisable. Text has to stop being guessable, and there are far fewer things a smudged digit could be. So set Method to Solid block from the start. Leave the colour black.
Drag one box over each of the three items. Do not draw three tight boxes on one line if a single wide box would do; a wide box removes the spacing between the fields as well, which is itself a clue. The counter should read three areas.
Change Save as to PNG for this one. The source is flat text on a white page, and PNG keeps those edges clean where a compressed format would leave a faint fizz around every letter. The parts you kept stay easy to read, and the parts you removed are simply gone.
One extra step that helps a lot
If a picture is going somewhere public, make it smaller before you post it. A photo shared at 800 pixels wide holds far less detail than the same photo at 4000, so anything you softened has less left to give away.
Do it in this order. Hide the areas here and save the file. Then open that saved copy in the resizer on this site and bring the width down to what the destination actually shows. Shrinking first would be a mistake, because you would be drawing your boxes on a small preview and could easily miss a detail that a full size view would have shown you.
Tools that finish the job
Redaction is one part of preparing a picture for strangers, and two other pages here cover the rest.
The EXIF viewer opens a file and lists the hidden fields inside it, so you can confirm for yourself that a photo carries no camera model, no timestamp and no map position. Reading it once teaches you how much a plain phone photo normally says about you.
The image compressor is the last stop if the destination has a size limit. Run it after the boxes are saved, never before, so you are always drawing on the clearest version of the picture you have.
The invisible passenger: location data
Photos from phones usually carry hidden fields recording the camera, the time, and often the exact map coordinates of the shot. Covering your address in the pixels while the file still stores your position would be a hollow victory.
Saving from this tool re-encodes the picture from scratch, and that hidden block does not survive the trip. The output holds pixels and nothing else, which for a redaction job is precisely what you want.
What this page will not do for you
There is no automatic face finder here. You place every box yourself, which is slower for a crowd scene but means nothing is missed because a detector had an off day. An on-device automatic option is planned for the site's AI section.
If your task is annotating rather than censoring, with arrows and captions plus the odd blur, the screenshot markup tool next door combines both. And blurring an entire image evenly is a job for the effects pages, not this one.
The photo that never travelled
Think about what an upload would mean here. The unredacted original, the version containing everything you are trying to hide, would sit on someone else's server at least briefly. That is a strange first step for a privacy task.
So it does not happen. The file is opened by your browser from your own storage, every effect is computed on your processor, and the redacted copy is written straight back to your device. At no moment does any version, clean or censored, cross the network. The only person who ever sees the original is you.