
Cutting one picture into many, in the right order
Splitting a picture is easy. Getting the pieces the right size, in the right order, with names that sort properly, is where it goes wrong. This article covers the preset list, the two number boxes, the numbering tick boxes, and what the finished pieces look like. There is a worked panorama with real pixel values, plus the size maths that decides whether your pieces look sharp or soft.
One picture in, a pile of files out
The best known reason to cut a picture up is social: a wide photo split into squares becomes a post you swipe through as one long scene, and a picture cut into nine tiles becomes a mural spread across a profile grid. Those are the jobs the presets are built around.
They are not the only ones. People print a poster by splitting it across several sheets of paper and taping them together. A scanned page holding four old photographs gets cut into four files. A wide diagram becomes two slides. A tall menu becomes readable chunks for a message. A class activity needs a picture cut into 12 pieces to reassemble. The tool does not know or care which of those you are doing.
The preset list and the two number boxes
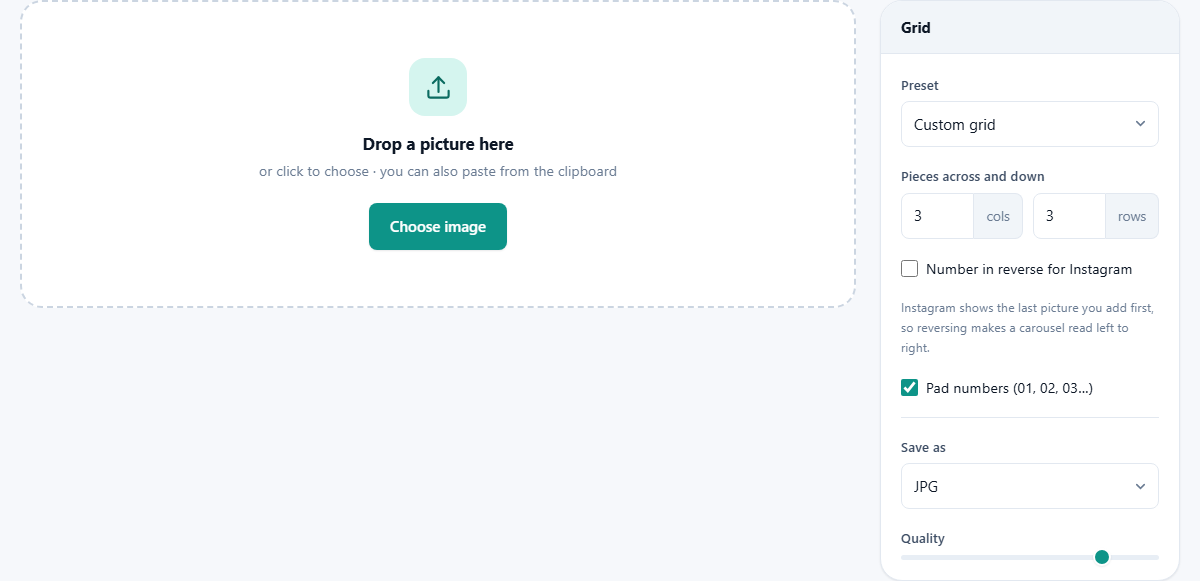
Preset sits at the top of the Grid panel. It opens with Custom grid, then four entries named after the photo sharing app they suit, being two carousel widths and two puzzle feed shapes. After those come Split in half side by side, Split in half top and bottom, and Four quarters. Choosing any of them fills in the numbers below for you.
Underneath, two small boxes labelled cols and rows hold the real settings. Both accept 1 to 12, and both start at 3. Columns are the pieces across, rows are the pieces down, and the total is one multiplied by the other. So the largest job here is 12 by 12, which is 144 files. Type into either box and the preset switches itself to Custom grid, which is simply telling you the truth: you are no longer on a preset.
The numbered grid on your picture
As soon as an image is loaded, a grid appears over it with a number in every cell. Those lines are exactly where the cuts will fall, so you can see straight away whether a face is about to be sliced down the middle or a caption split across two files. Change the columns or rows and the grid redraws instantly.
The numbers are not decoration. They are the order your files will be named in, so you can read the finished sequence off the picture before anything is cut. Under the preview a small line reports how many pieces you will get and roughly how big each one will be in pixels. Check that line before you press anything. It is the quickest way to catch a source picture that is too small for the job.
Two tick boxes that decide the order
The first tick box reverses the numbering, and its label names the app it exists for. That app shows the last picture you added first, so a set added in normal order comes out backwards and your wide scene reads right to left. Reversing the numbers cancels that out, so adding the files in name order gives a post that reads the way you drew it. The presets for that app switch this on by themselves, and picking any other preset switches it off again.
The second box, Pad numbers, is ticked to start with and should usually stay that way. It writes 01 and 02 rather than 1 and 2. This matters because most computers sort names as text, so without padding, piece 10 lands between piece 1 and piece 2 in every file picker you meet. With more than 99 pieces the padding grows to three digits so the sort still holds.
Start big, or the pieces look soft
Every piece is a real cut from your original, so its width is your picture divided by the number of columns. Nothing is invented or stretched. That single fact decides how sharp the result looks, and it is where most disappointment comes from.
Work backwards from where the pieces are going. A square post wants about 1080 pixels on a side, so a three piece carousel wants a source about 3240 pixels wide, and a nine tile mural wants about 3240 both ways. Split a 1500 pixel photo into three and each piece is only 500 across, which will be visibly fuzzy when it fills a phone screen. If your source is too small, the answer is a bigger source, not a setting on this page.
What you get back
Press Split image and the pieces appear in a panel below, each with a thumbnail, its own file name, its size in pixels and its weight in kilobytes. Every row has a Save button for grabbing one piece on its own. The names are your original file name with a dash and the piece number added, so a file called harbour becomes harbour-01, harbour-02 and so on.
Download all as ZIP is the sensible route for anything past two or three pieces. It bundles the lot into one archive named after your picture. Unzip it and the files are already in the right order, which is the whole point of the numbering. Save as offers JPG, PNG and WebP, with a Quality slider from 60 to 100 that starts at 92. Choose PNG and the quality slider disappears, because PNG does not work that way. One thing to know: JPG cannot store see-through areas, so any transparency in your picture is filled with white before the cut.
A panorama, worked all the way through
Say you have a harbour panorama at 3240 by 1080 pixels and you want it as a three part post. Drag it onto the drop area. The file name and its true size appear at the top, and the preview comes up with a 3 by 3 grid over it, since that is the starting shape.
Choose the carousel preset for three across. The grid changes to three tall columns, the reverse tick box switches itself on, and the numbers now read 3, 2, 1 from left to right. The line underneath confirms three pieces at about 1080 by 1080 each. That is the moment to check the cuts: if a mast or a face is sitting on a line, nudge the framing in a crop tool first and come back.
Press Split image. Three squares appear in the list, named harbour-01, harbour-02 and harbour-03, each 1080 by 1080. The one numbered 01 is the right hand slice. Press Download all as ZIP, unpack it, then add all three to a single post in file name order. The result swipes left to right as one continuous harbour.
When the numbers do not divide evenly
Pictures rarely divide neatly. A 1000 pixel width cut into three gives 333 and a third for each piece, which is not a number of pixels anything can hold. Rather than trim the edge off, the leftover pixels are handed to the last column, so you get 333, 333 and 334. The same rule applies down the rows.
The upshot is that no part of your picture is ever lost, but the pieces on the right and along the bottom may be a pixel or two bigger than the rest. Nobody will see that. It only matters if something later demands that every file be identical in size, in which case make your source a clean multiple first: 3240 divides by three, 1080 divides by nine, and so on.
Mistakes worth avoiding
- Splitting a wide photo into nine for a profile mural. The tiles come out wide, not square, and the grid will crop them. Make the source square first.
- Leaving the reverse tick on when you are not posting to that app. Your pieces will be numbered backwards for no reason.
- Turning padding off and then wondering why piece 10 sits second in the list.
- Uploading the pieces in whatever order the file picker offers. Sort by name, then add them.
- Splitting a picture that has already been shrunk for the web. Go back to the original before it was resized.
- Splitting a picture with a transparent background to JPG, then wondering where the white came from.
When a different page is the right one
If the pieces need to be square and your picture is not, crop it square before you come here. This page only ever cuts equal rows and columns out of what you give it, so a wide source can only make wide pieces. If you only want one region out of a big picture, that is a crop as well, not a split.
If you want the opposite job, several pictures joined into one sheet, that belongs to a different page too. And if the aim is simply to make a huge file smaller to send, cutting it into pieces is the hard way round. Compress it or resize it instead, and keep it as one picture that people can actually view.
Your picture never leaves the room
The cutting happens inside your browser tab. Your machine reads the file, draws each piece onto its own hidden canvas, and hands you the results. Nothing is uploaded, there is no account, and no copy of your photograph exists anywhere except on your own disk.
That is a practical benefit as much as a principle. There is no size limit set by somebody else's server, no queue when the site is busy, and no wait to download 144 files back again. Big jobs simply use your own processor for a few seconds, and the ZIP is built on your machine too.