
Getting a real scan out of a phone photo of a page
Hardly anyone owns a scanner now, but everyone carries a camera. This article explains how the tool works out where your page is, what each setting on the right does to the finished image, and how to get sharp black text out of a photo taken on a kitchen table under a ceiling light.
What goes wrong when you just take a photo
A form arrives by post and has to go back by email. A landlord wants the signed page today. You want your grandmother's recipe card kept somewhere safer than a drawer. In all three cases you point a phone at paper and hope for the best.
The photo is never quite right. You lean over the page, so the far edge comes out narrower than the near one and the whole sheet tips to one side. Your head blocks the lamp, so half the page is grey. The kitchen light is warm, so white paper turns the colour of weak tea. Send that to an office and it looks like a snapshot of paperwork, because that is what it is.
This page deals with all three faults at once. It finds the paper, pulls it back into a proper rectangle, then decides for every dot whether it is ink or paper.
Take the photo so the tool has an easy job
Everything that follows depends on the four corners being visible and obvious. Two minutes spent on the photo saves five minutes of dragging handles later.
- Put the page on something dark and plain. A wooden worktop or a dark jumper is perfect. A patterned cloth is the worst thing you can use.
- Get all four corners inside the frame, with a bit of space around them.
- Switch the flash off. A flash burns a white hole in the page, and no amount of cleaning brings those words back.
- Stand so your shadow falls behind you. Light from a window to one side is ideal.
- Hold the phone fairly square to the page. A slight lean is fine. A steep angle stretches the far end and softens the text there.
Checking the corners before anything else
Drag a file in, click to choose one, or paste a picture you have just copied. Photos in the HEIC and HEIF formats that many phones save are accepted as they are, so there is no converting first.
The panel that appears is headed Check the corners. An outline sits over your picture with a handle at each corner, and that outline is only a guess. Press a handle and drag it. Put each one right on the corner of the paper, or a whisker outside it.
Three small buttons sit under the picture. Find the page again asks for a fresh guess, handy once you have dragged the handles into a muddle. Whole photo stretches the outline to the entire frame, which is what you want when the paper runs off the edge or the picture was cropped to the page already. New photo drops this image and lets you load another. Whatever the handles say when you press save is what gets straightened.
Clean-up, the choice that changes everything
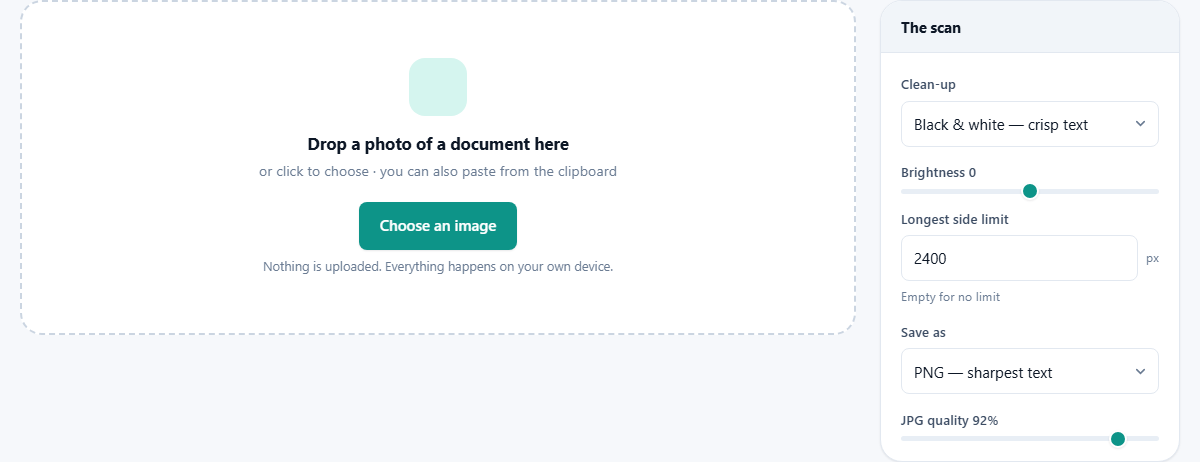
The panel on the right is headed The scan, and Clean-up is the menu at the top of it. Four options, each suited to a different kind of page.
- Black and white for crisp text. Every dot ends up black or white. Printed pages and pen writing go razor sharp, and the uneven lighting stops existing.
- Greyscale keeps the shades of grey. This is the one for pencil, faded till receipts and old carbon copies, where marks are soft rather than solid.
- Colour, cleaned keeps the colours and evens the light. Reach for it with a printed letterhead, a stamped form, or a page marked with a highlighter.
- None, just straighten, changes the shape and nothing else. Right for a page with a photograph on it, a child's painting, or a whiteboard where marker colour means something.
Brightness moves the line between ink and paper
The Brightness slider runs from minus 60 to plus 60, moves in steps of five, and starts at zero. In the two tone mode it is not an ordinary brightness knob at all. It shifts the point where the tool stops calling something paper and starts calling it ink.
So use it by symptom. Has a faint pencil note been swallowed? Pull the slider below zero, and weaker marks count as ink. Are the margins peppered with dark specks? Push it above zero, and the texture of the paper drops out.
In the other three modes it does the plain thing and makes the scan lighter or darker. Move it a notch or two and look. The steps are small on purpose.
Size limit, file type and quality
Longest side limit is a number box holding 2400, counted in pixels. It caps the longer edge of the finished scan, and the shorter edge follows along so the page keeps its proper shape. Clear the box and nothing is capped at all.
Why 2400? Across the long edge of an office sheet that is roughly 200 dots to the inch. Easy to read, good enough to print, small enough to email. Raise it towards 3500 for tiny footnotes. Drop it to 1600 for a pile of shop receipts.
Save as offers PNG for the sharpest text, or JPG for a smaller file. PNG keeps every edge exact, and a two tone scan saved as PNG is often smaller than the photo it came from, because a picture made of two colours squeezes down beautifully. JPG quality runs from 40 to 100 and starts at 92. It only matters when JPG is chosen, and below about 70 you get grey fuzz around the letters, which is the one thing a scan must never have.
A worked example: two pages of a tenancy agreement
Page one is on a dark oak table. The phone was held slightly to the left, and the window is on that side too, so the right hand edge is dimmer. The file is IMG_4417, saved in HEIC.
Drag it onto the drop area. The picture appears with the outline on it. Three corners have landed correctly, but the bottom left handle has grabbed the edge of the table. Drag it onto the paper corner and the outline hugs the sheet.
Clean-up is already on black and white. The typed clauses go crisp, and the blue biro signature comes out solid black, which is how a signature ought to copy. One thing is wrong: a pencil note in the margin reading agreed 12 March has vanished. Move Brightness to minus 10 and it returns, with the margins still clean.
Leave the size limit at 2400 and Save as on PNG. Press Download the scan, and IMG_4417-scan.png arrives in your downloads folder. Shoot page two, repeat, and you have a matching pair.
What you get, and how to make it a PDF
The result is one image per photo. It takes the name of the file you put in with -scan added before the extension, so bill.jpg comes back as bill-scan.png if you picked PNG. Most offices and portals accept images without complaint, so often you can attach it and be done.
When one bound document is wanted, open the finished images and use your browser's print command, choosing to save as PDF instead of printing on paper. A word processor works too: one image per page, then export. Either way the binding happens on your machine.
Rename the images page-01, page-02 and so on before you combine them. Most programs bind in name order, and camera names are not always the order you want.
Things that go wrong, and the fix
- The outline grabbed a pattern on the tablecloth. Move the handles by hand, or press Whole photo and drag from the full frame.
- A page from a bound book curls near the spine. Straightening assumes flat paper, so a curved page stays bent. Press it down, or shoot one page at a time.
- A photograph printed on the page has turned into a mess of dots. That is the two tone mode on the wrong material. Switch to colour or to straighten only.
- There is a white patch with no words in it. That is glare, and nothing was recorded underneath, so no setting will help. Move the light and shoot again.
- One end of the scan is soft. The camera was close and steeply angled, so that end had far fewer pixels. Step back and shoot more square on.
- The text turned to porridge after you set the size limit to 800. Small type needs pixels. Keep 2000 or more for anything meant to be read.
When another page suits the job better
If your picture is already flat and square and you only want a smaller file, Batch Image Editor is the quicker route with fewer decisions.
If you want the words as text you can edit, search or paste into an email, this is the wrong tool. It gives you a picture of writing. Image to Text reads the characters off the page instead, and it also runs in the browser.
If the scan holds something a stranger should not see, such as an account number, run it through Blur and Redact before sending. And for a whiteboard covered in coloured pens, stay on greyscale or colour, because the two tone mode treats red and green alike.
The paperwork never leaves the room
Look at what people actually scan. Tenancy agreements, payslips, medical letters, a passport for a visa form, a birth certificate for a school place. Those are things you would not hand to a stranger, yet handing them to a stranger's computer is what a cloud scanning app quietly asks for.
Nothing here is uploaded. Choosing a file hands it to this browser tab, which reads it from your own disk. Finding the corners, pulling the page flat, judging every dot and writing the image are all done by your own processor, and the scan is saved straight back to your device.
There is no account and no sign in, so no copy of your paperwork sits on a server waiting to leak. The only place that scan exists is the folder you saved it to.