
Turning a picture the right way up, and levelling the ones that lean
This page does three jobs that look similar and behave very differently: spinning a photo by a quarter turn, mirroring it, and nudging it a fraction of a degree to level a tilted horizon. One of those costs nothing at all in quality; another costs a little. Here is what each control does, what the corner setting is for, and how to put a whole folder right in one go.
Three separate jobs on one page
A quarter turn is what you need when a scan came out on its side, or a phone recorded the wrong orientation and half your apps display it lying down. The picture is not damaged in any way; it is simply pointing the wrong direction.
Straightening is a different animal. Nobody holds a camera level, and a sea horizon leaning by one degree is oddly obvious even to people who cannot say why the picture bothers them. Mirroring is different again: it reverses left and right, which helps in layout when you want a person facing into the page rather than off the edge of it. Knowing which of the three you are doing matters, because only one of them touches the pixel values.
Quarter turns, and why they are free
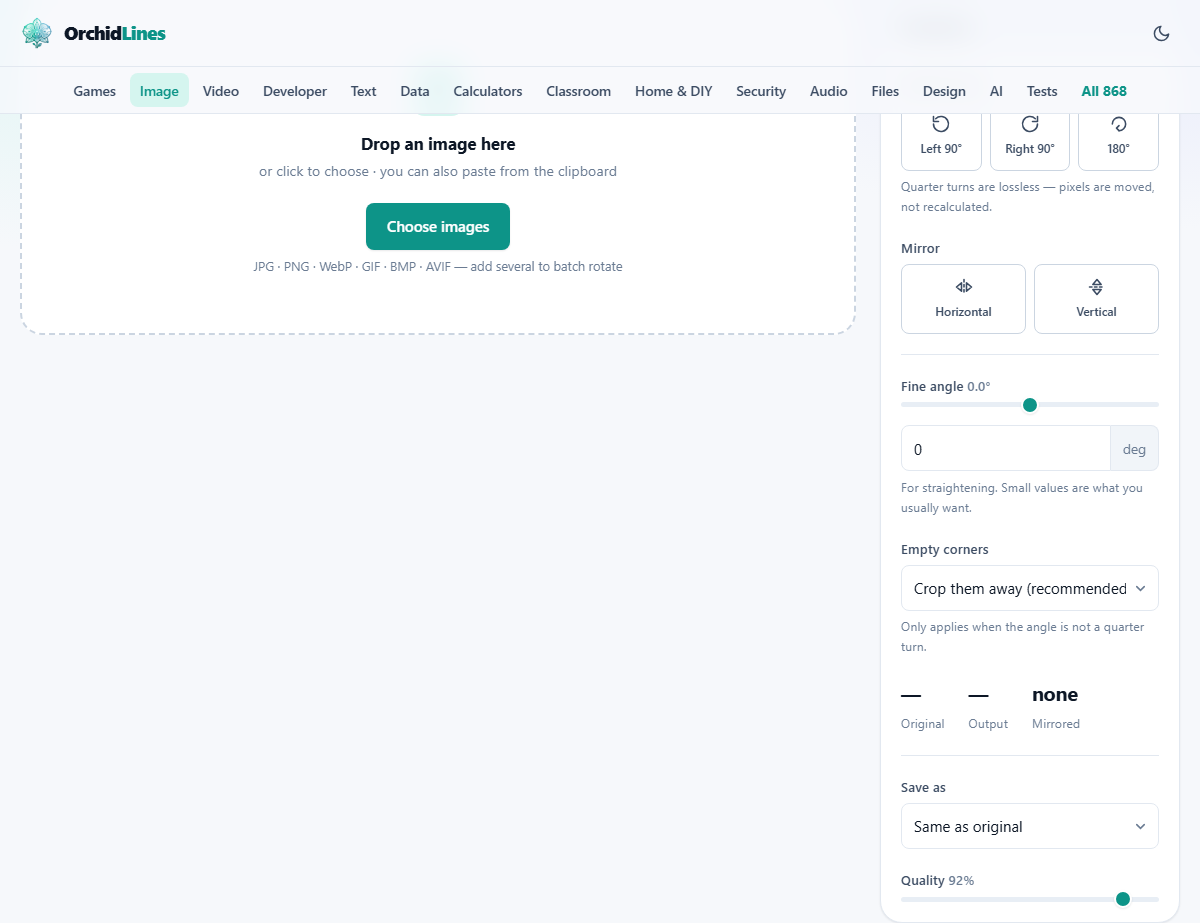
Three tiles sit under the heading Quarter turns: Left 90, Right 90 and 180. Press them as often as you like; two rights make a 180, and four bring you back where you started.
These are free in the strictest sense. A quarter turn just moves each pixel to a new address. The pixel that was at the top left ends up at the top right, unchanged in colour. No blending, no averaging, no invention. Save the result and it is every bit as good as what you started with. A small grey line under the tiles reminds you of this while the fine angle is still at zero, and it steps aside once you tilt the picture, because at that point the promise no longer holds.
Mirroring, and how it differs from a 180
Two more tiles, Horizontal and Vertical, sit under Mirror. Horizontal swaps left with right, like looking at the picture in a mirror. Vertical swaps top with bottom, which is a strange effect on most photos but exactly right for a reflection in water.
People often reach for a mirror when they meant a 180. The two are not the same and the difference is easy to see with writing in the shot. Turn a picture 180 degrees and any text is upside down but still correct, so you can read it by tipping your head. Mirror it and the text is the right way up but reversed, which no amount of head tipping fixes. A small readout in the panel labelled Mirrored keeps score, showing H, V or none, so you always know what state the picture is in.
Fine angle, the straightening control
Fine angle is a slider running from minus 45 to plus 45 degrees in tenths, with a number box beside it if you would rather type. Negative rolls one way, positive the other. Almost all real straightening lives between minus 3 and plus 3, so treat this as a nudge control rather than a spin control.
The readout beside the label shows the total turn, quarter turns and fine angle added together. Turn a picture right by 90 and then tilt it another 1.5 and it reads 91.5. That total is the honest number, and it is what will actually be applied when you save.
This is the one operation that costs something. Tilting means the new grid of pixels does not line up with the old one, so every output pixel has to be worked out from a blend of its neighbours. The loss is genuinely tiny, but it is real, and it repeats each time you save and reopen. So do your straightening once, in one pass, from the original file rather than from a copy you already straightened yesterday.
The empty corners, and your four options
Tilt a rectangle inside its own frame and four wedges of nothing appear at the corners. There is no picture data there, because your camera never recorded any. The Empty corners drop-down decides what happens to them, and it only comes into play when the angle is not a plain quarter turn.
Crop them away is the first option and the recommended one. The tool cuts inwards to the largest rectangle that contains only real picture, so the result has no gaps at all. It is very slightly smaller than the original, which is the price of a level horizon.
Expand canvas, leave transparent grows the frame to hold the whole tilted rectangle and leaves the corners see-through, so save it as PNG; a JPG cannot store transparency and fills them instead. Expand canvas, fill with colour paints the wedges in, and reveals a Corner colour well, set to white, for matching a page background. Keep original size holds the frame as it was, gaps and all.
Reading the numbers before you save
Three small readouts sit in the panel: Original, Output and Mirrored. Original is the measurement of the file you loaded. Output is what you are about to produce, and it updates the moment you change anything, so you can see the cost of a decision before you commit to it.
Watch those two together and the corner setting explains itself. Rotate an upright picture by a quarter and the numbers trade places. Tilt it a couple of degrees with cropping on and the output shrinks. Choose to expand and it grows, because the frame must stretch to hold the corners. None of it is guesswork.
Doing a whole folder at once
Load several pictures and a row of thumbnails appears under the main view. Click any of them to bring it up and work on it. Each picture keeps its own settings, so you can fix a set individually if they need different treatment.
When they all need the same treatment, which is normal for a batch of scans, set the first one up and press Apply to all. The same turn, mirror and angle are copied across the set. Click through the thumbnails to check, and adjust the odd stubborn one by hand. Then Save all as ZIP hands you a single archive containing every finished picture. Reset puts the current picture back to how it arrived, Add more brings in extra files, and Clear all empties the workspace.
A leaning seafront, levelled
Take a holiday photo, 4032 by 3024, where the horizon drops slightly to the right. Drop it on the page. Original reads 4032 by 3024 and Output reads the same, since nothing has been done yet.
The sea leans down to the right, so the picture needs turning anticlockwise. Drag the fine angle slider to minus 1.0 and look at the horizon against the top edge of the panel. Still a touch low on the right, so type minus 1.4 in the number box instead. Now it sits level. The grey note about quarter turns being free has disappeared, which is correct, because you are no longer doing a quarter turn.
Leave Empty corners on Crop them away. Output now reads roughly 3930 by 2947, a little smaller, with no gaps anywhere. Set Save as to JPG, leave Quality at 92, and press Save image. The file arrives with rotated added to its name, sitting next to the leaning original, which is untouched.
Saving, and the format choice
Save as offers the original format, JPG, PNG or WebP, and there is one case where the choice is forced. If you asked for expanded transparent corners, only PNG will keep them, and the drop-down says so beside that option. Everything else is a matter of taste and file size.
The Quality slider runs from 30 to 100 and opens at 92, which is high enough for anything short of print work. It has no effect on PNG. One habit is worth forming: always start from your original file. Rotating a JPG you already saved compresses it again, and while one round is invisible, five are not.
Things that trip people up
The problems here are mostly about expectations rather than the controls.
- The corner setting appears to do nothing. It only applies to tilted angles. At a plain quarter turn there are no gaps for it to deal with.
- White triangles turned up in the corners of the saved file. The corners were left transparent and the picture was saved as JPG. Choose PNG, or switch the setting to crop the corners away.
- The straightened picture came out smaller. That is cropping doing its job. There is no way to keep every original pixel and have no gaps; something has to give.
- A photo looks upright in one program and sideways in another. Saving it here writes the orientation into the picture itself, so every program agrees from then on.
- The batch buttons are missing. They only appear once two or more pictures are loaded.
When you want a different tool
This page turns whole pictures. It does not cut pieces out of them, beyond the automatic corner trim, and it does not change how many pixels they contain. If the framing is what bothers you, crop. If the file is simply too large for a website, resize. If the building leans because you were standing close and pointing up, that is perspective rather than rotation, and a slider that spins the whole frame will not correct it.
One sensible order of work: straighten first, then crop, then resize last. Straightening trims the edges anyway, so cropping afterwards means you frame what is actually left rather than guessing at it.
Nothing leaves your machine
Every turn, mirror and tilt on this page is calculated by your own browser. Your pictures are read from your own disk, drawn onto a canvas in the page, and saved back to your downloads folder. No copy is sent out, no account is involved, and the page keeps nothing once the tab is closed.
That fits what this tool gets used for. Sideways scans of old family albums, paperwork photographed at an angle, documents that need turning before anyone can read them. Those are the files you would rather not hand to a stranger's server just to spin them ninety degrees.