
Swapping a picture from one file type to another
File types are the plumbing of pictures, and you only notice them when something refuses to open. This piece explains what the four destination types are actually good at, walks through every switch in the settings panel, shows what the page does about see-through areas, vector drawings and moving pictures, and runs two real jobs end to end.
How a picture ends up in the wrong type
Nobody chooses a file type on purpose. Your camera picked one, a designer picked another, a download picked a third. The trouble starts when some piece of software has an opinion. An upload form takes JPG and PNG and nothing else. An old viewer opens a downloaded file as a blank grey square. A shop wants small files so its pages load quickly.
The picture itself is fine in every one of those cases. Only the wrapper is wrong. Changing the wrapper is all this page does, and it does nothing else on purpose: the size of the picture in pixels is left exactly as it was.
What you can put in
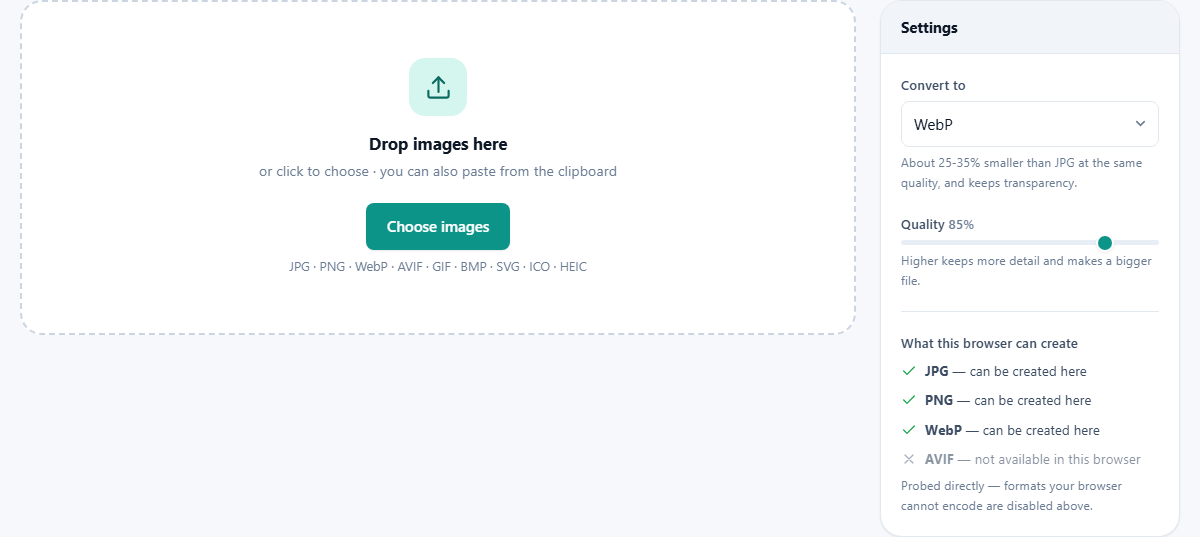
The drop box takes JPG, PNG, WebP, AVIF, GIF, BMP, SVG, ICO and the HEIC files that phone cameras make. Drag them in, click to open a picker, or paste from the clipboard. A single file is fine and so is a folder full of them, and they do not have to match: a batch can be half screenshots and half camera shots and it will not mind.
Once files are in, Add more brings up the picker again and Clear all empties the workspace. Nothing you do here alters your disk. Every original stays where it was, at the size it was.
The four destinations
Convert to holds the whole decision, and a line of text under it describes whichever entry you have chosen. JPG is the safe answer for photographs. It is understood by everything ever made, and it cannot record see-through areas. PNG loses nothing at all, keeps transparency, and pays for both with a file that is often several times larger on a photograph.
WebP is the modern middle ground: roughly a quarter to a third smaller than JPG at a matching quality, and it keeps transparency too. AVIF squeezes hardest of all, but it takes longer to write and is not understood everywhere yet. If you have no strong reason to choose, WebP for your own web pages and JPG for anything you are sending to a stranger will serve you well.
The panel that says what your browser can write
At the foot of the settings sits a short list headed What this browser can create, with a tick or a cross beside each of the four types. This is not a guess from a table of browser versions. When the page loads it quietly asks your browser to write a tiny picture in each type and watches whether it comes back correct.
Anything that fails is switched off in the Convert to list and labelled as unsupported, so you cannot pick it by mistake. The list opens on WebP where the browser can write it. Reading a type and writing one are different skills, which is why a browser can show you an AVIF and still not be able to make one.
Quality, and when it vanishes
The Quality slider runs from 20 to 100 and starts at 85. Higher keeps more of the fine detail and gives a bigger file, and the useful range for photographs sits somewhere between 75 and 90.
Choose PNG and the slider disappears from the panel altogether. That is correct rather than broken. PNG stores every pixel exactly as it found it, so there is no dial to turn: it either fits in the file or the file grows. The slider comes back the moment you pick a type that trades detail for size.
See-through areas, and the colour that replaces them
When a file is added, the page examines it for see-through pixels and marks any it finds with a small transparent tag in the list. If you then aim at a type that cannot hold transparency, a banner appears above the files warning you that those areas are about to be filled in.
That is what Background behind transparency is for. It shows up only when it is needed: click the swatch and pick whatever the empty parts should become. Match the shade of the page a logo is going onto and the join will not show. To keep the transparency instead, aim at PNG or WebP and the swatch goes away.
A drawing has no size until you give it one
SVG is not a grid of pixels at all. It is a set of instructions for drawing shapes, which is why a logo in that form stays sharp at any size. To turn it into an ordinary picture, somebody has to decide how large that picture is.
That is the field called Rasterise SVG at, which takes a width in pixels from 16 up to 10000 and starts at 1024. The height follows the drawing's own proportions. The field only appears when there is an SVG in the list. Pick the width you actually need: a slide wants something around two thousand, a small icon far less. A drawing that pulls in outside files or fonts may refuse to render, and the page says so rather than writing out a broken picture.
Moving pictures stop moving
Add a GIF and a notice appears explaining what will happen. If the GIF is animated you will get one still frame, because not one of the four destinations can store a sequence. This is stated up front rather than discovered later, and the file gets an animated tag in the list so you cannot miss which one it is.
If keeping the motion is the point, converting to a still type is the wrong move entirely and no setting here will help. That job belongs to a video tool.
The preview, and what the list tells you
Above the file list sits a preview of the first picture in the batch, drawn on a chequered backdrop so any see-through parts are obvious. Underneath it, a line reports the type you came from, the type you are going to, the old size, the new size and the change as a percentage. The picture is really encoded to get that figure, so it is not an estimate.
The list itself carries a row per file with its name, its current type, its dimensions and its weight. After a run, each row shows the swap it made and what it cost or saved. Save writes one file. Download all as ZIP appears once two are finished and packs the set into one archive.
A worked example: twenty-four product shots
A designer has sent 24 product photographs as PNG files, about 3.4 MB each, because PNG is what the export dialog was set to. They are going on a shop page, where that is a poor choice: eighty megabytes of pictures on one page is a slow page.
Drag all twenty-four in. The summary line confirms the count and the total. Set Convert to WebP, leave Quality on 85, and check the preview line on the first photo, which will typically report a drop of well over ninety percent. Press the button, now reading Convert to WebP, and watch the bar move along.
Each row comes back with its saving beside it, and the total for the batch sits at the top. Take the ZIP rather than saving twenty-four files by hand. If any of the photos had soft, gradual backgrounds, open one at full size first and look for banding, since that is where a quality setting shows itself soonest.
A smaller job: one logo, two sizes
The second common job is a single vector drawing that has to become an ordinary picture. Drop the SVG in. The panel grows its extra field, and the vector tag appears on the row.
Type 2048 into Rasterise SVG at, set Convert to PNG so the space around the logo stays clear, and press convert. Save the result. Then change the width to 512, press convert again, and save that one too. Two runs, two files, both crisp, because each one was drawn fresh from the instructions rather than shrunk from the other. Shrinking a picture of a logo always costs a little sharpness. Drawing it again costs none.
Things that catch people out
Most surprises here come from expecting the page to do a job it deliberately leaves alone.
- The file got bigger. You aimed a photograph at PNG. Photographs belong in JPG, WebP or AVIF.
- My logo now has a white box round it. The target could not hold transparency and the background colour filled it in. Go back to PNG or WebP, or set the swatch to match the page.
- The picture is still too heavy for the upload limit. Converting alone rarely hits a set number. The Image Compressor can aim at an exact file size.
- It is the same number of pixels as before. That is by design. Nothing here resizes; that is the Image Resizer's work.
- Converting a blurry JPG to PNG did not sharpen it. Nothing can put back detail that was thrown away earlier. You have simply stored the damage perfectly.
When another page fits better
Reach for the Image Resizer when the dimensions are the problem, and the Image Compressor when a number in kilobytes is the problem. If your files came off a phone and will not open anywhere, HEIC to JPG is the page built for exactly that complaint.
One last piece of advice about direction of travel. Always convert from the best copy you own. Each trip through a type that trades detail for size takes a little more away, and going back afterwards never returns it.
Your files stay on your machine
Reading, redrawing and re-encoding all happen inside the browser tab, using your own processor. No picture is sent to a server, there is nothing to sign up for, and no watermark is added to anything. You can pull the network cable out after the page has loaded and the batch will still convert.
Two things follow. Speed depends on your own machine rather than a queue, so a large batch simply works through steadily. And the hidden notes attached to a photo, including where it was taken, are dropped when the new file is written.