
Making a picture file lighter without wrecking it
Something has refused your photo for being too heavy, and now you need it smaller. This article takes the compressor apart one control at a time, explains what each number really does to the pixels, and runs two complete jobs through it with figures you can compare against your own. It finishes with the cases where squeezing a file is not the fix you actually want.
The three situations that send people here
Nobody sets out to compress a picture for fun. You come here because something said no. A council form will not accept a photo over 200 KB. An email refuses the five holiday shots you attached to it. A web page you built crawls on a phone, and the reason is one enormous banner picture sitting at the top of it.
Underneath, all three are the same problem. Phone cameras save far more picture than most jobs need. A single frame can be four thousand pixels across and several megabytes heavy. That is wonderful for printing and wasteful for everything else. Compressing keeps the picture and drops the weight.
Getting your pictures in
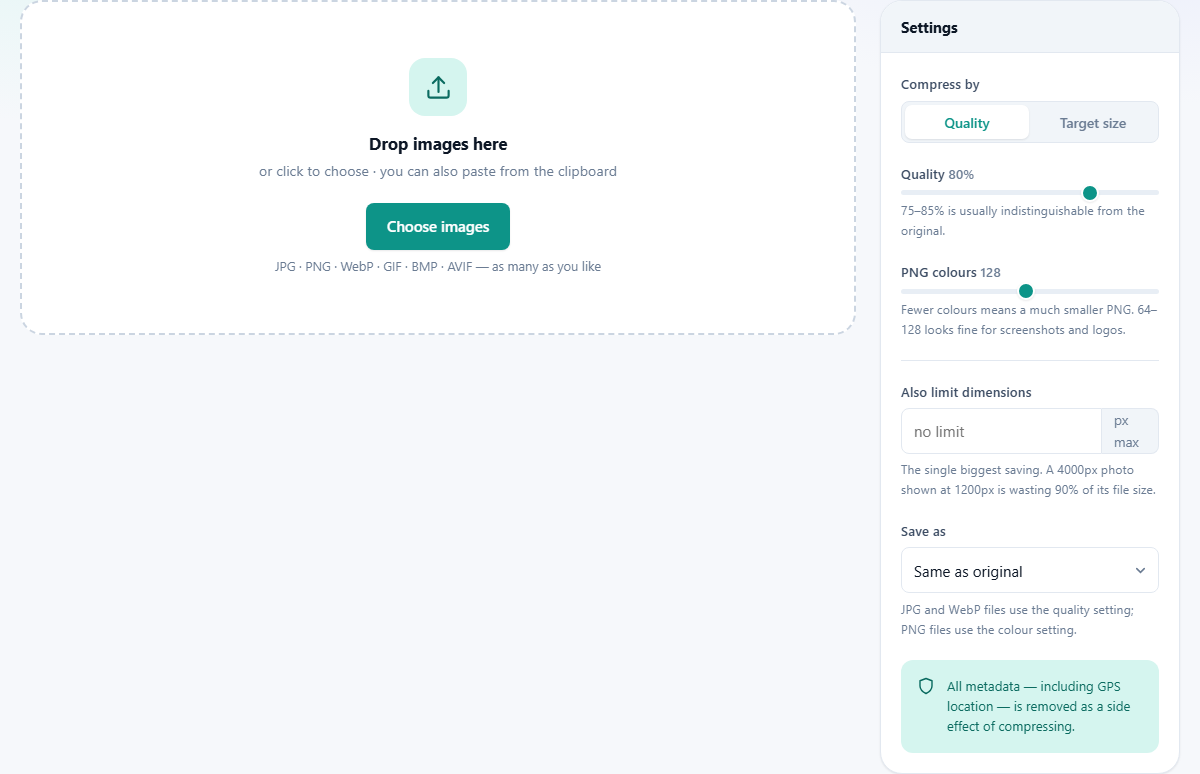
The drop zone in the middle of the page takes files three ways. Drag them over from a folder, click it to open the usual file picker, or paste a picture straight from the clipboard. That last route is handy for a screenshot you have just taken and never saved.
It reads JPG, PNG, WebP, GIF, BMP and AVIF, and there is no cap on how many go in at once. Add more tops the batch up and Clear all empties the list. Neither button touches the files on your drive. The page works on copies held in memory, so your originals survive every experiment.
Two ways to aim
At the top of the settings panel sits a control marked Compress by, with two buttons: Quality and Target size. They ask two different questions, and it is worth knowing which one you are asking.
Quality means you set the dial and accept whatever size comes out. Target size means you state the size and let the page work out the dial. Choose Quality when you care most about how the picture looks, and Target size when a rule says the file must come in under a certain number.
The Quality slider
In Quality mode a slider appears, running from 20 up to 100, and it starts at 80. The number is not a percentage of anything you can see. It tells the encoder how much fine detail it is allowed to discard while writing the new file.
The advice printed under it is sound. Between 75 and 85 you will struggle to tell the result from the source. Below 60, flat areas such as skies and skin begin to show blocks and bands. Above 90 the file grows fast and the gain is mostly invisible. This slider governs JPG and WebP output only.
PNG colours, which is a completely different lever
PNG never loses detail, so there is no quality to lower. What makes a PNG heavy is the sheer number of distinct colours in it. That is what the PNG colours slider controls, from 8 up to 256, in steps of 8, starting at 128.
The page rebuilds the picture using only that many colours, picked to suit the image in front of it. On a screenshot, a logo or a chart, dropping to 64 or 128 can halve the file with nothing visible lost. Such pictures never had many colours to begin with. On a photograph the same move gives you ugly banding, which is your cue to save it as JPG or WebP instead.
Target file size, and what happens if it cannot be met
Switch to Target size and a number box appears, already set to 200, with a short list beside it offering KB or MB. Type in the ceiling you have been handed and press the compress button.
Out of sight, the picture is written out several times over, each attempt closing in on the best setting that still lands under your figure. That is why a target run takes a little longer than a plain quality run does.
Sometimes the number is out of reach. A twelve megapixel photo will not become a 30 KB file at any setting. The row is then labelled as having missed the target, and a message names the two moves that genuinely help: cap the dimensions, or switch to WebP.
Also limit dimensions, the control that does the heavy lifting
Below a dividing line sits a number box labelled Also limit dimensions, with px max printed after it and the words no limit showing while it is empty. It takes any figure from 16 to 20000. Whatever you type becomes the longest that any side of the picture may be, and the shrinking is done in proportion, so nothing ends up squashed.
This is where the real savings live, and it works in both modes. Halve the width of a photo and you quarter the number of pixels in it. Ask yourself how large the picture will ever be shown, then cap it a little above that.
Save as, and the colour behind transparency
The Save as list holds four entries. Same as original keeps a JPG a JPG and a PNG a PNG. The other three push everything in the batch to JPG, WebP or PNG. While the first option is chosen, both sliders stay on screen with a note explaining the split, because a mixed batch needs both.
Pick JPG and one more field appears: a colour swatch called Background behind transparency. JPG has no way to record see-through areas, so something has to fill them, and this is where you say what. If the graphic is headed for a dark page, set a dark tone here rather than finding a white box round it later.
What comes out, and how to read it
Each row in the list shows a thumbnail, the file name, the dimensions and the current size. After a run the row also carries the new size, the change as a percentage, and the new dimensions if your cap changed them. The heading above the list adds up the whole batch.
Two buttons appear on every finished row. Save writes that single file to your downloads folder. Compare opens a panel above the list holding your original on the left and the result on the right, split by a divider you drag across. Both sides are shown at full size. Once two or more files are done, Download all as ZIP gathers them into one archive.
A worked example: thirty-eight photos for a club page
The village fete pictures come off the camera at 4032 pixels wide, roughly 5 MB each, thirty-eight of them in all. They are going into a gallery on a club website where nothing is ever displayed wider than about eight hundred pixels.
Drag the whole folder into the drop zone. Leave Compress by on Quality and the slider at 80. Type 1600 into Also limit dimensions, which leaves the gallery room to show a larger version if a visitor clicks one. Set Save as to WebP. Press the button, which now reads Compress 38 images, and watch the bar cross the foot of the panel.
The heading settles at something like 190 MB down to 6 MB. Open Compare on the busiest picture, the one full of grass and leaves, since fine texture is where compression shows first. If that one holds up, the rest will. Then take the ZIP, unpack it, and upload the folder in one go.
A second run: one photo, one hard ceiling
The other shape of job is a single file and a rule. A registration page wants a portrait under 200 KB, and the phone has produced a 4.1 MB file.
Drop it in and press Target size. The box already says 200 and the unit list already says KB, so there is nothing to type. Add a dimension cap of 1200 as insurance, because a smaller picture reaches any target far more gracefully than a huge one squeezed hard. Press compress.
The row comes back at about 180 KB with the saving beside it. Open Compare and study the face rather than the background, since that is what a human being will look at. Press Save and upload the file. Your original sits untouched on the disk at full size.
Where people trip up
A handful of complaints come up again and again, and not one of them is mysterious.
- The file got bigger rather than smaller. You have almost certainly saved a photograph as PNG. Set Save as to JPG or WebP and run it again.
- A second pass did nothing at all. The picture has been through this before and there is little left to remove. Fetch the original file and compress it once, harder.
- The sky has turned into flat blocks. The quality is too low for that particular photo. Lift the slider, and take the weight out of the dimension cap instead.
- The PNG barely moved when I dragged the quality slider. It was never listening. Use the colours slider instead.
- The writing in my screenshot looks smeared. Sharp edges are the one thing JPG handles badly, so keep screenshots as PNG.
When another tool suits the job better
If the format is the only thing you want changed, the Converter is the simpler page for it. If you need a picture at a set width and height, the Resizer is built for that. If half the frame should go altogether, crop it first, because cropping sheds weight for free.
And please do not run your whole photo library through this. Compression is a one way trip, and the detail it removes has gone for good. Squeeze the copies that travel, and keep the originals whole.
Nothing is sent anywhere
Every step above happens inside your own browser, on your own processor. No picture is uploaded, no account is asked for, and no copy waits on a server to be deleted later. Load the page, switch your network off, and it carries on working, which is the plainest proof anyone can offer.
One side effect is worth knowing about. Writing a fresh file drops the hidden notes a camera attaches to a photo, including the spot where the shot was taken. The settings panel says so on screen. If you are posting a picture of your own front door, that is a quiet privacy win.