
Choosing the right pixel size, and getting there without surprises
Almost everyone who resizes a picture is trying to satisfy someone else: a form with a size cap, a website that loads too slowly, a printer, an email that keeps bouncing. This article explains what the three modes really do, goes through every field in the settings panel, walks a batch of camera photos through the page, and clears up the one setting that catches nearly everybody.
Two different meanings of the word big
A picture has two sizes and they are easy to muddle. One is its measurement in pixels, say 4032 across and 3024 down. The other is how much room the file takes on disk, say 4.8 megabytes. Cutting the first usually cuts the second, but they are not the same thing and they are not controlled by the same setting.
So read the requirement before you touch anything. A note saying maximum 1600 pixels wide is about measurement, and this page answers it exactly. A note saying under 2 MB is about file weight, and although shrinking the measurement gets you most of the way there, the tool aimed at a weight target fits better.
Loading files in
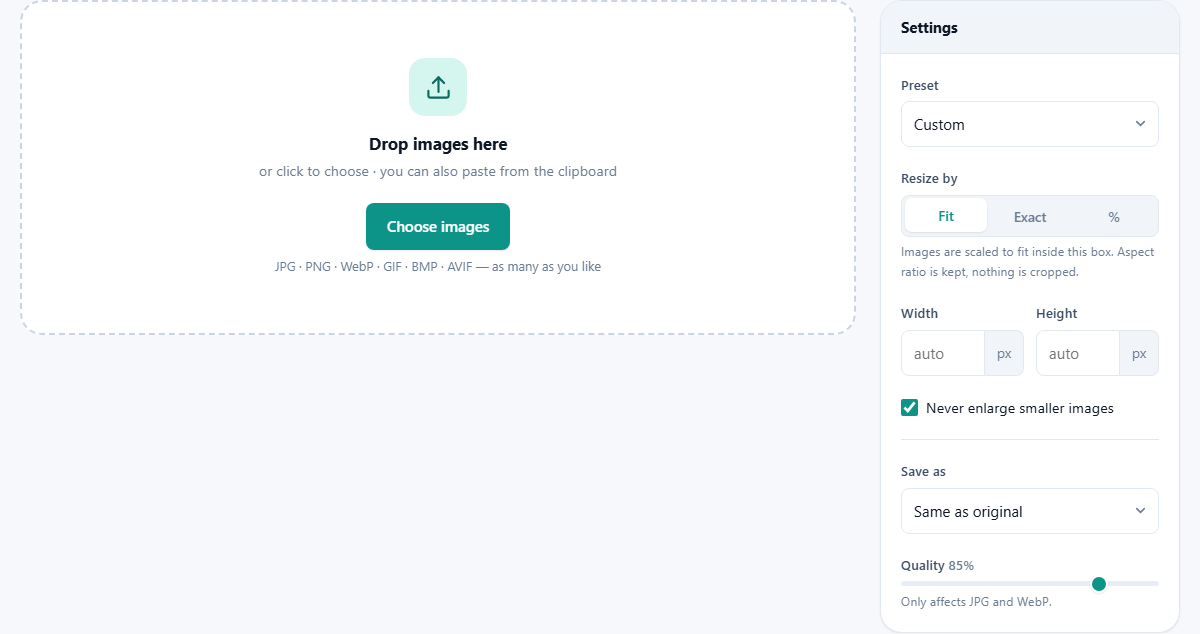
The drop area accepts a drag from a folder window, a click to open the file browser, or a paste from the clipboard. It takes JPG, PNG, WebP, GIF, BMP and AVIF files, plus the HEIC pictures modern phones save. There is no cap on how many you add.
Once loaded, a list appears with a running summary at the top. Add more tops the list up without disturbing what is already there. Clear all empties it. A preview panel shows one picture at its true size so you can judge sharpness rather than trusting a shrunken thumbnail. None of this alters anything on your disk; the page is only working with copies held in memory.
Fit, Exact and percent
Resize by is a three-way switch and it is the most important control on the page. Fit treats the numbers you type as a box. Every picture is shrunk until it sits inside that box, with its shape untouched and nothing trimmed off. Feed it a mixture of upright and sideways photos with a 1600 box and each one comes out with its longest side at 1600. This is the setting most people want most of the time.
Exact aims for the precise numbers you type. Percent ignores the width and height fields entirely and scales every picture by a share of its own size, so a 4000 pixel photo and a 800 pixel one both shrink by the same proportion and end up at very different sizes. Percent is the one to pick when you simply want everything smaller and you do not care about matching a specific target. A short line of grey text under the switch reminds you what the current choice means.
Width, Height, Scale to, and the ratio tick
In Fit and Exact modes you get two number fields, Width and Height, both measured in pixels and both accepting values up to 30000. They start empty, showing the word auto. That word is meaningful: leave one blank and the tool works it out from the other while keeping the shape. Typing 1200 into Width alone is a perfectly good instruction.
Switch to percent and those fields are replaced by a single box labelled Scale to, which takes anything from 1 to 500 and starts at 50. Half size, in other words.
The tick box labelled Keep aspect ratio only appears in Exact mode, and here is the part that catches people. Leave it ticked and the picture is scaled to fit within both of your numbers without distortion, which means you may not land on those exact numbers at all. A 3:2 photo asked for 1080 by 1080 comes out 1080 by 720. Untick the box and it really is forced to 1080 by 1080, but the picture is stretched to get there and everybody in it gets slightly fatter or thinner. Neither answer is wrong; you just need to know which one you asked for.
The ready-made sizes, and the enlarge guard
The Preset drop-down at the top fills the fields for you. It holds the common web widths, from a small thumbnail up to full high definition and 4K, plus familiar social sizes: a square post, an upright full-screen story, a wide video thumbnail, a page banner and a profile picture. Choosing one sets both the mode and the numbers at once. Custom leaves you in charge, and typing your own numbers returns the list to Custom.
Below the fields sits Never enlarge smaller images, ticked when the page opens. Leave it that way. It means a picture that is already smaller than your target is passed through at its own size instead of being blown up. Enlarging cannot add detail that was never recorded, so all it produces is a soft, mushy version of a small picture in a large file. The guard exists because a mixed folder almost always hides one or two small images you had forgotten about.
Format, quality and the background well
Save as offers four choices: keep whatever the original was, or convert to JPG, PNG or WebP. JPG makes the smallest files for photographs and cannot store see-through areas. PNG throws nothing away and holds transparency, but produces very large files from photographs. WebP is the modern middle path, usually noticeably smaller than JPG at the same visible quality, and every current browser reads it.
The Quality slider runs from 30 to 100 and starts at 85. It only has any effect on JPG and WebP, and the page hides it when you choose PNG. For photographs going on a website, 85 is a good place to sit; drop to 70 if size matters more than perfection, and go above 90 only when someone will inspect the picture closely.
One more field appears only when it is needed. Choose JPG while your pictures contain transparent areas and a colour well labelled Background behind transparency turns up, set to white. JPG has no way to store see-through pixels, so something must fill them, and this is where you decide what.
What comes out
Press Resize images and a progress bar tracks the job. Pictures are handled one after another rather than all at once, which is why a folder of a hundred large photos does not exhaust the memory on a modest laptop. Each finished file appears in the list with its own download link.
The new files are named after the originals with the new measurement added, so a file called harbour becomes harbour-1920x1280 and you can tell the two apart at a glance in a folder. When you have more than one, a Download all as ZIP button appears and packs the lot into a single archive. Do note that saving a fresh file drops the hidden information the camera wrote into the original, such as the camera model and the location. For pictures going onto the public web that is usually a bonus rather than a loss.
Forty holiday photos for a website
Here is the job in full. You have forty photos straight from a camera, each about 6000 by 4000 and roughly 8 MB, and they are going into a gallery page that is currently crawling.
Select all forty in your folder window and drag them onto the page. The summary confirms the count. Choose the full high definition preset from the list, which switches the mode to Fit and puts 1920 in both fields. That gives you a 1920 box: the upright shots come out 1280 wide by 1920 tall, the sideways ones 1920 by 1280. Leave Never enlarge smaller images ticked, in case an old phone picture crept into the set.
Set Save as to WebP and pull Quality down to 80. Press Resize images. The bar fills, and forty files appear, each around 200 KB instead of 8 MB. Press Download all as ZIP, unpack it, and upload. The gallery that took twenty seconds to load now takes one, and your original camera files are sitting untouched where they always were.
The mistakes that come up again and again
Five things account for most of the confusion on this page.
- The file got bigger, not smaller. You converted a photograph to PNG. Choose JPG or WebP for photographs and save PNG for logos, screenshots and drawings.
- Nothing happened when you pressed the button. Both number fields were empty. The tool needs at least one of them to know what you are asking for.
- The picture looks squashed. You are in Exact mode with the ratio tick cleared. Tick it again, or crop the picture to the right shape first and then resize.
- It is still over the upload limit. That limit is about file weight, so lower the quality slider as well, or use the compression tool that aims at a weight target directly.
- You resized something that was already small and it now looks soft. Undo by going back to your original and starting again, and keep the enlarge guard ticked.
When a different page is the answer
Resizing keeps the whole picture and changes how many pixels it is made of. If you want to throw part of the picture away, that is cropping, and it is a separate page. If you want to keep every pixel exactly as it is but make the file lighter, that is compression. And if the picture is the wrong shape for a slot, resizing alone will never fix that; crop it to shape first, then resize the result.
A rule of thumb worth remembering: crop for what is in the frame, resize for how many pixels, compress for how many bytes. Most jobs that feel complicated are really two of those in a row.
No upload, no queue, no waiting
Everything on this page is done by your own browser using your own processor. The pictures are read from your disk, worked on in memory, and written back out as downloads. Nothing is sent anywhere at any point, which you can prove by loading the page, disconnecting from the internet, and carrying on as normal.
There is a practical bonus beyond the privacy. With no upload and no results to fetch back, the speed rests on your machine rather than your connection. A folder that would take minutes to push to a server finishes here in seconds, with no daily limit, no account and no watermark at the end.