
Turning a folder of photos into one sheet you can point at
A grid of small pictures with names under them is one of the oldest useful objects in photography, and it still solves problems that no folder of files can. This article explains what each setting in the rail does to the finished sheet, does the arithmetic that decides how big that sheet will be, builds a real one from a client shoot, and says plainly where this page stops being the right choice.
Why anyone still makes these
The value of a sheet like this is that it turns a folder into a thing you can point at. A photographer sends one image to a couple and gets back a message saying numbers seven, nine and twenty-two, which is a conversation that cannot happen over a shared folder of thumbnails that everybody scrolls differently.
The other uses are quieter but just as common. A record of what is in a box before it goes into the loft. A page for the front of a photo album. One picture you can attach to an email so somebody sees the whole shoot without downloading it. Anything where the point is the overview rather than any single frame.
Getting the shoot onto the page
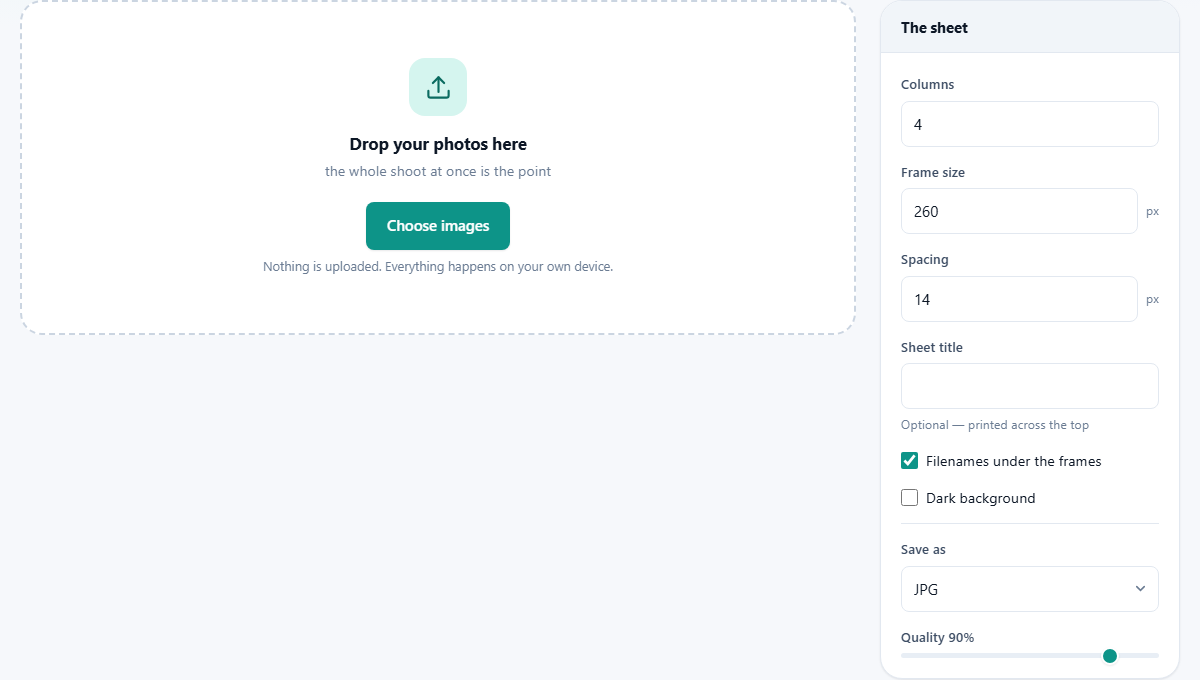
Drop the photos into the box, or click it and pick them in the file dialog. A whole shoot at once is the intended way to use it. As soon as the first batch lands, the empty box is replaced by a live drawing of the sheet, and every change you make afterwards redraws it within a moment.
Two small buttons sit beside the heading. Add more opens the picker again and appends to what is already there. Clear throws the lot away and gives you the empty box back, with no undo behind it.
Columns, and why it is the first thing to set
Columns takes any whole number from 1 to 12 and starts at 4. It is the only setting that changes the shape of the page rather than its detail. With a fixed pile of photos, more columns means fewer rows, so the sheet grows wide and short. Fewer columns means more rows, so it grows narrow and tall.
Match it to where the sheet is going. Four or five columns give a tall page that suits paper. Eight or more give a wide page that suits a screen or a slide. With twelve photos, three or four columns fill the grid neatly and leave no gap at the end.
Frame size, measured in the finished picture
Frame size runs from 80 to 800 and moves in tens, starting at 260. The number is in pixels of the sheet you are about to save, not pixels on your screen, so raising it makes the saved image genuinely larger and more detailed rather than just looking bigger in the preview.
Every frame is a square, and each photo is placed inside its square whole. Nothing is cut off. A landscape shot leaves a strip above and below, a portrait leaves strips at the sides, and a square shot fills its frame exactly. That is why a mixed set still lines up in tidy rows instead of stepping about.
Spacing, and the border you did not ask for
Spacing goes from 0 to 80 in twos and starts at 14. It is the gap between one frame and the next, and it is also the margin around the whole sheet, so raising it pushes the grid away from the edges as well as loosening it.
Set it to zero and the frames touch, which reads as a solid block and can look striking. Around 10 to 20 suits most sheets. Above 40 the page feels like a gallery wall, which is lovely for a small set and wasteful for a large one.
Sheet title and filenames
The Sheet title box is empty on purpose. Type anything in it and the words are drawn across the top of the sheet in bold, in a band that grows with the frame size so it never looks lost. Leave it empty and no band is drawn at all, and the grid starts at the top. A date and a place is usually the most useful thing to put there.
Filenames under the frames is a tick box, and it starts ticked. Each frame gets its file name printed beneath it in small type, and very long names are shortened so they cannot spill over their neighbours. Turn the labels off for a sheet meant to be looked at. Leave them on for a sheet meant to be replied to, because a label is the only way somebody can tell you which picture they mean.
Dark background
The second tick box swaps the sheet from a white page with pale frames to a near black page with dark grey frames, and lightens the title and label text to match. It is off to begin with.
Dark suits a sheet that will only ever be looked at on a screen, especially in a dark room, where photos seem to glow against it. White suits anything you are going to print, both because it looks like a page and because a dark sheet of A4 uses an alarming amount of ink.
The line above the preview, and the sums behind it
Above the picture, a line reports how many photos you have and how large the finished sheet will be, in pixels. It updates on every change, which makes it the most useful thing on the page. Watch it while you drag the frame size around and the cost of your choices becomes obvious.
The arithmetic is simple enough to do in your head. The width is the columns multiplied by the frame size, plus the spacing once for every gap and once for each outside edge. The height stacks the rows up the same way, with a little extra under each frame for its label and a band at the top if you set a title.
Saving it
Save as offers JPG or PNG, and JPG is chosen already. For a sheet of photographs JPG is right: the file is a fraction of the size and nobody will see the difference. PNG is worth the extra weight only if the sheet is mostly flat colour, or if the labels must stay perfectly crisp for someone reading them closely.
The Quality dial runs from 40 to 100 in steps of two and sits at 90. It only has an effect on a JPG. At 90 the sheet is clean. Down at 60 the file shrinks a lot and small labels start to look soft, which matters here more than it would on a single photo. Download the sheet then writes one ordinary image file to your downloads folder.
A worked example: forty-eight frames for a client
Say you have 48 photos from an afternoon shoot and the client has to choose six. Drop all of them in. Set Columns to 6 and Frame size to 220, which is small enough to keep the sheet manageable and large enough to tell two similar frames apart. Drop Spacing to 12. Type a title such as Hall wedding, first look, 12 March. Leave the filename labels on, because they are what the client will quote back at you.
The line above the preview now reads 48 photos and a sheet of 1404 by 2076 pixels. Six columns across 48 photos gives eight full rows, so there is no ragged gap at the end. Leave Save as on JPG and Quality on 90, press Download the sheet, and attach the single file to your reply. The client scrolls once, not forty-eight times.
Printing one
The sheet is a plain image, so printing it is whatever your computer normally does with a picture. A page around fourteen hundred pixels wide fills a sheet of A4 at roughly one hundred and seventy dots per inch, which is coarse for a photograph and perfectly good for an index.
If you want a crisper print, raise the frame size rather than the quality. More pixels in the frames is the only thing that puts real detail on paper. Printing borderless is worth doing too, since the sheet already carries its own margin.
The things that catch people out
None of these are faults in the sheet. They are all decisions made earlier than you expected.
- The photos are in the wrong order. They are placed in the order they arrived, left to right and down. Add them in the order you want, or rename them first with the Bulk Renamer so the file picker hands them over sorted.
- The sheet came out gigantic. Frame size and columns multiply. Halve the frame size before you touch anything else, and watch the size line as you do it.
- Nothing renders at all past a certain size. Browsers refuse to build a picture beyond a few thousand pixels on a side. Fewer columns or smaller frames brings it back.
- Somebody replied asking about the one with the red door. The labels were turned off. Tick them back on and send it again.
- A portrait photo has grey strips beside it. That is the square frame doing its job. Nothing has been cropped, and that is deliberate.
When another page is the better one
This makes an index, not an artwork. If you want the pictures to fill their spaces edge to edge with no gaps and no labels, that is a Collage Maker job. If you are trying to decide which frames to keep rather than which to show, the Blurry and Duplicate Photo Finder does that work directly instead of asking your eyes to do it.
And if what you actually need is a set of small copies of each photo as separate files, this is the wrong shape of answer entirely. A sheet is one image. Resizing a batch is a different tool.
The shoot stays on your machine
Every photo you drop in is read, scaled and drawn by your own browser, and the sheet is built in your computer's memory. Nothing is sent to a server, which is why a hundred photos take a few seconds rather than the long wait an upload would cost.
That matters for the work this page usually does. Client photos before delivery, family pictures, a record of what is in your house for insurance: none of those should have to be handed to a website just to make a grid out of them. Close the tab and nothing is left behind.