
Navigating the Current in Undertow
This guide explains the drift mechanic at the heart of the puzzle, how shells and the move budget work, and the techniques that let you ride the water instead of fighting it.
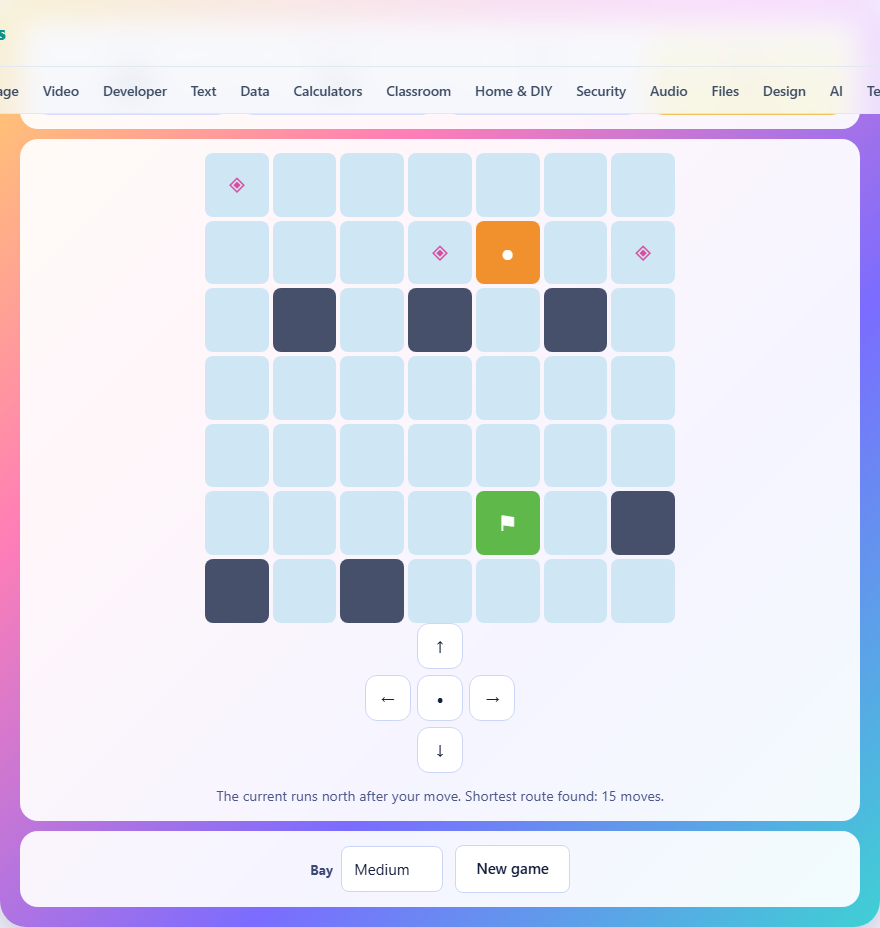
How a turn works
Every turn has two halves. First you choose a direction to step: north, east, south, or west. Then the current sweeps you one more square in whatever direction it is currently facing. Your step happens first, the drift happens second, and the result is where you end up. If you choose to hold still instead of stepping, the drift still happens, so holding still does not mean staying put. It means letting the water carry you one square for free.
The current rotates a quarter turn every turn, always in the same order: north, then east, then south, then west, then back to north. The direction for the coming drift is shown on the scoreboard before you move, so you always know what the water will do after your step. Planning the pair together, your step and the drift, is the core skill of the game.
Rocks, shells, and the bay mouth
Rocks block both you and the current. If your step would take you into a rock, you stay where you are. If the drift after your step would push you into a rock or off the edge of the grid, the drift is cancelled and you stay where your own step left you. This means rocks are as much a tool as an obstacle. Tucking against one on the side the current is pushing from is how you hold your position when you need to wait.
Shells are scattered across the grid. You must collect every one before the bay mouth opens. Any time you end up on a shell, whether by stepping onto it or by drifting onto it, it is collected. The bay mouth is a green square. Reaching it before all shells are aboard does nothing. Once the last shell is collected, the mouth opens and stepping or drifting onto it ends the puzzle with a win.
Controls
Three input methods work at the same time. Arrow keys on a keyboard send you in the four compass directions. W, A, S, and D do the same thing for people who prefer that layout. The spacebar holds you still, letting the drift happen without a step. On a phone or tablet, a directional pad appears below the board with four arrow buttons and a centre dot button for holding still.
Every input counts as a turn. There is no way to undo a move. If you step the wrong way, the current has already shifted and your position has changed, so the puzzle is in a new state. You can still reach the goal, but the route will be different from the one you planned.
Bay sizes and move budgets
The Bay dropdown offers three sizes. Small gives a six-by-six grid with two shells. Medium is seven-by-seven with three shells. Large is eight-by-eight with three shells. The rock density rises slightly with each size, and the slack in the move budget drops from six extra moves on small and medium to five on large.
The move budget is the shortest possible solution plus that slack. Every board is verified before it is offered. A breadth-first search walks through every possible sequence of steps and holds across the full state, which includes your position, the current facing, and which shells you have already collected. Boards with no solution are thrown away, and so are boards that can be solved in fewer than six moves. The result is a puzzle that always has an answer and always feels like a puzzle.
Strategy: use the drift as a free ride
Most beginners fight the current, stepping against it or trying to ignore it. Strong play does the opposite. When the current is running in the direction you want to travel, hold still. One hold covers one square of distance and costs one move, the same as a step. But if you step in the same direction the current is going, you cover two squares for one move. Long crossings of open water are almost always made by combining your step with a friendly drift.
Before each move, check the current arrow. If it points the way you need to go, step that way and arrive two squares closer. If it points sideways, consider whether holding still and drifting sideways brings you nearer to a rock you can brake against on the next turn.
Strategy: step against the drift to wait
Sometimes the current is facing the wrong direction and you need to wait for it to rotate into something useful. Stepping one square into the current and letting the drift push you straight back leaves you exactly where you started. You have spent one move, but the current has rotated a quarter turn.
Since the cycle is four turns long, you know that whatever the current is doing now, it does again in four moves. If you need the current to face east and it currently faces north, one wait move turns it to east. If you need south, two waits. Counting in fours makes longer routes predictable, because you can plan which drift you want to arrive at each key square.
Strategy: plan shell order around the cycle
With three shells on the board, the order you collect them matters. A shell that is downwind of the current on turns one and two might be upwind by turn five. The cheapest route usually collects shells in an order that keeps the drift at your back as much as possible.
Before your first step, trace a rough loop through all the shells and the mouth. For each leg, check whether the current will help or hinder. If two legs both need an eastward drift and they are four turns apart, you can catch the east current on both. Rearranging the order to line up with the cycle often saves two or three moves, and on large boards that is the difference between clearing and running out.
A short worked example
Suppose the grid is seven by seven, the current starts facing north, and there are three shells scattered across the board. You begin in the bottom-left corner. The nearest shell is two squares to the right and one square up. The current arrow shows north.
You step east. The drift pushes you north. You end up one square right and one square up from where you started, covering two squares of useful distance for one move. The current now faces east. The shell is still one square to the right. You step east again. The drift pushes you east as well. You land on the shell and collect it, having covered two squares eastward in a single turn.
Two moves, one shell collected, and you have gained four squares of ground. That is the power of lining up your step with the drift. The rest of the puzzle follows the same logic: check the arrow, choose the step that combines with the drift to send you where you need to go, and use rocks to brake when the drift would carry you too far.
Common beginner mistakes
Forgetting to read the current arrow is the most frequent error. Every turn the drift happens whether you planned for it or not. Ignoring it means half your movement is random, and random movement burns the budget fast.
Heading straight for the bay mouth before picking up all shells is another common slip. The mouth only opens once every shell is aboard, so arriving early wastes the moves it took to get there and the moves it will take to leave and come back.
Underusing the hold button is the third. New players feel that standing still wastes a turn. In practice, a well-timed hold that lets the current carry you one square for free is often cheaper than two steps in the wrong direction followed by a correction.
Privacy and saved data
The entire game runs inside your browser. Nothing is uploaded, there is no account, and no server is involved after the page loads. Your best move count is stored in local storage on this device only. The page works offline once it has finished loading.