
Crossing the Causeway When the Ground Keeps Disappearing
Tidal is a crossing puzzle where the board changes underneath you every turn. The tide rises and falls on a fixed cycle, flooding low squares and clearing them again. This article covers the rules in full, how to read the gauge, when standing still is your strongest move, and how to plan a crossing that uses the water's rhythm instead of fighting it.
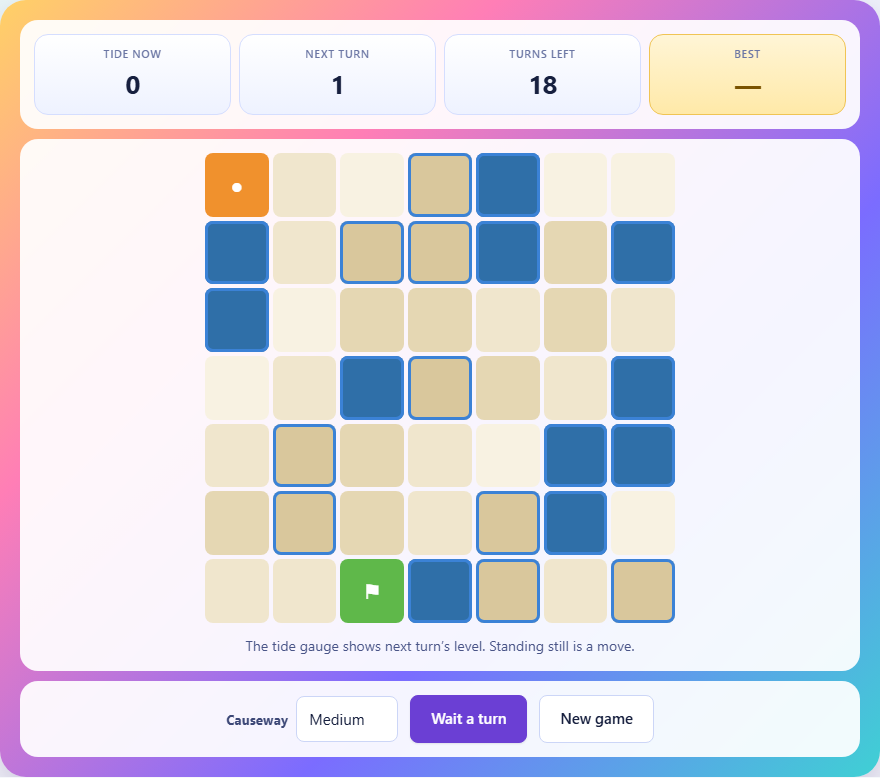
What the puzzle asks of you
You stand on one side of a grid. A green flag sits on the other side. Every square has a height, and the tide rises and falls through a repeating cycle. A square is safe to walk on only while its height sits strictly above the current water level. Equal height is not safe. You move one square per turn in any cardinal direction, or you stand still. Either way, the tide advances one step.
The goal is to reach the flag before your turn budget runs out. That budget is the shortest possible crossing plus a small number of extra turns. If you run out of turns before you arrive, the tide has beaten you.
Reading the board and the gauge
Squares are shaded by height. Tall squares are darker and harder to flood. Pale squares sit low and spend most of the cycle underwater. The scoreboard shows two numbers that matter: the tide level right now and the tide level next turn. Squares about to go under are outlined in blue, so you can see danger one step ahead.
The cycle repeats exactly. On the Small causeway it runs through four values. On Medium it runs through six. On Large it runs through eight. Once you know the pattern, you know exactly which turns a given square will be clear. Nothing in this puzzle is random after the board is built.
Controls and how to move
On a phone or tablet, tap the square you want to move to. It must be right next to you, up, down, left, or right. Diagonal moves are not allowed. On a keyboard, use the arrow keys or the W, A, S, D keys. Press Space to stand still for one turn.
There is also a Wait a turn button below the board. It does the same thing as pressing Space. The Causeway selector lets you pick Small, Medium, or Large, and New game generates a fresh board at your chosen size.
Why standing still wins games
In most grid puzzles, wasting a turn is a mistake. Here it is often the correct play. Suppose a row of low squares lies between you and the flag. Those squares are underwater for four of every six turns. You cannot sprint across them. But if you stand on a high square and wait two turns, the water drops and the path opens. Then you walk across in two or three turns before the water returns.
The game enforces this by refusing moves that would land you on a square about to flood. You cannot drown yourself by accident. The only way to lose is to spend too many turns waiting when you should have moved, or to move when you should have waited.
Planning around the tide cycle
The key insight is that the tide is a clock. Every square has a schedule of safe turns and flooded turns, and those schedules repeat. Before you move, count which turn of the cycle you are on and which turn you need to arrive at the low ground.
For example, if the cycle is six turns long and the low path is clear on turns one and two, you need to be standing next to it on turn zero. That means you might have to wait on a high square from turn four to turn zero. Three turns of apparent idleness, all of them necessary. The game's par time accounts for these waits, so a crossing that looks slow can still beat the shortest-path counter.
High ground as a waiting room
The tallest squares on the board never flood. They are always safe, and they are where you go when the water is high. Think of them as rest stops. A good crossing often involves reaching one high square, waiting for the water to fall, sprinting through the low section, and then reaching the next safe spot before the water comes back.
On harder boards the high squares are fewer and farther apart. That tightens the schedule. You may only have one safe turn to cross a gap of two or three low squares, which means the approach path to the high ground matters as much as the timing.
A worked example on a Medium board
Imagine a seven-by-seven grid. The cycle runs through levels zero, one, two, three, two, one. Your start sits at height four in the top-left corner. The flag sits at height four in the bottom-right. Between them is a valley of height-one squares that floods whenever the tide passes one.
Turn one: the tide is at zero, so every square is clear. You move south. Turn two: the tide rises to one, and the height-one squares go under. You wait. Turn three: the tide rises to two, flooding more squares. You wait again. Turn four: the tide is at three, its peak. You are safe on your height-four square. Turn five: the tide falls to two. Turn six: it falls to one. The valley opens. You move through two squares of the valley before the cycle starts again. That sequence of move, wait, wait, wait, wait, move, move is exactly what the puzzle is testing.
Common beginner mistakes
The most common error is rushing into the low ground as soon as it opens, without counting how many turns it takes to cross. If the path is three squares long and the water is only clear for two turns, you will be stranded on a square that floods next turn. The game will refuse that last step, and you will have wasted turns walking into a dead end.
Another mistake is ignoring the blue outlines. Those outlines mark squares that will be underwater next turn. Moving to such a square is blocked, but standing next to one that is about to flood means you might lose the return path behind you. Always glance one turn ahead before committing to a direction.
- Rushing into low ground without counting turns to cross
- Ignoring the blue flood-warning outlines
- Treating waiting as wasted time instead of a tactical move
- Taking a long scenic route over high ground when a timed shortcut through the valley would save turns
Difficulty levels and what changes
Small uses a six-by-six grid and a four-step tide cycle. The water alternates quickly, so windows are short but come around fast. Medium uses a seven-by-seven grid with a six-step cycle. The longer cycle creates more waiting but also longer windows. Large uses an eight-by-eight grid with an eight-step cycle and gives you fewer extra turns above the shortest path, so there is almost no room for error.
Every board is verified before it is offered. A breadth-first search checks every possible sequence of moves and waits, finds the true shortest crossing, and throws away any board that cannot be solved or that can be solved in fewer than six turns. Both your start and the flag sit on ground above the highest tide, so neither end can ever be underwater.
The missed window is not always fatal
Because the tide runs up and then back down, a low square clears twice per cycle: once as the water falls and once as it falls again on the next pass. If you miss one window, the next one comes a few turns later. This is built into the par time. The best crossing sometimes requires you to wait through one full cycle and catch the second opening rather than scramble for the first.
The game runs entirely inside your browser. No data is sent anywhere, and your best scores are stored on your own device. Once the page has loaded, you can play offline with no connection at all.
Scoring and what a good crossing looks like
When you reach the flag, the game shows how many turns you used and what the shortest crossing was. The shortest crossing is the true minimum, found by the breadth-first search that checked every possible sequence before the board was shown. If you match that number, you found the perfect route. If you beat the budget but used more turns than the par, you still win, though your score is higher than necessary.
Lower is better. The game tracks your best score per difficulty level. A strong player on Medium might cross in twelve turns where the par is ten. An expert finds the ten-turn route by memorising the cycle and not wasting a single wait. On Large, where the slack is only four extra turns, every move is a commitment.