
Why the boldest move wins when every attempt is against you
Why committing everything you can is provably the best plan when success is unlikely, how the board works out your true chance from every reserve, what the green and red readings mean, and how to judge a run where the result is partly luck and the choosing is not.
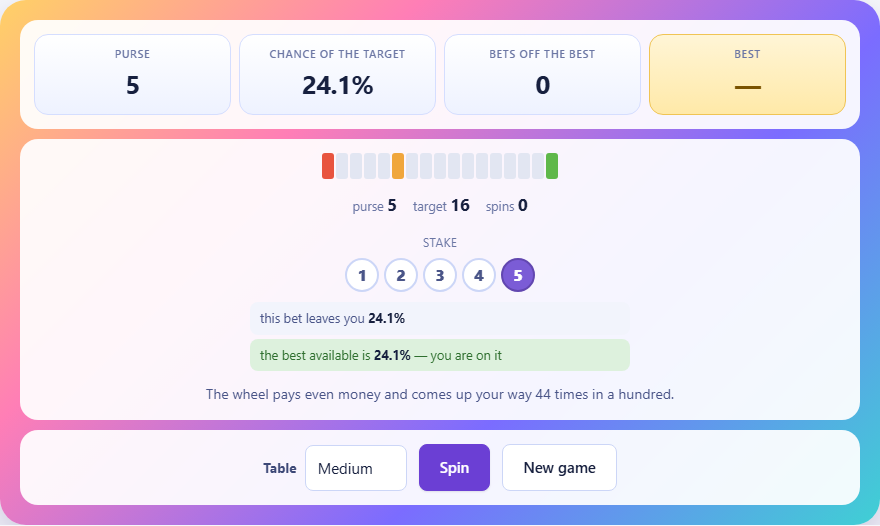
What the game asks of you
You hold a reserve of units. There is a mark you need to reach. Each attempt you choose how many units to commit. If the attempt works you get double the committed units back. If it fails those units are gone. Attempts work less than half the time. The task is to reach the mark before the reserve falls to zero.
The point that shapes everything is this: you are not being asked to come out ahead over many rounds. You are being asked to reach one number, once, starting below it. That changes which plan is right. The usual advice about small, steady steps only works when time is on your side. Here time is on the other side.
The three settings and what changes between them
The Setting menu offers three runs. Gentle puts the mark at eight, hands you a reserve of three, and each attempt works 45 times in a hundred. Standard moves the mark to sixteen, hands you five, and the rate drops to 44. Steep keeps the mark at sixteen, starts you at three, and the rate falls to 40.
As the setting hardens, your starting chance drops sharply. On Gentle, flawless choices give you a shade over 31 per cent. On Standard it is about 24 per cent. On Steep it is a little over one in ten. Those are honest numbers, not a design flaw. Every attempt is tilted against you and no plan can undo that. The most a plan can do is make the best of what is there.
The controls and how one attempt runs
A row of small buttons sits under the bar. Each one is an amount you may commit, from one up to the smaller of your reserve and the gap between the reserve and the mark. Tap a button to choose that amount. The button with the dashed edge is the full commit, the largest amount the rules allow you right now. Press Commit to run the attempt.
Two lines of text sit under the row. The first says what chance your chosen amount leaves you. The second says what the best chance from this reserve would be. When the two match, the second line turns green and tells you that you are on it. When your choice is worse, the line turns red and warns you that you are giving some chance away. The New game button starts a fresh run whenever you want one.
Why the biggest commit is the right one
Every attempt is tilted against you, so each extra attempt is one more chance for that tilt to show itself. The way to reach a mark under those terms is to face as few attempts as you can. That means committing everything you hold, or the exact amount that lands you on the mark, whichever of the two is smaller.
That is the full commit. It sounds reckless. It is not. Committing a single unit at a time is the reckless choice, because it hands the process a long run of attempts in which to wear you down. The full commit either lands on the mark or ends the run there and then. Against an attempt that fails more often than it works, that short, sharp shape is the best there is.
If the process ran in your favour, the opposite would hold. Then you would commit tiny amounts and let a long run of attempts carry the numbers your way. Length always helps whichever side the tilt favours. In this game it does not favour you.
How the board works out your true chance
For every reserve from zero up to the mark, the board works out the best possible chance of reaching the mark from there. A reserve of zero has a chance of zero. A reserve equal to the mark has a chance of one. Every reserve in between depends on the reserves you might land on, and those sit both above and below it.
That circular shape is why no single formula can be run once and be done. Instead the board fills a grid with rough guesses and then goes over it again and again, each pass using the numbers the pass before produced. After a few hundred passes nothing moves any more. The values have settled, and they agree to many decimal places. The method has a name of its own: value iteration.
With that grid in hand the board can judge any choice on the spot. It takes your amount, works out the chance after a success and the chance after a failure, weighs the two by the success rate, and compares the answer with the value it holds for the reserve you are on.
When two amounts are equally good
The full commit is always optimal. It is not always the only optimal choice. On a mark of sixteen, eight of the fifteen reserves have more than one amount that reaches the very best chance. From a reserve of five, amounts of one, three and five all tie exactly, while two and four fall short. The board paints every tied amount green.
This is why the score counts slips rather than daring. A slip is a choice that leaves you a smaller chance than the best on offer from that reserve. A small amount that ties with the full commit costs you nothing at all, so it is not a slip. The game marks poor choices, not timid-looking ones.
Scoring, and what a good run looks like
The bar above the board tracks three numbers. Reserve is what you hold right now. Chance of the mark is the best chance available from where you stand. Choices off the best is your running count of slips.
A clean run has no slips in it. You can play a clean run and still finish empty, because the best plan lifts your chance and cannot promise a result. The score is the count of slips, so lower is better, and your best is kept in this browser on this device.
When you land on the mark the game says how many attempts it took and how many choices gave away part of your chance. When the reserve empties it either counts the choices that were off the best or, if there were none, says plainly that the run went against you anyway.
Four ways a run goes wrong
- Committing one unit out of caution. Against a tilted attempt this is the worst thing you can do, because it gives the process the thing that helps it most, which is time.
- Committing more than you need. If four units would land you on the mark and you hold six, committing six throws two away, and those two would have been useful after a failure. Commit the gap, not the whole reserve.
- Ignoring the two lines under the row. They tell you whether your choice is the best one before you press Commit. A red line is the game spelling out that you are about to lose ground.
- Judging a run by whether you got there. The score is about choices, not results. An empty reserve with no slips is a better performance than a mark reached with three.
A worked run on the standard setting
You begin on Standard with a reserve of five, a mark of sixteen, and attempts that work 44 times in a hundred. The full commit is five, because five is smaller than the gap of eleven. You commit five, the attempt works, and the reserve climbs to ten.
Now the gap to the mark is six while you hold ten, so the full commit is six. You commit six and the attempt fails. You drop to four. The full commit is four. That one works and you reach eight. The full commit is eight. It fails, and the reserve is empty.
Four attempts, no slips, no mark. That is a perfectly played run that still ended at zero, and it happens often. What matters is that no other sequence of choices from a reserve of five had a better chance of reaching sixteen. Small amounts would have looked safer, and a rate of 44 in a hundred would have worn the reserve down all the same, only more slowly and more surely.
Everything happens on your own machine
The board, the arithmetic and the score all run inside the page. Nothing you do here is sent anywhere and no account is needed. Your best score sits in this browser and stays in it. Cut the network once the page has loaded and the game carries on exactly as it did before.