
Placing burners so the heat settles exactly where you need it
How the heat puzzle works, what the thermometers tell you, why averages matter more than distance, the three sheet sizes, and the thinking that turns trial and error into reliable solving.
What the puzzle asks
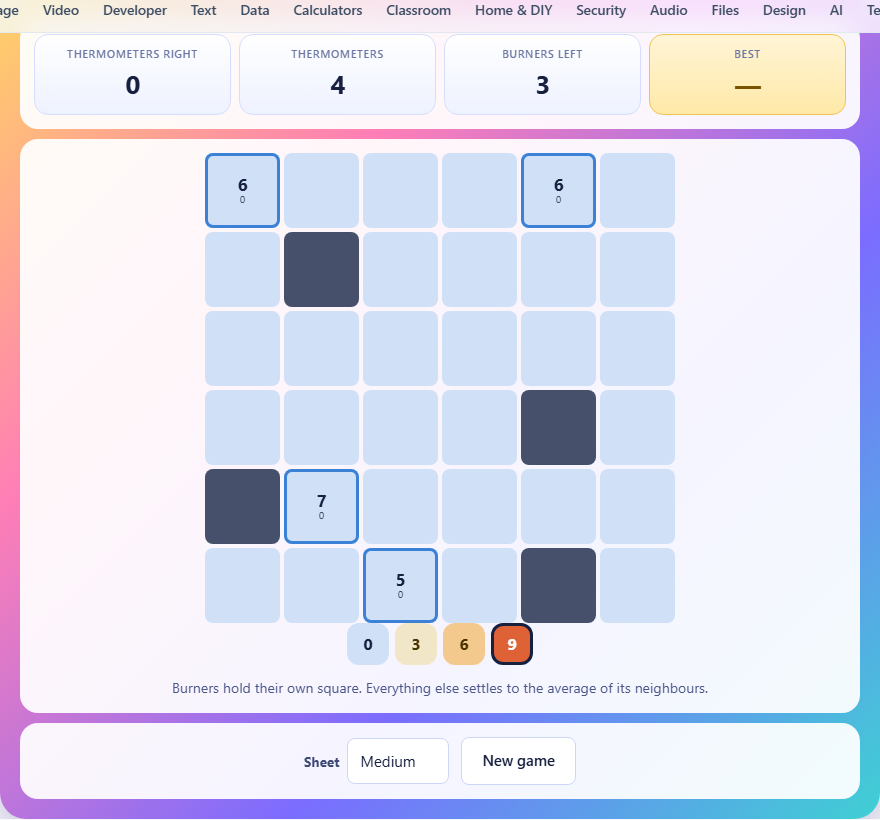
Thermal gives you a grid with a few thermometers scattered across it. Each thermometer shows a target number, the temperature it must read when you are done. Your job is to place burners on the grid. A burner holds its own square at a fixed temperature and never changes. Every other square on the grid settles to the average of its open neighbours, over and over, until nothing moves any more.
When the sheet has finished settling, every thermometer must read exactly its target number. The thermometer rounds the settled value to the nearest whole number, and the comparison uses that rounded figure. If every thermometer turns green at the same time, you have solved the puzzle.
Placing and removing burners
Below the grid sits a palette of available temperatures. Tap one to select it. Then tap any open square on the grid to place a burner at that temperature. The burner appears on the square with its number displayed. If you tap a square that already holds a burner, the burner is lifted and the square becomes free again.
Each sheet comes with a limited supply of burners. The Small sheet gives you two, the Medium sheet gives you three, and the Large sheet also gives you three. The stat bar above the board shows how many burners you have left to place. You can rearrange burners as many times as you like. Just tap to remove one and place it somewhere else.
Reading the thermometers
A thermometer cell shows two numbers. The large number is the target, the temperature it must reach. The small number is what it currently reads based on your burner arrangement. These two numbers are colour-coded. Green means the thermometer reads correctly. Red means it is reading too hot. Blue means it is reading too cold.
Thermometers cannot have burners placed on them. They are fixed parts of the puzzle. The same is true for wall squares, which are shaded differently and block heat from passing through.
The three sheet sizes
The Sheet dropdown offers Small, Medium and Large. Small is a five-by-five grid with two burners, three thermometers, and a few walls. Medium is six-by-six with three burners and four thermometers. Large is seven-by-seven with three burners and five thermometers.
Larger sheets have more walls and more thermometers to satisfy with the same number of burners. The temperature palette also grows with the sheet size. Small offers three values, Medium offers four, and Large offers five. More choices mean more freedom but also more ways to go wrong.
The generator makes sure the thermometers show a spread of different readings, so you cannot solve the puzzle by placing all burners at the same temperature.
Thinking in averages, not distance
The most common mistake is to think of heat as fading with distance, like a lamp growing dimmer the further you stand from it. That is not how this grid works. Each free square takes the average of the squares beside it, and the average has no memory of where the heat came from.
A square sitting exactly between a hot burner and a cold one settles at their midpoint, regardless of the path the heat took. A square walled off on three sides takes the temperature of whatever it can see through the one open side. Walls change the effective neighbourhood of a square, so a pocket behind a wall behaves very differently from open ground.
The quickest way to predict a temperature is to trace which burners the square can see and average their influence. A square surrounded by one hot burner and three cold ones will settle closer to the cold side, weighted by how many cold paths reach it.
The maximum principle and why it helps
Nothing on a settled sheet can be hotter than the hottest burner or colder than the coldest. That is the maximum principle, and it is the first sanity check you should apply to any plan. If a thermometer asks for a reading of nine and your hottest available temperature is nine, you know a burner must sit right beside that thermometer or even adjacent to it.
Similarly, if a thermometer asks for a very low reading and your palette includes zero, a cold burner probably needs to be nearby. Without a cold source pulling the temperature down, an isolated thermometer will sit at whatever the warm burners push toward it.
Using the three-known-neighbours trick
At equilibrium, every free square is exactly the average of the four squares around it. That means if you know the values of three neighbours, you can work out what the fourth must be. This gives you a way to reason backward from the thermometer readings.
Suppose a thermometer reads five and three of its four neighbours are known. Multiply the thermometer reading by four, subtract the three known values, and the result is what the unknown neighbour must be. If that unknown neighbour is a free square, you now know its settled value. If it is a spot where you could place a burner, you know what temperature that burner should be.
This arithmetic is the most powerful tool in the game. It turns fuzzy guessing into exact deduction.
Cold burners pull heat down
It is easy to forget that a burner set to zero is not an empty square. A zero burner actively pulls the temperature of its neighbours down. Thermometers reading low usually need a cold burner nearby, not just an absence of hot ones.
On larger sheets where you have three burners and five thermometers, you often need one hot burner and one cold burner to create the right contrast, with the third burner somewhere in between. Placing two hot burners and one cold one is a common shape for solutions, because many puzzles ask for a mix of warm and cool readings.
Walls create isolated pockets
Walls are scattered across the grid as shaded squares that block heat. They cannot hold burners and heat does not pass through them. A free square next to a wall has fewer open neighbours, which changes how it settles. If a square is walled off on three sides, it has only one open neighbour and takes that neighbour's temperature exactly.
This creates pockets. A thermometer sitting in a pocket surrounded by walls on two or three sides is almost completely controlled by whatever burner sits on the open side. Understanding pockets lets you solve parts of the sheet in isolation. Identify which thermometers are walled off, figure out what temperature reaches them, and lock in the burner that feeds each pocket before worrying about the open areas.
Common beginner mistakes
- Placing all burners before reading the thermometers. Look at the target numbers first. They tell you roughly where hot and cold sources need to be.
- Ignoring walls. A wall blocks heat flow. A thermometer behind a wall may need a burner on its own side because heat from the far side cannot reach it.
- Using only hot burners. If any thermometer reads low, a cold burner is almost certainly needed somewhere on the sheet.
- Moving burners one at a time without watching all thermometers. Shifting one burner changes every reading on the sheet. Watch the colour of every thermometer after each change, not just the one you were focused on.
- Forgetting that multiple correct arrangements may exist. The puzzle accepts any placement that produces the right readings, so do not assume there is only one right answer.
Scoring and completion
The stat bar shows how many thermometers are currently reading correctly, the total number of thermometers, and how many burners you have left to place. When every thermometer turns green at the same time, the puzzle is complete. The game records the number of burners you placed, though since the budget is fixed per size, the real satisfaction is in solving the layout.
There is no timer and no penalty for rearranging burners. You can take as long as you need. New game generates a fresh sheet whenever you want one.
Everything runs on your own device
The settling calculation, the thermometer comparisons, and the puzzle generation all happen in your browser. Nothing is uploaded to any server. The page works offline once loaded, and no data leaves your machine at any point.