
Filling every silhouette in Tangram
What the seven classic pieces are, why corners matter more than edges, how the flip button saves a stuck puzzle, and the thinking that turns a blank silhouette into a finished figure before the clock runs out.
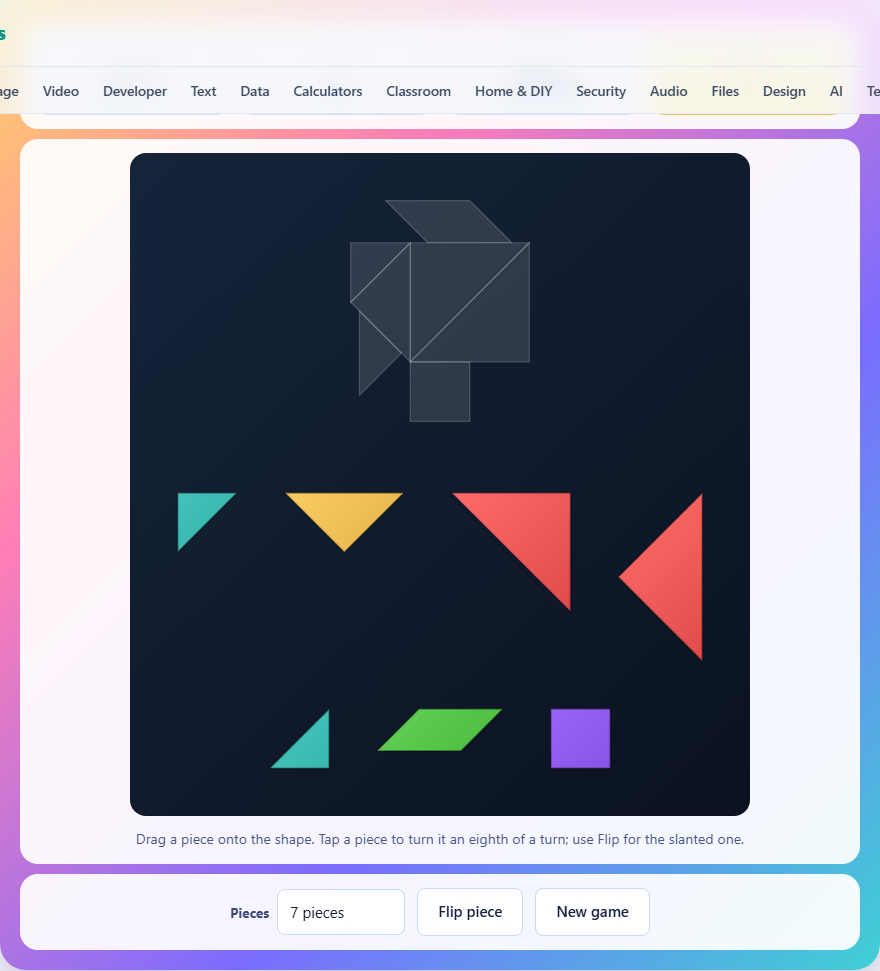
The seven pieces and what makes each one special
A tangram set has exactly seven flat pieces. Two large triangles, one medium triangle, two small triangles, one square and one parallelogram. Every puzzle uses all of them. No piece is left over, no gap is allowed, and nothing may overlap.
The two large triangles together cover half the total area of any figure. That single fact drives most of the strategy. If you place them correctly, the remaining five pieces fill what is left almost by elimination. If you place them wrong, nothing else will fit no matter how long you try.
The square and the medium triangle have the same area. Both of them cover exactly the space of two small triangles. That means a gap that looks perfectly square might actually need the medium triangle turned at an angle, and a triangular gap might need the square. Keeping that interchangeability in mind prevents a lot of wasted effort.
The parallelogram and the flip button
Six of the seven pieces look identical in a mirror. Turn a triangle over and it is the same shape. The parallelogram is the exception. It has a left-handed version and a right-handed version, and no amount of turning will change one into the other. That is what the Flip piece button is for.
If you have found a gap that matches the parallelogram exactly but it refuses to snap in, the most likely problem is that you need the mirror image. Press Flip and try again. This one piece causes more frustration than all the others combined, and knowing about it early saves a great deal of time.
Controls on desktop and on a phone
On a desktop you drag a piece with the mouse to move it. Releasing it near the right slot snaps it into place. A click without dragging turns the piece 45 degrees. Eight clicks bring it all the way around to where it started.
On a phone the same actions work with a finger. Drag to move, tap to turn. The board scales to fill the screen, and the pieces are large enough to pick up with a thumb. The Flip piece button below the board mirrors the parallelogram. A new game deals a fresh silhouette at the same difficulty level.
Reading the silhouette before you start placing
Before you touch a single piece, look at the outline. Count the sharp points. A sharp acute angle can only be formed by the tip of a triangle or the pointed end of the parallelogram. If the figure has a sharp point at the top, one of the triangles must go there with its tip pointing up. That narrows down where the big pieces sit.
Next look for right angles along the edge. The square has four of them. Any right-angle notch in the silhouette is a strong candidate for the square. If the notch is wider than the square, the medium triangle turned on its side might be the fit instead.
On the easier levels the joins inside the figure are drawn as thin lines, which show you where one piece ends and the next begins. On the hardest level those guides are hidden, which is the traditional way the puzzle is played. Without the internal lines you rely entirely on corners and edges to work out the arrangement.
Strategy for placing the big pieces first
Start with the two large triangles. They are the biggest pieces and the hardest to place later if you fill the figure from the edges inward. Look for the two largest open regions in the silhouette and try the large triangles there. Once they are home, the remaining area is small enough that the other pieces often have only one or two possible positions.
After the large triangles, place the medium triangle. It is the next biggest and the one most likely to be confused with the square. If the medium triangle is placed right, the square and the two small triangles usually fall into place quickly.
Leave the parallelogram for last whenever possible. It is the trickiest piece because of the flip, and by the time everything else is placed the remaining gap will tell you immediately whether it needs the left-handed or right-handed version.
When a piece will not snap in
The most common reason a piece refuses to lock is that it is turned the wrong way. Before moving it somewhere else, tap it through all eight turns right where it sits. Most stuck moments are a rotation problem, not a position problem.
If all eight rotations fail, the piece is in the wrong slot. Pick it up and try a different part of the figure. Remember that the square and the medium triangle are the same size, so swapping them is always worth a try.
On the hardest level, where internal guides are hidden, a piece can look like it fits but be off by one rotation step. The snap is precise. The corners of your piece must land on the corners of the slot within a tight margin. If it almost fits but will not click, it is not the right turn.
The three difficulty levels
The first level uses only five of the seven pieces. It drops the two small triangles, leaving you with two large, one medium, the square and the parallelogram. The internal guides are visible and you have four minutes. This is a good level for learning the controls and the feel of the snap.
The second level uses all seven pieces with the internal guides still showing. The time extends to five and a half minutes. The extra two small triangles add real complexity because their positions are the least constrained.
The third level uses all seven pieces with the internal guides hidden. You see only the outer silhouette, which is the traditional tangram challenge. The timer gives seven minutes. Reading the corners becomes essential because there is no other way to tell where one piece ends and the next begins.
Working through a tricky figure
Suppose the silhouette is a tall arrow shape pointing upward. The top has a single sharp point. That point must be a triangle tip, and only the large or medium triangle is big enough to cover the wide base below it. Place one large triangle with its tip at the top. The second large triangle probably fills the other half of the broad base.
Now five pieces remain and the open area is small. The medium triangle and the square are the same size, so try both in the widest remaining gap. Once one of them clicks, the two small triangles and the parallelogram fill the leftover spaces. If the parallelogram will not snap, flip it over. The whole figure is done in six or seven placements.
This is the pattern for most solves: big triangles first, then the medium triangle and square, then the small pieces, and the parallelogram last. The order is not a rule, but it works more often than any other approach.
Mistakes that eat the clock
- Starting with the small pieces. They fit in many places and committing to a wrong spot early forces a restart.
- Forgetting the flip. The parallelogram is the only piece that needs it, but forgetting to try it wastes minutes of turning and dragging.
- Forcing a piece into a gap it almost fits. If the snap does not fire, the piece is not right. Move on to another gap instead of nudging it repeatedly.
- Ignoring the corners of the silhouette. Edges are misleading because several pieces share the same edge length. Corners are unique and tell you which piece must go where.
- Not using the easy level to learn. The five-piece version teaches you how the snap works and how to read a silhouette, so you spend less time confused on the harder levels.
Everything runs in your own browser
The silhouette is generated on your machine by laying real pieces down one at a time and checking for overlaps. No figure is fetched from a server. Your best score is stored in local storage on this device and is never uploaded. Once the page has loaded you can play the game offline without any connection at all.