
Setting the junctions when the track keeps changing
How the arrows rotate behind the train, why a loop is almost never a dead end, what the three yard sizes expect of you, and the mental shift from planning a path to winding up a board so the path finds itself.
A board that rewrites itself
Every square on the board carries an arrow pointing up, right, down or left. When the train enters a square, it leaves in the direction that arrow points. Then, after the train has left, that arrow turns one quarter clockwise. Point up becomes point right. Right becomes down. Down becomes left. Left becomes up.
This means the same square behaves differently the second time the train crosses it. A square that sent the train left on the first pass will send it down on the second. If the train visits a square four times, the arrow has completed a full rotation and is back where it started. Anything fewer than four visits leaves it pointing somewhere new.
The parts of the yard
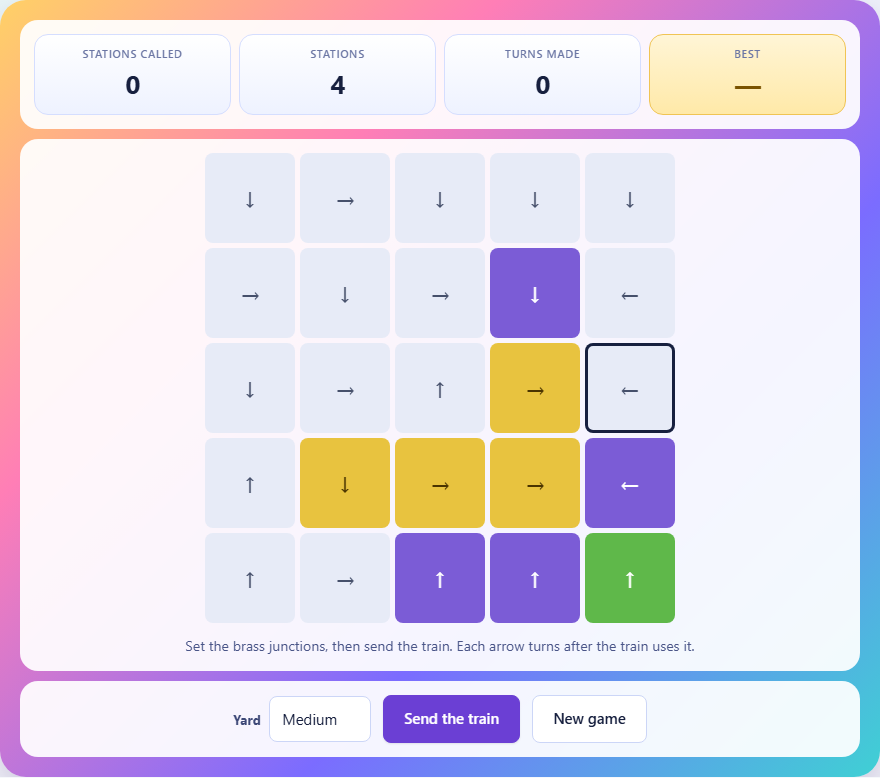
The board has four kinds of square. Most are fixed arrows that you cannot change. They form the background track. Some squares are brass junctions, drawn in a distinct colour. These are the only arrows you may adjust. Purple squares are stations that the train must visit. A green square is the shed where the train must finish.
The train always starts from a fixed entry point. When you press Send the train, it follows the arrows from that point, turning each one after it passes. The run ends when the train reaches the shed, goes off the edge of the board, or has visited too many squares without stopping. Every station must be called at before the train reaches the shed, but the order does not matter.
The rules in full
You win by setting the brass junctions so that, when the train runs, it visits every purple station and then arrives at the green shed. The train does not choose where to go. It follows the arrows mechanically. Your only control is the starting direction of each junction, set before the train leaves.
Tap a junction to turn it one quarter clockwise. Each tap counts as one turn in your move total. The total number of turns is your score, and fewer is better. Pressing Send the train does not count as a turn, so you can send the train as many times as you like to test your arrangement without penalty.
If the train goes off the edge of the board, the run is reported as a derailment with a count of how many stations it called at before leaving. If the train loops endlessly, the run is abandoned after a set number of squares and reported as still going round. If the train reaches the shed before calling at every station, the run is reported as incomplete.
Controls and yard sizes
The Yard selector offers Small, Medium and Large. Small is a four by four grid with three junctions and two stations. Medium is five by five with four junctions and four stations. Large is six by six with five junctions and five stations.
On Small and Medium, the puzzle has exactly one correct setting of the junctions. Large has more junctions and therefore more combinations, so it may have a handful of valid answers rather than just one. Any setting that completes the run counts as correct.
After each run the train's path is drawn on the board so you can see exactly which squares it crossed and in what order. Squares it visited are highlighted. This trace stays visible until the next run, letting you compare what happened with what you intended.
Strategy: think about the second crossing, not the first
New players plan a route as if the arrows stay put. That never works. The whole point of the game is that the board changes behind the train. When you see a route that requires the train to cross a junction twice, the question is not where does the junction send it the first time, but where does it need to send it the second time, given that the arrow will have already turned once.
This is the core mental shift. Instead of tracing a path on a static map, you are setting initial conditions on a machine that changes itself as it runs. The route is a consequence of those initial conditions plus the physics of the turning arrows.
On Medium and Large yards the train often crosses the same junction three or even four times. At four crossings the junction is back to its starting direction. That pattern matters because it means a junction crossed exactly four times effectively resets, and you can treat it as a fixed arrow when counting the remaining crossings.
Strategy: use loops to wind up the board
A train that loops looks like failure, but it is usually one junction away from a solution. Loops are what turn the board's arrows. A junction that the train visits twice during a loop has been wound up by one extra notch. If the train then breaks out of the loop on a later crossing, that junction is now pointing where you need it.
Experienced players sometimes set a junction deliberately to create a short loop that crosses other squares, rotating them into the right orientation for a later straight run. The loop is not the path to the stations. It is a tool for adjusting the arrows that the real path will use.
Send the train after every change and study the trace. When the train loops, count how many squares are in the loop and which ones are junctions. If a junction sits inside the loop, think about what turning it once would do to the loop. Often a single tap breaks the loop open and sends the train onward.
Strategy: watch the border
An arrow pointing off the edge of the board derails the train immediately. The border squares are the most dangerous because a fixed arrow near the edge might point outward after one rotation. Even junctions can cause trouble. Junctions are always placed on inner squares, so all four of their orientations point inward, but the train can still reach a border square via a fixed arrow and leave the board from there.
Before sending the train, check whether your junction setting sends the train toward the border at any point. If it does, follow the path mentally. Will the train reach that border square on a crossing that has the fixed arrow still pointing inward? Or will it arrive after the arrow has already rotated and is now pointing off the grid? That distinction is the difference between a near miss and a crash.
A puzzle from start to finish
You pick Medium and get a five by five yard. Four brass junctions sit in the interior. Two purple stations mark squares the train must visit, plus two more further from the entry. The green shed is on the far side of the grid.
All four junctions start pointing right. You send the train to see what happens. It crosses two junctions, misses both stations, and loops in a three square circle. You note which junction sits inside the loop and tap it once, changing it from right to down.
You send again. This time the train breaks out of the loop, calls at one station, crosses a junction for the second time, and derails off the bottom edge. Progress, but not enough. The fixed arrow that pushed it off the edge was rotated by a prior crossing. You tap a different junction to reroute the train before it reaches that row.
On the fourth send the train calls at three of four stations and reaches the shed. One station was missed. You study the trace and see the train passed one square east of the missed station. Tapping the third junction once shifts it to approach from the west instead. Fifth send: all four stations called, the train reaches the shed. Five total junction turns.
Common mistakes and dead ends
- Treating the arrows as permanent. Every crossing changes them. A route planned on the first pass will not survive the second.
- Turning too many junctions at once. Change one thing, send the train, and study what changed. Adjusting three junctions at once makes it impossible to tell which change helped and which made things worse.
- Ignoring the move counter. Sending the train is free, but each junction tap costs a turn. The puzzle can be solved with fewer turns than you might think. Experiment by sending first, then make targeted adjustments.
- Giving up on a looping train. The loop is usually rotating the board toward the answer. One more junction tap often breaks it.
- Forgetting the shed ends the run immediately. If the train reaches the shed before visiting every station, the game reports the run as incomplete. Watch for accidental shortcuts through the shed.
Everything happens right here
The puzzle is generated in your browser. The arrows are laid down, the train is simulated, and the stations and shed are placed along the path the train actually took, which is why a solution always exists. No data leaves your machine. Your best move count per yard size is stored in your browser on this device alone. Load the page, disconnect, and the game works the same.