
Fitting cargo into the fewest crates possible
How the bin packing puzzle works, why the obvious answer is sometimes impossible, what makes the middling items so dangerous, and the step-by-step method that gets you to par on every board.
The puzzle and why splitting is forbidden
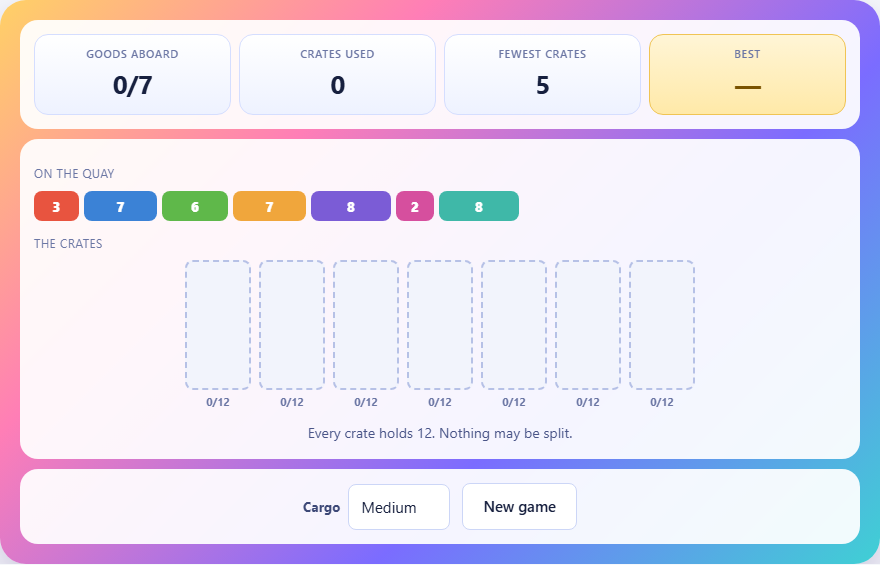
Items sit on a quay, each showing its size as a number. A row of crates waits below, and every crate holds the same amount. Your job is to load all the items into as few crates as possible. The one rule that makes it hard is that nothing may be split between crates. An item must go into a single crate or not at all.
Without that rule, the answer would always be the total of all the items divided by the crate size, rounded up. A crate of size 12 holding items that total 36 would need exactly three crates, and you could chop up the last item to fill the gap. But because items stay whole, the pieces sometimes refuse to fit together neatly, and the true minimum can be one or two crates more than the arithmetic suggests.
Controls and how loading works
Tap an item on the quay to pick it up. It highlights to show it is held. Then tap a crate to drop it in. If the item fits, it appears inside the crate as a coloured bar whose height shows how much of the crate it fills. If the item would overflow the crate, the game refuses the drop and tells you how much room is left.
To remove an item from a crate, tap the item inside the crate. It returns to the quay and can be placed somewhere else. Only the crates in use at the end are counted, so rearranging is free. You can unpack everything and start over as many times as you like without penalty.
The three cargo sizes
The Cargo selector offers three levels. Small gives about seven items and crates that hold ten units each. Medium gives about nine items with crates of twelve. Large gives about eleven items with crates of fourteen. The word about is deliberate: the game varies the exact number of items so that par does not always land on the same figure.
Item sizes range from two up to just under the crate capacity. The game generates items randomly within that range and then checks that the resulting puzzle needs between three and six crates to solve. If the random draw produces something too easy or too hard, it redraws. That means every board is genuinely solvable and has a clear, reachable goal. You will never face a set of items that requires more crates than the game provides.
The stats bar and what par means
Three figures appear above the board. Goods aboard shows how many items are loaded out of the total. Crates used counts only the crates that currently hold at least one item. Fewest crates shows par, the true minimum number of crates that can hold everything.
Par is exact. The game searches every possible packing, skipping arrangements that are the same as ones already tried. On the small boards used here the search finishes instantly, so par is not an estimate or a lower bound. It is the real answer. When you match it, you have found a solution that no cleverer approach could beat.
Strategy: add up the total first
Before touching any item, add up all the sizes and divide by the crate capacity. Round up. That number is the absolute floor. Nothing can ever beat it. If the total is 47 and crates hold 12, the floor is four, because three crates would only cover 36.
Sometimes par equals this floor and sometimes it is one higher. When it is one higher, the game tells you so in the win message. That extra crate exists because the items refuse to fit together to fill every crate exactly. Knowing the floor before you start tells you whether you are aiming at the obvious number or at something one above it. This mental step takes five seconds and saves minutes of fruitless rearranging.
Strategy: look for exact pairs
Two items that together fill a crate exactly are the best thing on the board. A crate of size 12 with items of 5 and 7 is perfectly packed, wasting nothing. Find these pairs before you do anything else, because every pair you lock in is a crate solved with no room lost.
After pairs, look for triples. Three items that together add to exactly the crate size are nearly as good and worth hunting for. The more complete crates you can build early on, the fewer awkward leftover items you have to juggle at the end.
Strategy: place the big items first
After pairing off exact matches, sort the remaining items in your head from largest to smallest and place the big ones first. The reason is that large items are inflexible. An item of size 9 in a crate of 12 leaves only 3 units of room, which can only be filled by a 1, a 2 or a 3. If you leave it until last and the only remaining items are 4 and above, you are stuck with a nearly empty crate.
Small items are flexible. A 2 or a 3 can fit into almost any gap. Saving them for last means you always have something that can fill a crate's remaining space. This largest-first approach is a well-known technique in packing problems, and it gets close to the optimum on its own. On many boards it gives you the exact best answer without any further thought.
The dangerous middle: items just over half
The hardest items to handle are the ones just over half the crate size. In a crate of 12, an item of 7 is the worst possible size, because it cannot share a crate with another 7. Each one nearly costs an entire crate of its own, leaving five units of room that can only be filled by small scraps.
When you see several items in this range, you know the puzzle will be tight. The gap between the arithmetic floor and par is almost always caused by these middling items. If you have three items of 7 and a crate of 12, that is three crates right there, holding 21 out of a possible 36, with 15 units of space wasted. No amount of clever packing can fix that. Recognising it early keeps you from searching for a solution that does not exist and helps you accept the true minimum without frustration.
Common mistakes that cost an extra crate
- Loading items in the order they appear from left to right on the quay. The quay is not sorted by size, so working in order is random packing. Pick by size, not by position.
- Filling one crate at a time. It is better to scan for exact pairs across all the items before committing to a single crate.
- Forgetting that rearranging is free. If you realise a better grouping halfway through, tap items out and repack. There is no penalty.
- Ignoring the remaining space in a crate. The number under each crate shows how much is filled out of the total. A crate at nine out of twelve has room for a three and nothing bigger.
- Aiming for the arithmetic floor when it is not reachable. If the total divided by the crate size comes to four but par is five, no arrangement of four crates will work. Accept the five and move on.
Scoring and what a win looks like
When all items are aboard and the number of crates used is at or below par, the game declares a win. If par is higher than the arithmetic floor, the win message points that out. Your best score is the fewest crates used and is saved in your browser on this device.
If everything is aboard but you used more crates than par, the game tells you how many fewer were possible and lets you keep rearranging. You can always take items back out and try a different grouping. There is no move limit and no timer, so you can take as long as you need to find the best arrangement.
The whole puzzle stays on your machine
The items, the crates, the search for par and your score all run inside the page. Nothing is uploaded, there is no account, and the best-score figure lives only in your browser. Once the page has loaded, the game works offline with no difference in behaviour. You can prove it by disconnecting from the network and pressing New game. The items are generated locally and the search for the fewest crates happens entirely in your browser's memory.