
Filling a grid with diagonals and no loops
How the corner numbers work, why the no-loop rule is the real solving tool, how to read the edges for fast progress, and the thinking that cracks a nine-by-nine grid.
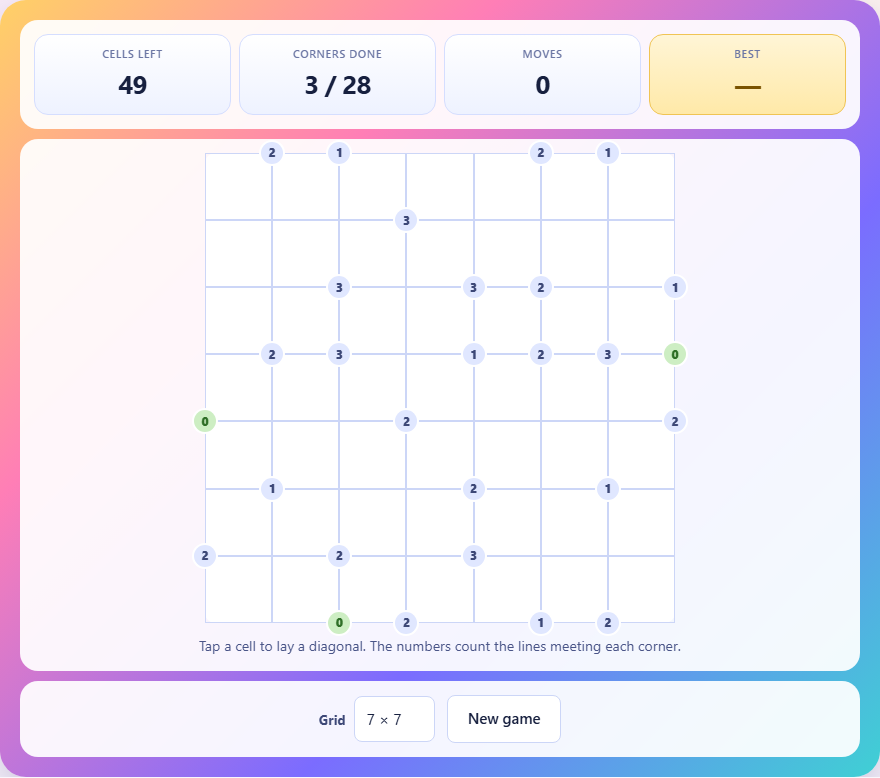
What the puzzle asks you to do
Every square in the grid needs exactly one diagonal line. Each diagonal runs from one corner to the opposite corner, either as a backslash or a forward slash. The challenge is twofold: the numbers on the corners must be satisfied, and the lines may never close into a loop anywhere in the grid.
The numbers sit on the intersections between squares, not inside them. Each number counts how many diagonals touch that corner point. A corner shared by four squares could have zero, one, two, three, or four diagonals pointing at it. The number tells you exactly how many.
Rules in detail
A corner marked 0 means no diagonal touches it. All four surrounding squares must point their diagonals away from that corner. A corner marked 4 means every surrounding diagonal points toward it, settling all four squares at once. Values of 1, 2, and 3 sit between those extremes and require you to figure out which combination of diagonals satisfies the count.
Not every corner carries a number. Blank corners have no count requirement, but the no-loop rule still applies to every line that passes through them. A finished grid has one diagonal in every square, every numbered corner showing the correct count, and no closed ring of lines anywhere.
The no-loop rule explained
Each diagonal connects two corner points. As you fill the grid, chains of connected corners grow longer. A loop forms when a new diagonal would connect two corners that are already linked by some other path through the grid. At that point a ring of lines closes, and the puzzle forbids it.
The test is simple to describe: before placing a diagonal, follow the chain from one of its corners. If you can reach the other corner by walking along lines already on the board, that diagonal would close a loop and the other direction is forced. Two diagonals sharing a corner is perfectly normal and expected. Only a complete closed ring is illegal.
Controls and grid sizes
Tap or click a square to place a diagonal. The first tap lays one direction, the second tap flips it to the other, and the third tap clears the square. Corner numbers change colour as you work. A number turns green when its count is exactly satisfied. It turns red if too many diagonals already point at it, warning you to fix something before moving on.
The Grid dropdown offers three sizes. The five-by-five grid is a gentle start with fewer cells and more corners showing numbers. The seven-by-seven grid is the default and needs real thought. The nine-by-nine grid is large enough that the loop rule becomes the main solving tool, since the numbers alone leave many squares ambiguous.
Strategy: start with zeros and fours
A corner marked 0 settles every square around it immediately. Each of those squares must point its diagonal away from that corner, and there is only one direction that does so. On the edge of the grid, a 0 has only two neighbouring squares, and in the very corner of the grid it has only one. These are the fastest cells to fill.
A corner marked 4 is equally decisive. Every square around it must point its diagonal toward it. Again, each square has only one option. Start with all the zeros and fours, and you often find that a quarter of the grid falls into place before any real thinking is needed.
Strategy: read the edges first
Corners on the outside edge of the grid sit between only two squares instead of four. That means their numbers are far more restrictive. An edge corner marked 1 tells you that exactly one of its two neighbours points at it. Combined with its own neighbour's number, this often settles both squares immediately.
The four grid corners are even more constrained. Each one has only a single square around it. A corner-of-the-grid number of 0 or 1 fully decides that square with no further thought. Work the border first, then move inward where each ring of already-placed diagonals limits what the next ring can do.
Strategy: using the loop rule to decide
Late in a grid you will hit squares where the numbers allow both diagonals equally well. This is where the no-loop rule earns its keep. One of the two directions would connect two corners that are already part of the same chain, closing a ring. The other direction joins separate chains and keeps the grid legal.
To check for a loop, pick one corner of the square and trace the existing chain from it. If the chain arrives at the other corner, that diagonal would close a loop and the alternative is your only choice. This is not a tiebreaker or a last resort. It is a full solving technique and the main tool for the harder grids.
Keeping a mental picture of the chains is easier on a small grid. On a nine-by-nine board, trace them one link at a time with your finger or your eye. The chains never branch, since each corner is simply connected or not, so following one is a matter of stepping from corner to corner along the diagonals already placed.
Strategy: reading pairs of neighbouring corners
A single corner marked 1 in the middle of the grid tells you that exactly one of its four surrounding squares points at it, but not which one. The information feels thin on its own. The trick is to read it alongside its neighbours.
If two adjacent corners along the same row are both marked 1, the square they share between them must either point at one or the other. Whichever way it leans, the two counts together cut the remaining options for both corners dramatically. Three corners in a line can sometimes settle the entire strip of squares between them.
This pairing technique is how experienced solvers move past the zeros and fours. Once the easy extremes are filled, the middle values fall into place by combining their constraints with their neighbours rather than trying to solve each corner in isolation.
Common mistakes
- Forgetting that a corner with no number is still governed by the loop rule. Blank corners carry no count, but lines meeting there can still form a loop. Treat them as uncounted, not unchecked.
- Thinking that two diagonals meeting at a corner is a loop. Lines crossing at a point is normal. Only a complete closed ring of connected lines is forbidden.
- Placing all the diagonals by number alone and ignoring the loop rule until the end. A grid can satisfy every number perfectly and still contain a loop. Checking for loops as you go is faster than fixing one after the grid is full.
- Overlooking edge corners. An edge corner with the number 2 means both of its neighbouring squares point at it. That settles two cells with a single glance, and missing it means doing extra work further in.
- Clearing a square by accident. The third tap on any cell empties it. If you meant to flip and tapped once too many, the cell is blank again. The cells-left counter in the stats bar catches this.
Scoring and completion
The stats bar shows three numbers. Cells left counts how many squares still need a diagonal. Corners done shows how many numbered corners currently match their count against the total number of numbered corners. Moves tracks every tap you make, including flips and clears.
The puzzle is solved when every cell has a diagonal, every numbered corner matches, and no loop exists. The score is your move count, and fewer moves is a better result. A perfect solve means placing every diagonal correctly the first time with no flips, though that is rare on the larger grids.
Everything runs on your own device
The grid is generated and checked entirely inside your browser. No puzzle data is sent to a server, no account is needed, and your best score is stored in your browser on this device only. The page works offline once it has loaded. Close the tab and nothing is left behind.