
Gravity, clay, and the puzzle of where water stops
Seep is a puzzle about water that falls, slides, and settles. A spout pours a fixed number of drops, and each one obeys simple gravity rules until it comes to rest. Your job is to place blocks of clay so the water ends up wetting exactly the squares marked as targets. This article covers every rule of the water physics, explains the controls and visual cues, and offers strategies for thinking about basins, overflows, and the left-before-right tiebreaker.
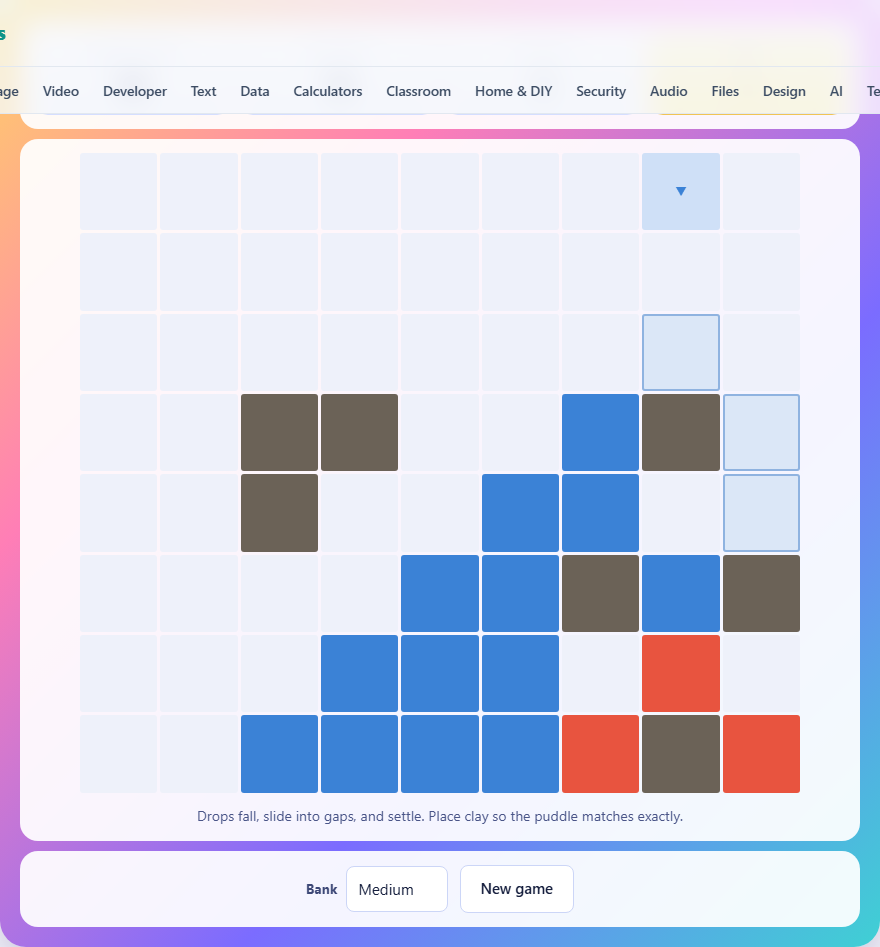
How the water moves
Each drop enters the board from the spout at the top row and falls straight down, one square at a time, until something stops it. A drop stops when the square below it is occupied by rock, clay, or another drop that has already settled. Once a drop cannot fall any further, it tries to slide sideways into a neighbouring square, but only if that square has open space below it. A drop does not creep along a flat floor. It only moves left or right when the adjacent square lets it continue falling.
Drops are settled one at a time. The first drop falls and stops before the second drop is poured. This sequential process means the early drops fill the deepest reachable basin first, and later drops stack on top. When a basin fills completely, the next drop sits on the pile and then slides sideways over the lower lip, spilling into whatever is on the other side. The spill is determined by the same rules: fall when you can, slide when you must, stop when neither works.
The left-before-right rule
When a drop is blocked below and can slide either left or right, it always chooses left first. This fixed preference removes all randomness from the puzzle. Given the same board and the same clay, the pour will always produce exactly the same puddle. Without this rule, the outcome would depend on which way each drop happened to go, and the puzzle could not be reasoned about.
The left bias affects more than just tied situations. Because the first available sideways path is always tried leftward, water tends to pool on the left side of symmetrical basins. If a basin has lips of equal height on both sides, the overflow will spill left before it spills right. Knowing this lets you predict where each drop will end up without having to simulate the pour in your head.
Reading the board colours
The board uses three colours to show the state of each square after the pour. Deep blue means the square is wet and it is supposed to be wet. That is a correct square. A pale outlined square means the square is supposed to be wet but is currently dry. Something about your clay placement is failing to send water there. A red square means the square is wet but should not be. Water is landing somewhere it is not wanted.
Rock squares are fixed obstacles that cannot be changed. They are part of the terrain and the water flows around them. The spout is shown by a downward-pointing arrow on the top row. You cannot place clay on the top row or on a rock square. Every other open square below the top row is available for clay placement.
Controls and difficulty levels
Tap any empty square below the top row to place a block of clay. Tap the same square again to remove it. The pour recalculates instantly after every change, so you see the result of your placement right away. There is no separate run button. The scoreboard shows how many squares are currently correct, how many squares are wet, and how many clay blocks you have left to place.
The Bank dropdown sets the difficulty. Small gives you a seven-by-seven grid with three clay blocks and ten drops. Medium is nine by eight with four blocks and sixteen drops. Large is eleven by nine with five blocks and twenty-four drops. More drops and a wider board create more complex flow patterns, and extra clay blocks mean more possible placements to consider.
Strategy for thinking about basins
The fundamental structure in every puzzle is the basin. A basin is any enclosed area where water collects. It can be formed by rock, by clay, or by a combination of both. The important property of a basin is its capacity: how many drops it holds before it overflows. A basin that is three squares deep and one square wide holds three drops. Making it one square deeper with a clay block increases its capacity by one, which changes where every subsequent drop goes.
When you look at a puzzle, start by identifying the natural basins formed by the existing rock. Trace the path each drop would take without any clay at all. Where does the water pool? Where does it overflow? Then compare that natural result to the target. The difference between where water naturally goes and where you want it to go tells you what your clay needs to do.
Using clay as a shelf, not just a wall
New players often think of clay as a wall that redirects water sideways. That can work, but the more common use is as a shelf. A block of clay placed above a gap creates a ledge where drops will rest instead of falling past. Those resting drops change the height of the pile, which affects when the basin overflows and where the overflow goes.
Think of each clay block as changing the shape of the container rather than pushing the water in a different direction. A block placed at the right height can turn a shallow basin into a deep one, which keeps more water in one place and sends less water elsewhere. A block placed at the wrong height might cause the basin to overflow one drop too early, sending water to squares that should stay dry. The visual feedback is instant, so experiment freely, but think about capacity before you place.
Working out where the last drops go
The first few drops are often easy to predict. They fall straight down from the spout and settle in the deepest available basin. The interesting decisions happen after that basin is full. When the next drop cannot settle there, it overflows and follows a new path that depends on the shape of the terrain. The puzzle is usually decided by these late drops.
Count the target squares and compare them to the number of drops. If the target has twelve wet squares and the spout pours sixteen drops, four drops must end up somewhere that is not part of the target. That means the puzzle expects some waste, and your clay needs to direct those extra drops to places where they will not cause red squares. If the target has exactly as many wet squares as there are drops, then every drop must land on a target square and none can be wasted. That is a tighter constraint that usually requires more precise clay placement.
Common mistakes and how to fix them
The most common mistake is blocking the spout. If you place clay on the square directly below the spout, the first drop has nowhere to go and the pour stops immediately. No water reaches the board at all. Always keep the path below the spout open for at least the first drop.
A second mistake is thinking about the flow path instead of the resting places. Where the water travels is less important than where it stops. Two very different paths can end in the same square, and the puzzle only checks the final position. Focus on which squares end up wet, not on the route each drop took to get there.
A third mistake is using all your clay when fewer blocks would solve the puzzle. You do not have to use every block. Any arrangement that produces the correct puddle wins, even with clay left over. If the board looks right with two blocks placed, do not add a third just because you can. Extra clay can change the flow in ways you did not intend.
Privacy and how the puzzle runs
The puzzle runs entirely inside this page on your own device. Every board is generated in your browser by placing random clay on a random terrain, running the pour, and recording the result as the target. That means every puzzle has at least one valid solution. No data is sent to any server, there is no account, and nothing is stored between sessions. Once the page has loaded, it works offline with no further connection needed.