
Grain drops and controlled avalanches
The sandpile is a puzzle that rewards careful thinking about where things end up, not about what order they happen in. This article explains the toppling rule in full, walks through every control on the page, covers the three difficulty sizes, and offers practical strategy for working backwards from the target pattern to decide where your grains should go.
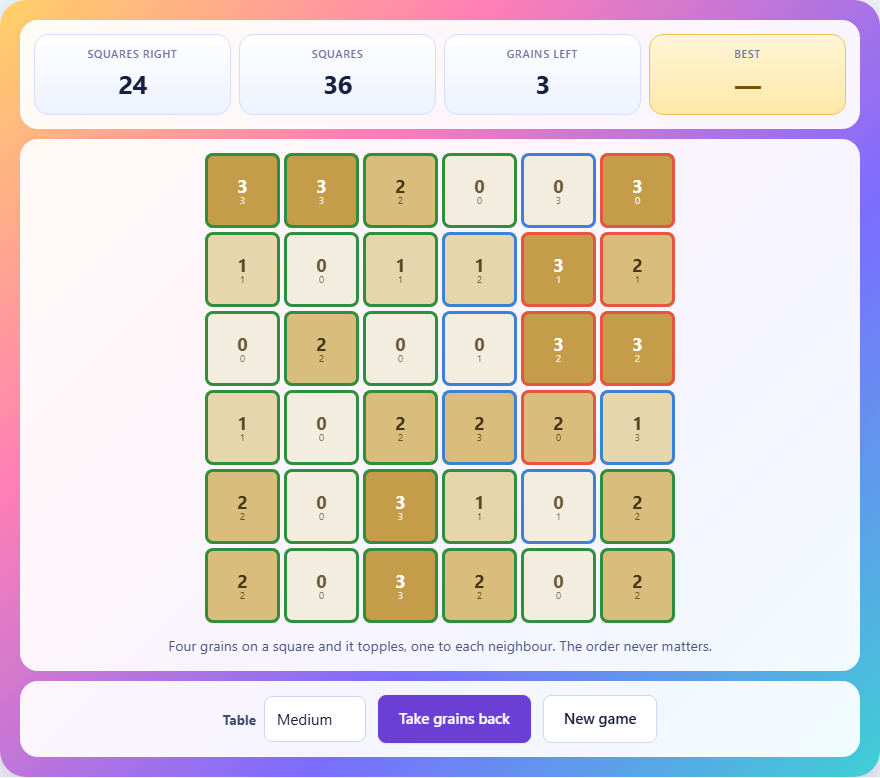
The toppling rule explained
Every square on the board can hold up to three grains. The moment a square reaches four grains it topples: it loses all four and sends one grain to each of its four neighbours, up, down, left, and right. That neighbour might now hold four grains as well, in which case it topples too. A single grain dropped on a square that already holds three can set off a chain reaction that changes most of the board. Grains pushed past the edge of the board are gone for good, which is the mechanism that stops the chain from running forever.
Diagonal squares never receive grains during a topple. Only the four squares sharing a flat edge with the toppling square are affected. A corner square has only two neighbours, so two of the four grains fall off the board when it topples. An edge square has three neighbours and loses one grain over the side. A square in the middle of the board keeps all four grains in play. These differences matter because the edge and corners act as drains, steadily pulling grains out of the system.
What is shown on each square
Each square displays two numbers. The large number is the current grain count after all your drops and their resulting avalanches have settled. The small number underneath is the target, the count that square must reach for the puzzle to be solved. When the two numbers match, the square turns green. When the current count is higher than the target the square is marked as over, and when it is lower the square is marked as under.
A small badge in the corner of a square shows how many of your limited grains you have dropped there. If you have dropped two grains on the same square, you will see a tiny number two. This badge helps you track your own moves because the board changes so much from an avalanche that it can be hard to remember where you placed your grains.
Controls and difficulty levels
The Table dropdown sets the board size. Small uses a five-by-five grid and gives you two grains to place. Medium is a six-by-six grid with three grains. Large is seven-by-seven with four grains. More grains and a wider board mean a longer avalanche and more squares affected by each drop, so the puzzle becomes harder to reason about even though the core rule stays the same.
Tapping a square drops one grain there. If you have used all your grains and tap a square that already has one of your drops on it, that grain is taken back. You can also tap the Take grains back button to remove every drop at once and start your placement fresh. The New game button generates a completely new puzzle with a new base pile and a new target pattern. The board always starts from a settled pile, so no square holds four or more grains before you begin.
Why the order does not matter
The sandpile has a mathematical property called the abelian property. In practical terms, it means this: if you plan to drop a grain on square A and another grain on square B, you will get exactly the same final pile whether you drop A first or B first. The avalanches triggered by each drop may look different along the way, but the settled result is always identical. This is not a simplification made for the game. It is a theorem proved about chip-firing systems in general.
Because order is irrelevant, you only need to think about which squares should receive your grains. You do not need to imagine the avalanche step by step or worry about timing one drop before another. Two players who choose the same set of squares, in any order at all, will always produce the same settled pile. This fact is what makes the puzzle solvable by reasoning instead of trial and error.
Strategy for reading the target
Start by comparing the current board to the target. Look for squares where the target is higher than the current count. Those squares need to gain grains somehow, and the only way a square gains grains is from a neighbour toppling. That means at least one of the four neighbours of a short square must reach four grains and topple during the avalanche.
Next, check which squares already hold three. Those are one grain away from toppling. Dropping a grain on a square that holds three guarantees an immediate topple, which sends grains outward. If several three-squares sit near each other, a single drop can start a chain that reaches deep into the board. On the other hand, a square holding zero or one needs multiple grains before it will topple, so dropping on it is unlikely to cause a useful chain unless other drops push more grains its way.
Working backwards from what is missing
The most reliable approach is to pick a square where the target is unmet and ask what could fix it. If a square currently shows one grain but needs three, two more grains must arrive from toppling neighbours. Which neighbours could reach four? If a neighbour holds two, it needs two more incoming grains to topple, which is a lot. If a neighbour holds three, it needs just one more, and your drop might be that one grain.
Following this chain of reasoning from the deficit back to a plausible drop site is usually faster than trying random placements and watching what happens. The Take grains back button makes it safe to experiment, but the real progress comes from noticing which three-squares are in the right position to feed the squares that are short. On larger boards, look for clusters of high-value squares near the deficit. A single grain dropped into a dense region can cascade outward and change a dozen squares at once.
The role of the edges
Edges and corners absorb grains permanently. When a square on the rim topples, at least one grain falls off the board and is lost. This drain effect is the reason every avalanche eventually stops, but it is also a strategic factor. If your target shows fewer total grains than the current board, some grains need to vanish, and they can only vanish at the edges.
Placing a grain near the edge tends to produce a shorter and more local avalanche because the edge soaks up some of the energy. Placing a grain near the centre tends to produce a wider ripple because all four neighbours stay on the board and can chain further. Choosing between a central drop and an edge drop depends on whether the target needs a broad change or a focused one. Most puzzles mix both, so read the pattern carefully before placing your first grain.
Common mistakes and how to avoid them
The most frequent mistake is focusing on one square in isolation. A player sees a square that needs more grains and drops directly on it, ignoring the avalanche that follows. A direct drop often overshoots the target because the dropped grain, plus the grains already there, pushes the square to four, which topples it right back down to zero while sending grains elsewhere. Think about the system rather than any individual square.
Another common error is wasting grains on squares that already match. Once a square is green, any further change to it is unwanted. Dropping near a correctly matched square risks toppling a neighbour into it and pushing it off target. Before each drop, check whether the squares around your chosen spot are already correct. If they are, consider whether the coming avalanche will disturb them.
A third mistake is placing all your grains before evaluating. Drop one grain, read the new board, and then decide where the next grain should go. The board after the first avalanche looks very different from the starting position, and the best second drop depends on what the first drop changed.
Privacy and how the puzzle runs
The entire puzzle runs inside this page on your own device. No data is sent anywhere, there is no account, and nothing is stored between sessions. Each new puzzle is generated in your browser by placing random grains on a random base pile, running the avalanche, and recording the result as the target. That means every target has at least one valid solution. Once the page has loaded, it works offline with no further connection needed.