
Placing springs so every copper tile weathers to the right shade
This article explains how water spreads through a grid of walls, why only the nearest spring matters, how to read the shade numbers on each tile, and the strategies that make the puzzle click.
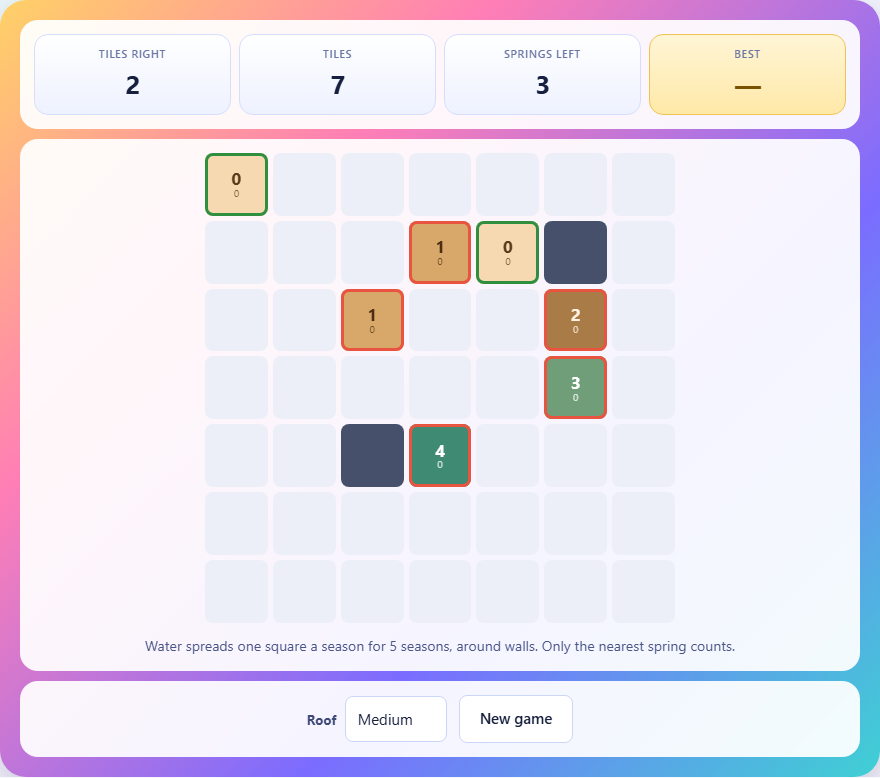
The roof and the goal
A grid of squares represents a copper roof. Some squares are walls. Some are open tiles, each marked with a target shade from zero to four. The shades go: bright, tarnished, brown, verdigris, and deep green. Your job is to place a fixed number of springs on the roof so that when water spreads out from them over several seasons, every tile finishes at exactly the shade it shows.
A tile that the water never reaches stays bright at shade zero. A tile that gets wet on the first season and stays wet for all five seasons ends at shade four, deep green. Everything in between depends on how far the tile is from the nearest spring, measured in walking steps around walls.
How water spreads
Water moves one square per season in the four compass directions: up, down, left, and right. It does not spread diagonally. It cannot pass through walls. If a wall blocks the direct path, the water goes around it, and the longer walk means the tile gets wet later and ages less.
A spring placed on a square makes that square wet from the very first season. The four squares next to it, if they are not walls, get wet on the second season. The squares next to those get wet on the third. The water fans out in a flood-fill pattern, one ring per season.
The number of seasons is fixed for the whole puzzle. On a medium board there are five seasons, which means a tile that is five steps away from the nearest spring only gets wet in the last season and ages by just one shade. A tile six or more steps away stays dry and stays bright.
Why only the nearest spring counts
If two springs are both near the same tile, only the closer one decides when the tile gets wet. The second spring does not make it age faster. It does not add extra moisture. The tile cares only about the shortest walking distance to any spring.
This is the key rule that makes the puzzle work. A second spring is useful for reaching tiles that are far from the first one, but it never doubles the effect on tiles they share. Placing two springs next to each other is almost always a waste because they cover the same ground.
Think of each spring as having a zone of influence shaped by the walls around it. Two springs far apart cover different zones. Two springs close together cover the same zone twice, which helps nobody.
Reading the two numbers on each tile
Each tile shows two numbers. The larger number is the target shade, the one the tile must finish at. The smaller number underneath is the shade the tile is currently heading for, given the springs you have placed so far. When both numbers match, the tile glows to show it is correct.
If you have not placed any springs yet, every tile's current shade is zero. As you place springs, the current shades start changing. A tile close to a spring jumps to a high shade. A tile far away stays low. A tile behind a wall might stay at zero even if the spring is close, because the walking distance around the wall is long.
The goal is to make both numbers match on every tile at the same time. When they all line up, the puzzle is solved.
How walls shape the puzzle
Walls block water completely. A spring right next to a wall cannot send water through it. The water has to find a path around, and that extra distance changes the shade the tile ends up at.
This means walls act as shields. A tile on the other side of a wall from a spring is protected from ageing. The tile might sit only two squares away from the spring in a straight line, but the walk around the wall could be six or seven steps. That makes the tile come out much lighter than its neighbours.
Walls are the reason the puzzle is hard. Without them, shades would form simple circles around each spring, and you could eyeball the answer. With walls, the circles get bent and stretched, and the only way to check is to count the steps.
Strategy: start with the deep green tiles
A tile that must reach deep green, shade four, has to be wet from the very first season. That means a spring must sit on that tile or right next to it, within one step. There is no other way to reach the highest shade.
Find the deep green tiles first. They tell you almost exactly where the springs must go. If two deep green tiles are far apart, each one needs its own spring nearby. If two are close together, one spring between them might serve both.
Once you have placed a spring for each deep green cluster, check the bright tiles. A tile that must stay bright at shade zero cannot be reached by any spring within the season count. If your spring placement puts water within five steps of a bright tile, something needs to move.
Strategy: count the walking distance by hand
When you are stuck, trace the path from a spring to a tile by counting squares. Go up, down, left, or right, one square at a time, stepping around every wall. The number of steps you count is the distance. Subtract that from the total number of seasons. If the result is positive, that is the shade the tile will reach. If the result is zero or negative, the tile stays bright.
For example, on a board with five seasons and a tile that is three steps from the nearest spring, the tile spends two seasons dry and three seasons wet. Three seasons of ageing gives shade three, which is verdigris. If the tile's target is two, the spring is too close and needs to be moved further away.
This counting is the fundamental tool for solving the puzzle. The board does the counting for you and shows the result as the small number, but understanding why the count comes out the way it does helps you plan ahead.
Common mistakes
Most failed puzzles come from a few repeated errors.
- Placing two springs close together hoping they will make nearby tiles age faster. They will not. Only the nearest one counts, so the second spring is wasted.
- Forgetting that walls block water. A spring on one side of a wall is useless for tiles on the other side unless there is a path around.
- Ignoring the bright tiles. A tile that must stay at shade zero cannot be within reach of any spring. If it is, no amount of rearranging other springs will fix it.
- Moving a spring to fix one tile without checking what it does to the others. Every spring placement affects every tile that is within the walking range of the seasons.
- Not using all the springs. You are given a fixed number of springs for a reason. The puzzle was built with that many, and using fewer will leave distant tiles unreached.
The three board sizes
Small is a six by six grid with two springs, five tiles, four seasons, and a light scattering of walls. The puzzles are gentle enough to solve by trial and error.
Medium grows to seven by seven with three springs, seven tiles, five seasons, and more walls. Three springs create overlapping zones, and sorting out which spring serves which tile takes real thought.
Large is eight by eight with three springs, nine tiles, five seasons, and the densest walls. More tiles means more constraints, and the larger board means springs have to cover more ground with the same number of seasons.
Everything runs on your device
The water spreading, the shade calculations, and the tile checks all run inside your browser on this page. Nothing is uploaded to any server. There is no account and no sign-up. Once the page has loaded, the puzzle works fully offline.