
Solving charged particle puzzles one pulse at a time
How the emitters, particles and rings work together, why one pulse moves everything on the board, and the thinking behind each firing decision that separates a clean solution from a wasted budget.
What the board shows you
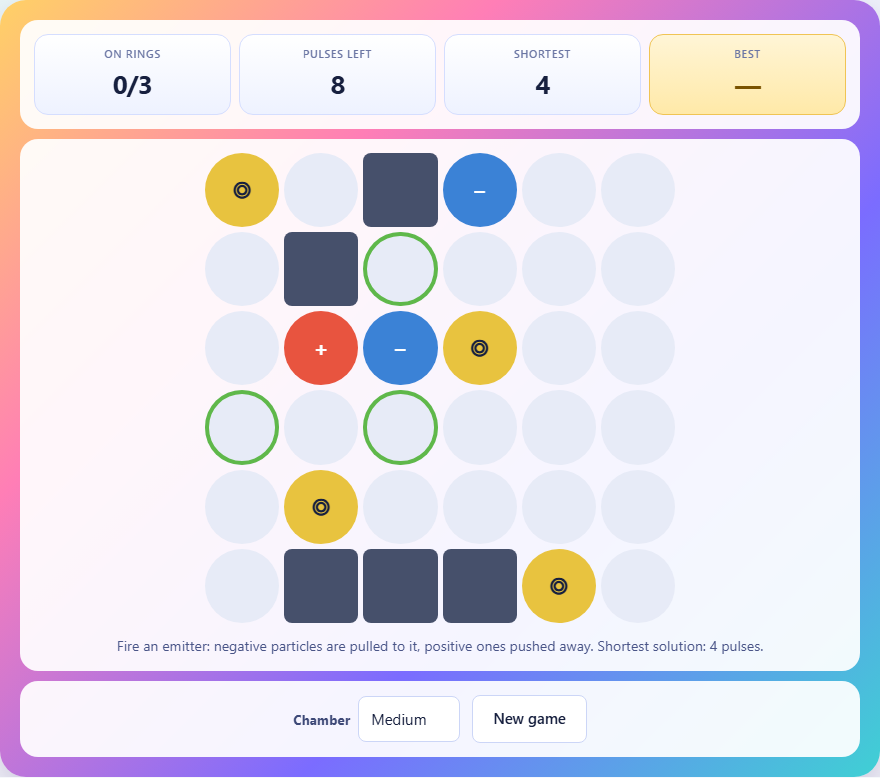
A grid sits inside a chamber. Some cells are walls. The rest hold three kinds of object. Yellow circles are emitters. Blue markers carry a minus sign and are negative particles. Red markers carry a plus sign and are positive particles. Green rings are the targets.
Every puzzle asks the same thing. Get every particle onto a ring. You do not drag pieces. You do not tap particles. You fire an emitter, and that single pulse moves every particle on the board at once.
How a pulse moves a particle
When you tap a yellow emitter, every particle reacts to it. A negative particle takes one step toward the emitter. A positive particle takes one step away from it. The direction of the step follows a rule. A particle moves along whichever axis puts it furthest from the emitter. If the two axes are equal, it moves along the row.
Suppose a blue particle sits three rows above an emitter and two columns to its right. The row distance is larger, so the particle steps one cell down, toward the emitter. A red particle in the same spot would step one cell up, away from it.
A particle that is blocked by a wall or by another particle stays where it is. It does not skip over the obstacle or bounce. It simply does not move that turn. Two particles trying to reach the same cell also block each other. The first one in the list claims the square and the second one stays put.
The budget and the par
Before a puzzle is offered, the game searches every possible sequence of emitter firings and finds the shortest one that seats all particles on rings. That number appears on the scoreboard as the shortest solution. Your budget is that number plus a few extra pulses.
On the Small chamber you get three extra. On Medium and Large you get four. If you seat every particle, your score is how many pulses you used. Lower is better. If you run out of pulses with a particle still off its ring, the chamber goes cold and you lose.
The three chamber sizes
Small is a five by five grid with two particles and four emitters. It is a good place to learn the movement rule, because two particles produce simple interactions. Medium is six by six with three particles and four emitters. The extra particle means every pulse has more side effects to consider. Large is seven by seven with three particles and five emitters. The extra emitter gives more choices, but the bigger grid makes the distances harder to read at a glance.
Thinking about side effects
The core challenge is that you never act on one particle. Every firing moves everything. The pulse that finally seats a blue particle on a ring might also shove a red one off its ring. The answer is the sequence where the side effects help instead of hurt.
Start by looking at the particle that is hardest to seat. Maybe it is far from any ring. Maybe it is blocked by a wall on one side and the only emitter that pulls it the right way also pushes another particle out of place. That particle should be seated last, because once it is on a ring, the next pulse will knock it off unless something blocks it.
Before you fire, read every particle and ask what this pulse does to each of them. Count the movements on your fingers if you need to. One pulse that seats two particles is always better than two pulses that seat them one at a time.
Using walls and blocking to your advantage
A particle against a wall cannot be pushed through it. That is not a problem. It is a tool. If you park a positive particle against the left wall, any emitter to its right will try to push it further left, but the wall holds it still. You can now fire that emitter freely without worrying about the red piece.
The same trick works with particles blocking each other. Two particles next to each other on the same row or column cannot be pushed apart by a pulse coming from the same axis, because one blocks the other. Use this to lock a particle in place while you work on the rest.
On the Large chamber, walls appear more often. Scan the board for particles already sitting beside a wall. Those particles are half solved. A single pulse in the right direction finishes the job, and the wall keeps them there.
The tie-break rule and why it matters
When a particle is the same distance from the emitter on both axes, the game breaks the tie by moving along the row. This is not a rare edge case. On a six by six grid, many positions are equidistant on both axes. The tie-break decides which direction a particle goes, and getting it wrong in your head wastes a pulse.
A concrete example helps. A blue particle sits at row three, column four. An emitter sits at row one, column two. The row distance is two and the column distance is two. The tie-break fires and the particle moves along the row, stepping one column to the left toward the emitter. If you assumed it would step up instead, the board ends up somewhere you did not plan.
Reading the board before your first tap
Before you fire anything, spend a few seconds mapping the board. Note which emitters pull the blue particles toward rings and which push the red ones toward rings. Some emitters do both at once. Those are the ones you want.
Check whether any particle is already on a ring. If it is, the next pulse will move it off unless a wall or another particle blocks it. That particle is not finished. It is in danger. Plan your sequence so that particle gets blocked or gets seated again as the final step.
Count the minimum moves in your head. If you can see a two-pulse solution, fire with confidence. If you cannot see one shorter than the budget, try the largest emitter effect first and see where the pieces land.
Common mistakes that burn pulses
- Firing without checking every particle. You noticed the blue one will land on a ring, but you missed the red one flying off the board edge in the wrong direction.
- Forgetting the tie-break. You expected a vertical move and got a horizontal one. The particle is now further from the ring than it was before.
- Treating walls as problems instead of anchors. A particle stuck against a wall is a particle you do not need to worry about for that axis.
- Trying to seat particles one at a time. Two separate pulses cost two from your budget. One pulse that seats two particles costs one.
- Ignoring the par. If the shortest solution is three and you have used five pulses with one particle still floating, the board is probably beyond rescue. Hit New game and try a fresh one.
Why the puzzles are always fair
Every board is searched by a breadth-first algorithm before it is shown. The search tries every emitter at every step and finds the shortest sequence that seats everything. Boards with no solution are thrown away. So are boards that can be solved in fewer than three pulses, because those are too easy to be interesting.
Because the movement rules are completely deterministic, the same sequence of firings on the same board always produces the same result. There is no luck involved. If you fire the same emitters in the same order, you get the same outcome every time.
Nothing leaves your machine
The entire puzzle runs inside your browser. The board is generated on your device, the search runs on your device, and your best score is stored in your browser only. No data is sent to any server at any point. You can load the page, go offline, and keep playing. Closing the tab is the only cleanup there is.