
Clearing the maze when four ghosts hunt differently
What each ghost is actually trying to do, when to eat a power pellet and when to save it, how the side tunnels buy you time, and why corners are your best friend in a chase.
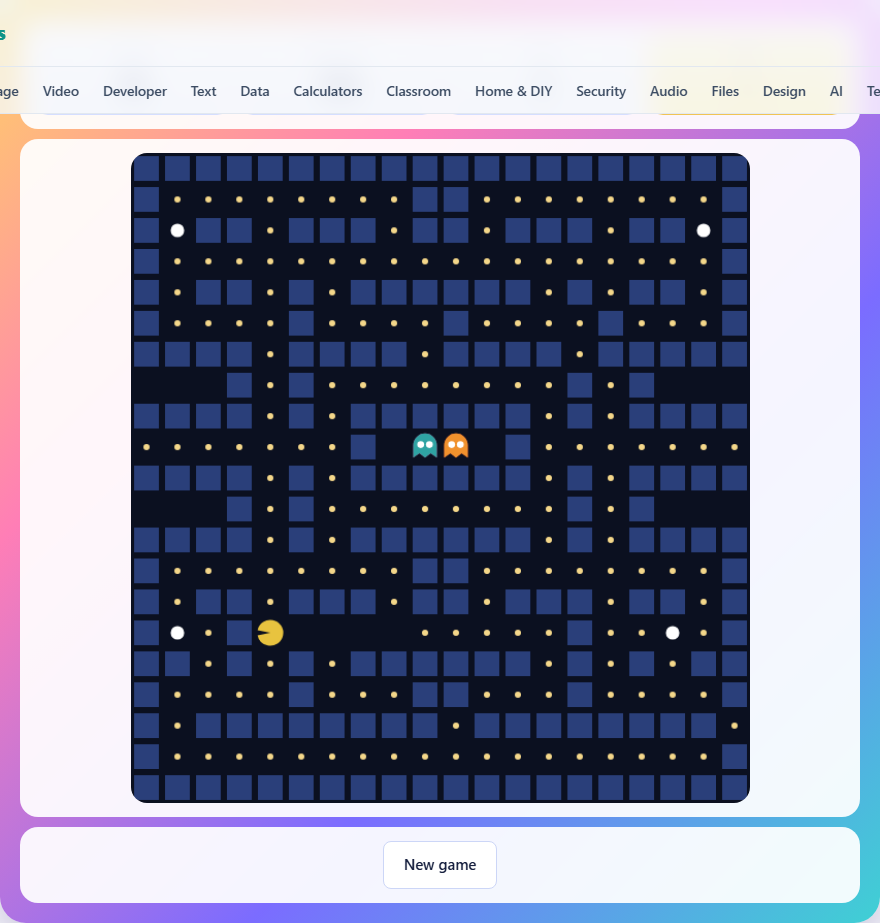
Four targets and the sum that picks each turn
A ghost only thinks at the moment it moves. It lists the four directions, then throws out any that would walk into a wall. It also throws out the way it has just come from. That second rule is why a ghost commits to a corridor instead of shivering on the spot. If the two rules together leave nothing, which happens only in a dead end, the ban on turning back is lifted for that one move.
Next it needs a target square. This is the only place the four differ.
With a target chosen, the ghost gives each legal direction a score. Take the square that direction would land on. Measure the row gap to the target and multiply it by itself. Do the same with the column gap. Add the two. The smallest total wins. That is a squared straight-line distance, so it knows nothing about walls, corners or the real length of a route. It is a compass reading, not a plan.
Ties come up often, and they are not settled at random. The directions are tested in the order up, down, left, right, and a later one takes the lead only if its total is strictly smaller. So on a level score the earlier direction keeps it.
Here is the first ghost move of a fresh game, with the real numbers. You begin at row 15, column 9, facing left. Frame 8 is your first step, so you shift to row 15, column 8. Frame 10 is the first ghost turn. The red one is at row 9, column 9, with walls above and below it, so left and right are its only choices. Left would land it on row 9, column 8. The row gap is 6 and the column gap is 0, so its total is 36 plus 0, which is 36. Right would land it on row 9, column 10, which gives 36 plus 4, or 40. Left is the smaller number, so left is where it goes.
The pink one sits beside it at row 9, column 10. You are heading left, so its target is four squares along that line, at row 15, column 4. Going left scores 36 plus 25, which is 61. Going right scores 36 plus 49, which is 85. It turns left as well, but not for the same reason: it wants the square in front of you rather than you.
A power pellet switches all of this off. While the fright counter is above zero, every ghost, the random one included, shares a single target: the corner away from you. The row is 1, the top, while you are in the lower half of the board, and 19, the bottom, while you are in the upper half. The column is 1, the far left, once you pass column 10, and 18 otherwise. The four personalities go quiet for the length of the pellet and come straight back when it ends.
- The red one aims at the square you are standing on.
- The pink one aims four squares ahead of you, along the way you are facing. Moving left from row 15, column 9, that target is row 15, column 5.
- The teal one swaps its target every 90 frames. For one stretch it aims at you, and for the next it aims at row 19, column 1, down near the bottom left.
- The orange one skips the target step and picks one of the legal directions at random.
The dot count, the frame clock, and two squares nobody reaches
The maze is 21 rows of 20 squares, typed out as plain text in the code. Reading it gives 189 things to eat: 185 small dots and 4 power pellets. That is the number the Dots left box starts on, and it counts the dot under your own feet, which you only collect if you loop back to it. Small dots pay 10 and pellets pay 50, so everything drawn on the map adds up to 185 times 10 plus 4 times 50. That is 1850 plus 200, or 2050.
Speed is counted in animation frames, not in seconds. You take one square every 8 frames. A ghost takes one square every 10. Across 40 frames that is 5 steps for you and 4 for them, so you gain a square every 40 frames. Eating a pellet sets the fright counter to 42 and stretches a ghost step to one square every 14 frames. The counter drops by one on each ghost move, so fright runs for 42 moves, which is 588 frames. On a 60 frames per second screen that is about 9.8 seconds, and in that window you take 73 steps to their 42. Their last 12 moves are the warning, when they blink white. That is roughly 168 frames, or under 3 seconds.
Because the counting is in frames rather than clock time, the whole game runs at whatever speed the screen refreshes. On a 120 hertz display everything happens twice as fast and the fright window is nearer 5 seconds. Nothing in the code corrects for that. Hiding the tab stops the frame loop, so the game waits for you instead of running on.
Two parts of the map do not join up to the rest, and both change what the game can do. The first is one small dot at row 18, column 19. The line of the map holding it is written a character too long. The grid only reads 20 characters from each line, so the closing wall character is dropped and that dot is left with walls above, below, left and right. Nothing can get to it. The counter therefore bottoms out at 1, and the message for eating every dot cannot appear. The most the map can hand you is 184 dots and 4 pellets: 1840 plus 200, or 2040.
The second is the box the ghosts start in. Rows 8 and 10 are solid from column 7 through column 12, and row 9 has a wall at column 7 and another at column 12. That leaves four open squares in a line, row 9 columns 8 to 11, with no doorway on any side. The arcade machine this game borrows its ideas from puts a gate on that box. This map has none.
The lower two ghosts start on row 10, columns 9 and 10, which are wall squares, because the code never checks the square a ghost begins on. Both of them face up. Their only way out is downward, and the ban on turning back removes it on the first move, so up into the sealed line is the one legal step they have. The other two are already in there. Running this same movement code for 120,000 frames, more than half an hour of play, never puts a ghost on a square outside those four.
So here is the honest picture. The chase rules above are real, and the code works through them at every turn. In this build they are being solved inside a closed box. No ghost can reach you, your three lives stay at three, and the 200 points for a frightened ghost cannot be banked either, because you cannot walk into the box to meet one. Read the strategy sections as a guide to the rules the ghosts follow, not to pressure you will feel while playing.
- Distance is measured straight through walls, so a ghost can take the turn that points at you and end up in a dead end.
- The same sum ignores the side tunnel. A wrap from column 19 to column 0 reads as a jump of 19 columns, so no ghost ever treats the tunnel as a short cut.
- Every frightened ghost pays a flat 200. There is no doubling for the second or third one caught on the same pellet.
- There is one maze and there are no levels. Nothing speeds up as the board empties, and no bonus fruit appears.
- Losing a life puts you back on row 15, column 9 and the ghosts back on their four starting squares. Eaten dots stay eaten and the score is kept. Each ghost keeps the direction it was already facing.
- The catch test only compares squares. You and a ghost move on the same frame only when the frame number divides by 40, so a straight swap of places on one of those frames would not be recorded as a catch.
The goal is simple, the maze is not
You control a round yellow character moving through a maze full of small dots. Eat every dot and you win. Four ghosts patrol the same maze and if one of them touches you, you lose a life. You start with three lives. Lose all three and the game is over.
Scattered around the maze are four large flashing dots called power pellets. Eating one of them frightens the ghosts for a few seconds. While they are frightened they turn blue, run away from you and can be eaten for 200 points each. The small dots are worth 10 points apiece.
The maze also has two gaps in the side walls - one on the left, one on the right. Moving through either gap wraps you around to the opposite side. The ghosts can follow you through, but the wrap gives you a moment to change direction that a straight corridor does not.
How to move
Arrow keys steer on a keyboard. You can also use W, A, S and D. On a phone or tablet, swipe in the direction you want to go. Below the game board sit four arrow buttons that work on any device.
One detail matters: you keep moving in the last direction you chose. You do not stop when you release the key. If you press left, you travel left until you hit a wall or press something else. This means you can queue up a turn before you reach the junction - press the direction you want next and the character will take that turn as soon as it arrives.
Four ghosts, four personalities
The ghosts look different and they behave differently. Understanding what each one is doing is the difference between clearing the board and being cornered on your second lap.
The red ghost chases you directly. It always picks the direction that closes the straight-line distance to wherever you are right now. It is the most predictable and the most dangerous when you stop moving.
The pink ghost does not aim for where you are. It aims for the square four spaces ahead of you in your current direction of travel. That means it tries to cut you off rather than follow you. When it works alongside the red ghost, one comes from behind and the other appears in front. Those pincer moments are the tightest spots in the game.
The teal ghost alternates between moods. For a stretch it chases you like the red ghost, then it wanders toward a fixed corner of the maze, then it chases again. You can feel the pressure ease and return.
The orange ghost moves at random. It picks a direction at each junction with no plan. That makes it the easiest to dodge but also the hardest to predict, because it can stumble into you around a corner you thought was safe.
Scoring and the dot counter
The stats bar shows your score, the number of dots still on the board and how many lives you have left. Small dots add 10 to the score. Power pellets add 50. A frightened ghost that you catch adds 200.
Your best score is saved in your browser so you can try to beat it across sessions. The game does not track anything else and there are no levels or stages beyond the single maze.
When to eat a power pellet
The four power pellets sit in the corners of the maze. Each one is a single-use escape tool. The fright effect lasts only a few seconds, and once it wears off the ghosts return to their normal behaviour immediately.
Eating a pellet when no ghost is near you wastes it. The fright window runs out before you reach any of them, and now you have one fewer lifeline for later. The best moment is when you are boxed in - two ghosts approaching from different directions with no clean corridor to run down. Pop the pellet, watch them reverse, and use those seconds to clear the dots they were guarding.
Near the end of a game, when only a handful of dots remain, you will often have one pellet left and a cluster of dots behind a ghost. Save that pellet for exactly that push. Eating it early means you have to dodge your way into the last corner without any help.
Using the tunnels and the corners
The side tunnels are the most underused part of the maze. If a ghost is bearing down on you along a horizontal corridor, ducking into the tunnel wraps you to the far side of the board. The ghost will follow, but it takes time to cross the full width, and you can change direction the instant you come out. The tunnel does not make you faster, but the distance it puts between you and the chaser is real.
Corners and tight junctions are valuable for a different reason. Ghosts choose their direction only at junctions. They cannot reverse mid-corridor unless they are frightened. A quick double-back at a junction can leave a ghost committed to a path it cannot undo for several squares. If you turn around at the right moment, the ghost sails past and you slip behind it.
Both tricks work best against the direct chaser. The pink ghost, which aims ahead of you, is harder to shake with a simple reversal because its target moves when your direction changes.
Staying alive in the tight spots
The most dangerous positions are T-junctions where two ghosts approach from different branches. Your instinct is to pick the open branch, but if the pink ghost is aiming four squares ahead, the open branch may be exactly where it is heading.
Instead, glance at the ghosts' colours. If you see red behind and pink ahead, you are in a pincer. Reverse into the red ghost's corridor - it will be one square behind you, but it cannot turn around until the next junction, so you pass it going the other way. This costs you nothing if you time it before the ghosts close the last square.
If all four ghosts are nearby and you have a pellet available, use it. Surviving is worth more than a perfect pellet timing. A wasted life costs far more than a wasted pellet.
Common beginner mistakes
- Chasing dots instead of planning a route. Moving toward the nearest dot leads you into dead ends. Pick a loop through the maze and sweep the dots along it.
- Eating a power pellet on reflex. You walked over it by accident and now the ghosts are blue with no ghost nearby to eat. Stay aware of where the pellets are and route around them until you need one.
- Ignoring the dot counter. When it drops below ten, the remaining dots are scattered and each trip to grab one is a risk. Know where they are before you go.
- Stopping at a junction. Standing still against the direct chaser is the fastest way to lose a life. Keep moving even if you are not sure where to go - a moving target is harder to pin down.
- Forgetting the tunnels exist. The side wraps are easy to overlook because they sit at the edge of the board. They are often the only way out of a bad position.
Reading the board at speed
At first the game feels hectic. Four ghosts, flashing pellets and corridors in every direction are a lot to track at once. The key is to stop watching your own character and start watching the ghosts.
Your character follows your last input reliably. You do not need to look at it. What you need is to see where the ghosts are heading next. That means tracking two things: which direction each ghost is facing and how far away it is. If a ghost is three junctions away and headed to the left, it is not a threat. If one is two squares behind and aimed at you, it is.
With practice, your eyes settle into a rhythm: scan the ghosts, press a direction, scan the ghosts again. The dots take care of themselves as long as your route is sensible.
The whole game runs in your browser
Nothing leaves your device. The maze, the ghost behaviour and your score are all handled inside this page. There is no server keeping track, no account to make and no data sent anywhere. If you close the tab, the only thing left behind is your best score in local storage, and clearing your browser data removes even that.