
Solving number grid picture puzzles step by step
How the counting rule works in Mosaic, which squares to fill first, how to use overlapping clue blocks to crack the middle of the board, and the mistakes that trip up everyone on their first grid.
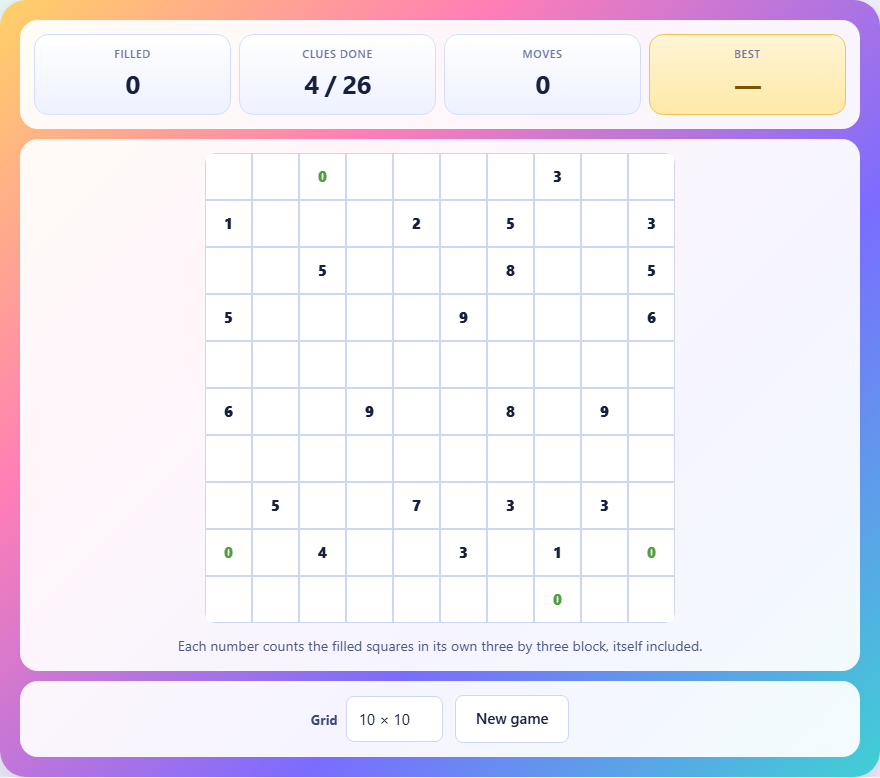
What the numbers mean
Every numbered square on the grid is a clue. The number tells you how many squares are filled inside a block of nine centred on that clue. The block covers the eight squares touching it - above, below, left, right and the four diagonals - plus the numbered square itself.
That last part catches nearly every new player. The clue counts itself. A square showing 1 can mean that it alone is filled and all eight of its neighbours are empty. A square showing 9 means every square in its block of nine is filled, itself included.
Squares that carry no number tell you nothing on their own. They are blank because the generator stripped their clue away during construction. You will fill some and leave others empty, but you learn which ones only from the numbered squares nearby.
Controls and grid sizes
Tap or click a square once to fill it. Tap the same square again to mark it with a cross, which records that you have decided it is empty. A third tap clears it back to unknown. The three states cycle in that order.
The game tracks three figures in the stats bar. Filled is how many squares you have coloured in so far. Clues done counts how many numbered squares already have the right number of filled neighbours. Moves is the total number of taps you have made, and the puzzle scores on that count - fewer moves is a better result.
A dropdown beside the New Game button lets you pick 7 by 7, 10 by 10 or 13 by 13. The small grid is a good place to learn the rules because you can see every clue at once. The large grid demands the same logic but takes longer and has more places for a mistake to hide.
Where to begin every puzzle
Look for the extreme numbers first. A 9 fills its entire block - the numbered square and all eight neighbours. A 0 empties its entire block, which means eight crosses and the square itself left unfilled. Both give you free progress without any reasoning at all.
After the extremes, look at corners. A corner square only has four squares in its block, because the grid has no room for the others. A 4 in a corner fills all four. A 0 in a corner empties all four. Any number in a corner is easier to settle than the same number in the middle of the board, because fewer unknowns means fewer possibilities.
Edge squares work the same way but with six squares in the block instead of four. A 6 on the edge fills everything it touches. These are not as dramatic as corners, but they still narrow things down faster than a clue surrounded by eight unknowns.
Using overlaps between neighbouring clues
Two numbered squares that sit next to each other share some of the same squares. If they are side by side in the same row, their blocks overlap by six squares out of nine. The three squares that belong to one clue but not the other are the key.
Suppose two adjacent clues read 5 and 3. They share six squares, and each has three squares of its own. The difference between the two clue values - combined with how many shared squares you have already filled - tells you about those private columns. If you already know that all the shared squares are filled, the private ones must account for the rest.
This overlap reasoning is how you break open the middle of a grid where nothing is on an edge or in a corner. It takes practice, but once you see the pattern it becomes the main solving technique.
The satisfied clue rule
A clue that already has enough filled squares is done. Every remaining unknown in its block must be empty. This is the single most useful deduction in the game and the one that produces the most crosses.
Say a square reads 3 and three of its neighbours are already filled. That clue is satisfied. Cross out every other unknown square in its block at once. Those crosses then ripple into the blocks of nearby clues, because a crossed square is no longer unknown - it is settled as empty, which may push another clue into the satisfied state.
The chain reaction is what makes Mosaic satisfying. One good deduction at the edge of the board can cascade inward and solve a dozen squares in quick succession. Missing the chance to cross out squares after a clue is satisfied is the main reason solvers get stuck.
A worked example on a small board
Picture a 7 by 7 grid. The top-left corner holds a 2. Its block is only four squares: itself and the three squares touching it. Two of those four must be filled. If the square to its right carries a 0, that zero empties its own block, which tells you the corner's right neighbour is empty. Now the 2 has only three candidates and needs two, so the logic tightens fast.
Next, scan the bottom row. An edge clue reading 6 means all six squares in its block are filled. Fill them, then look at any clue whose block overlaps those newly filled squares. Each one is now closer to satisfied.
Keep working outward from what you know. Never fill a square unless a clue forces it. The grid has exactly one answer, so there is always a square that can be settled by logic.
Marking empties matters more than you think
New players tend to skip the cross marks. Filling squares feels like progress, but leaving unknowns unresolved hides information. The cross does not affect the puzzle - it is purely for your own bookkeeping - but it changes what you can see.
When you cross out a square, every clue whose block includes that square now has one fewer unknown. That makes the arithmetic simpler. A clue with four unknowns and two still needed is ambiguous. The same clue with two unknowns and two still needed is solved - fill both and move on.
Make a habit of it. Every time you satisfy a clue, cross out its remaining unknowns before you look anywhere else. The few extra taps cost almost nothing and they keep the board readable.
Common mistakes and how to dodge them
- Forgetting that the clue counts itself. A 1 can mean only the numbered square is filled. If you treat it like minesweeper, where the number counts surrounding mines but not the square it sits on, every count will be off by one.
- Filling squares without evidence. If you are not sure, leave it blank. The puzzle always has a next logical step somewhere - if you cannot find it, look at the edges and corners again.
- Ignoring crosses. Skipping the cross marks makes the middle of the board much harder than it needs to be. Two minutes of disciplined crossing saves five minutes of staring.
- Working only with one clue at a time. The puzzle is solved by the interaction between clues. Look at pairs and clusters, not isolated numbers.
- Rushing on the larger grids. A 13 by 13 board has 169 squares and the clue count grows with it. Slow, careful work at the start prevents a tangle in the middle that forces you to undo ten moves.
How the puzzles are built
The generator paints a random picture using soft blobs rather than scattered noise, so the filled squares form clumps that look vaguely like shapes. Every square then gets its number - the count of filled squares in its block of nine.
After that, the generator removes clues one at a time in a shuffled order. After each removal it asks a solver whether the puzzle still has exactly one answer. If removing a clue creates a second solution, that clue goes straight back. What you are given is whatever survived that process.
This is why the remaining numbers look scattered instead of laid out in a pattern, and why every grid can be solved without guessing. The generator will not hand you a puzzle that needs luck.
Everything stays on your device
The grid is generated and solved entirely inside your browser. No image is sent to a server, no move is recorded anywhere outside this tab. You can load the page, disconnect from the internet and keep playing with no change in behaviour.
Your best result is saved in your browser's local storage on this device only. It will not appear on another machine, and clearing your browser data removes it.