
Crossing the sinking ground without getting stranded
This guide covers the stepping stone puzzle where the ground gives way behind you. It explains the three kinds of squares, how the step budget works, why the order of collection matters more than the path itself, and the thinking habits that keep you from getting stuck in the middle of a solved route.
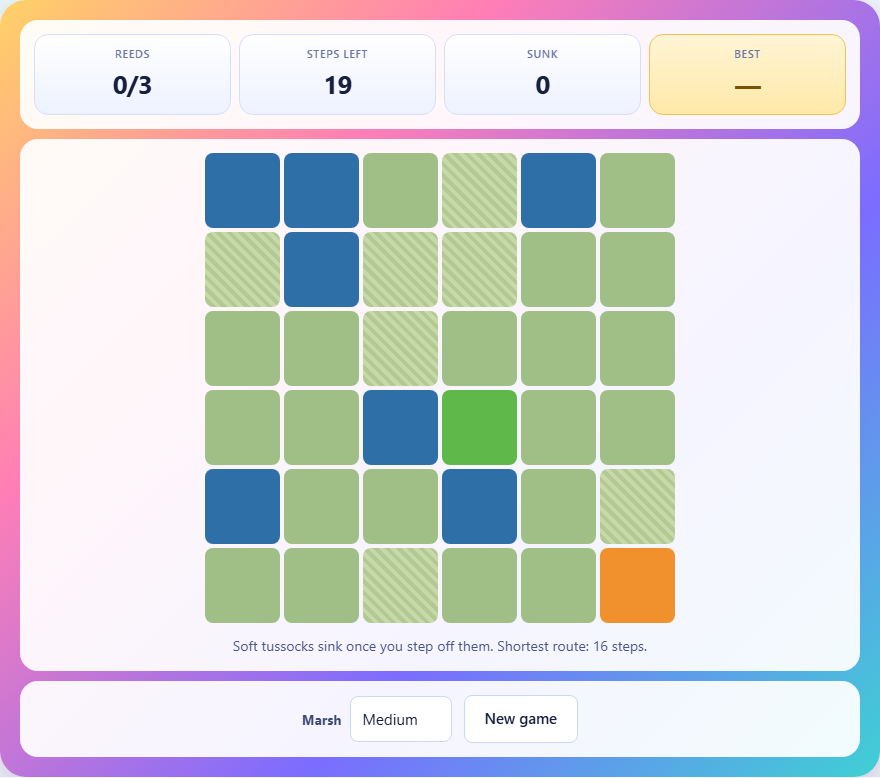
The three kinds of ground
Every square on the grid is one of three things. Plain green squares are solid. You can stand on them, walk off them, and come back to them as many times as you like. They never change.
Striped green squares are soft. You can stand on them safely. But the moment you step off a soft square, it sinks and becomes water. You cannot return to it. It is gone for the rest of the puzzle.
Dark blue squares are already water. You cannot step on them at all. They are walls you walk around.
Scattered across the grid are reeds. You pick them up by stepping on their square. You also have a starting position, marked by a dot, and a goal square, marked by a flag. The job is to pick up every reed and then reach the flag.
Controls and how you move
On a keyboard, use the arrow keys or W, A, S, D to move up, left, down, and right. Each press moves you one square in that direction. On a phone or tablet, tap the square you want to step onto. You can only move to a square that is directly next to you. No diagonal movement is allowed.
The game tells you immediately if a square is water or has already sunk. If you try to step on water, a message appears and nothing moves. If you reach a point where every neighbouring square is water or sunk ground, the game declares you stranded and the round ends.
A dropdown labelled Marsh lets you pick the grid size. Small uses a five by five grid. Medium uses six by six. Large also uses six by six but with more soft squares, more water, and a tighter step budget.
The step budget and par
Every puzzle has a par. This is the fewest steps needed to collect every reed and reach the flag. The game works out the par before showing you the puzzle by searching every possible route through the real state space. If no route exists, the puzzle is thrown away and a new one is generated.
Your step budget is the par plus a small amount of slack. On small and medium boards, the slack is three extra steps. On large boards, it drops to two. This means you do not need to find the perfect route. A route that wastes one or two steps still finishes inside the budget.
If you run out of steps, the game ends and tells you what the par was. Your score is the number of steps you used, and lower is better. Finishing in fewer steps than the budget gives a better record.
Why order matters more than path
Almost every failed attempt at a marsh puzzle is a route that was perfectly walkable and simply done in the wrong sequence. The path between two reeds is usually obvious. The question is which reed to collect first.
A reed sitting beyond a soft square can only be collected on the way through that square, because once you leave the square it sinks and you cannot come back. If you walk past that reed to collect a different one first, the soft square sinks behind you, and the first reed is now stuck on the far side of water.
Before you take your first step, look at the whole grid and ask: which reeds are behind soft squares? Those are the ones with limited access. Collect them in the order that lets each soft square sink without cutting off anything you still need.
Using solid squares as junctions
Solid squares are the only squares you can visit more than once. That makes them the branching points of your route. Every plan should be built around the solid squares.
If a solid square sits between two soft squares, you can walk through one soft square to collect a reed, come back to the solid square, and then walk through the other soft square to collect a second reed. The solid square acts as a hub. Without it, you would need two separate trips and would lose a soft square on each one.
On larger boards, chains of solid squares form corridors that stay open no matter what you do. Find those corridors early. They are the backbone of every safe route. Everything else hangs off them.
Counting the doors
Each soft square is a door between two parts of the grid. Once you walk through it, the door closes. If you need to cross back later, you need a different door.
Before you start, count how many times you need to cross a particular boundary. If two reeds are on the far side of a cluster of soft squares, you need to cross that cluster twice - once for each reed. That means you need two separate soft squares to use as doors. If there is only one, you must collect both reeds on a single trip.
This counting habit catches dead ends before you walk into them. A detour through a soft square that does not lead to a reed is a door wasted. Every door should earn its use by putting you next to something you need.
The stranding trap
Getting stranded means every square next to you is water or sunk. The game ends immediately. This is different from running out of steps. Stranding happens mid-route, often with reeds still uncollected.
The most common version: you step onto a solid square that is surrounded by soft squares. You arrived through one soft square, which has now sunk. The remaining soft squares are still intact, but they all lead away from the flag. You collect a reed on the far side of one, and its square sinks behind you. Now the solid square has water on two sides and soft squares on the other two. If you use another soft square, the solid square might become surrounded by water, and you are stuck on the far side.
The fix is to think about the route out before you commit to the route in. Every step off a soft square closes a door. Make sure you still have a door that leads back toward the flag.
A worked example
A five by five grid. You start in the top left. The flag is in the bottom right. Two reeds sit on the board. Reed A is in the middle, behind a soft square to the north. Reed B is near the bottom, behind a soft square to the east.
If you walk south through a column of solid squares, take the soft square east to grab Reed B, then try to come back for Reed A, the soft square behind you has sunk. Reed A is now unreachable. The route was walkable. The sequence was wrong.
Instead, go east first through a row of solid squares. Walk north through a soft square, grab Reed A, return south to the solid row. Now head south and east through more solid ground, take the soft square to Reed B, collect it, and continue south to the flag. Both reeds collected, flag reached, puzzle solved.
Common mistakes and how to avoid them
- Walking onto a soft square without checking what is on the other side. If there is no reed or flag past it, you are spending a door for nothing.
- Forgetting that you are standing on a soft square. The square does not sink until you leave. You have time to look around and pick a direction. There is no rush.
- Ignoring the step counter. The budget is not generous. Every wasted step brings you closer to running out. Plan the route before moving, not after.
- Trying to reach the flag before collecting all the reeds. The flag only counts when every reed is in hand. Arriving early wastes steps walking back.
- Assuming there is only one solution. The budget has slack. Several routes may work. If the obvious path looks risky, check whether a less direct route avoids the dangerous soft squares.
Everything runs locally in your browser
The puzzle generator and the route solver both run on your device. Every grid is checked before it appears, so every puzzle is guaranteed to have a solution. Nothing about the puzzle or your play is sent to a server. Your best score is stored in your browser on this machine only.
Load the page and cut your network connection. Press New game. A new grid appears, the par is computed, and the game works exactly as before. The server was never part of any of it.