
Racing tokens round the board against the computer
The full rules of the dice game, how the computer picks its moves, the choices that separate a lucky player from a smart one, and what to do when every roll seems to go wrong.
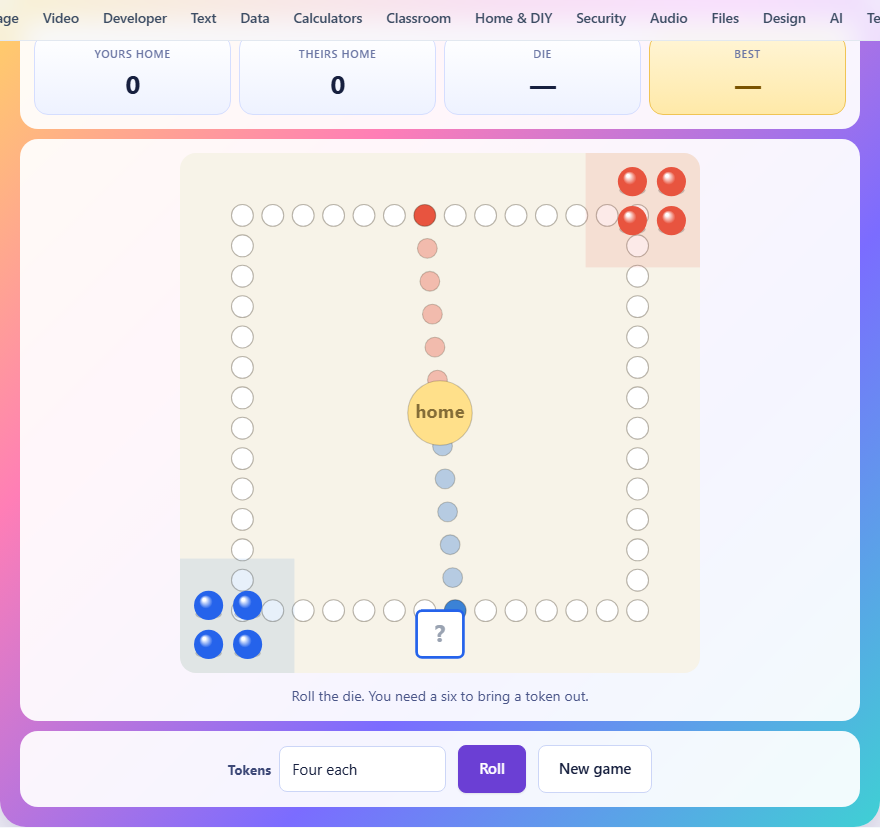
The board and what each part does
Two players share a square track of fifty-two squares. Each player has a coloured yard in one corner where tokens wait before they enter the game. In the centre of the board sits the home square, the finish line for every token. Between the track and home runs a short home column, five squares long, that only your tokens can enter.
You play as blue, starting from the bottom of the board. The computer plays as red, starting from the top. Both sides race their tokens around the same track in the same direction, but each side enters from its own starting square and turns off into its own home column after a full lap.
How to bring tokens out and move them
Every token starts in its yard. The only way to bring one out onto the track is to roll a six. When you do, one token moves to your entry square and you roll again. That second roll moves any token on the board by that many squares.
On your turn, press the Roll button or tap it on a phone. The die spins briefly and shows a number. If more than one of your tokens can legally move, the ones that can are shown with a glowing ring around them. Tap the one you want to move. If only one token can use the roll, it moves on its own after a short pause.
A six always gives you another roll, whether you used it to bring a token out or to move one already on the track. Consecutive sixes are allowed and each one grants another turn.
Capturing and sending tokens back
If your token lands on the exact square where one of the computer's tokens sits, that token is knocked back to the red yard. It will need another six to come out again. The same rule applies in reverse. If the computer lands on your token, yours goes back to the blue yard.
A capture earns the capturing player another roll, just like a six does. That makes captures doubly valuable. You remove a threat from the board and you get an extra turn to advance. Note that captures only happen on the shared track. Once a token enters its own home column, it is beyond anyone's reach.
The home column and the exact-landing rule
After a full lap of fifty-two squares, your token turns off the main track into your home column. The home column is five squares long and leads to the home square in the centre. Once a token enters the home column, nothing can reach it. The computer's tokens cannot follow yours in there.
To reach the home square you must roll the exact number of squares remaining. A token two squares from home needs a two. A three, four, five, or six cannot be used on it. This rule means tokens near the end of their home column can get stuck waiting for the right roll. The game does not let you overshoot.
Game modes and winning
Two options are available from the dropdown above the board. The quick game gives each side two tokens. The standard game, selected by default, gives each side four tokens. The first player to get every one of their tokens home wins.
Two-token games are faster and more affected by luck. A single bad capture can end the game before strategy has a chance to help. Four-token games take longer but give you more choices each turn, which is where smart play starts to matter. Whichever mode you choose, press New game at any time to start fresh.
How the computer decides which token to move
The computer scores every legal move and picks the highest. Its priorities, in rough order, are to capture one of your tokens, to land on the home square, to advance into the safety of the home column, to bring a new token out of the yard, and then to move whichever token gains the most ground.
It also counts how exposed a landing square is. If one of your tokens is within six squares behind the landing spot, the computer knows it could be captured next turn and penalises that move. This means the computer avoids reckless positions, and beating it requires you to do the same. Understanding its logic helps you predict where it will go. When you know the computer will take a capture over everything else, you can avoid leaving a token where it can be reached.
Getting multiple tokens onto the track
The biggest early mistake is pouring every six into advancing the one token already on the board. A single token is a single target. If the computer captures it, you lose all its progress and need another six to start again.
Whenever you roll a six and already have a token on the track, consider bringing a second one out instead. Two tokens give you a real choice on most turns. You can advance whichever one is in the safer position, or move the one closest to home while the other draws attention.
In the four-token game, aim to have at least two tokens running by the time any of them reaches the halfway mark. Three on the track at once is even better, because the computer cannot threaten all of them in one turn.
Reading the danger zone before you move
A token can be captured by anything that is one to six squares behind it on the track. Before you place a token on a square, look backwards. Count six squares from your landing spot. If a red token sits anywhere in that range, you could be sent home next turn.
Sometimes you have a choice between a long move into a dangerous square and a short move into a safe one. The safe move is almost always better unless the long move is a capture. Gaining three extra squares means nothing if you lose fifty on the next turn.
The risk calculation changes near the home column. A token one or two squares from safety is the most exposed piece on the board because it has the most to lose. Get it into the home column rather than waiting for a perfect roll. Even landing three squares inside the home column is better than sitting on the open track.
When to chase a capture and when to run
A capture is worth more than the squares it covers. You remove a threat, you send their token back to the start, and you earn another roll. If one of your tokens can capture and another can advance further, take the capture almost every time.
The exception is when the capture leaves your token badly exposed. After you land on the square you just cleared, look at what is behind you. If another red token is within striking range, the capture might cost you more than it gained.
Late in the game, when the computer has tokens near its own home column, captures become harder to set up and less common. At that stage the priority shifts to running your own tokens into safety as quickly as possible rather than hunting for a hit. The endgame is often decided by who gets the right small numbers first. A token stuck four squares from home needs exactly a four, and every other roll is wasted on it.
Common mistakes new players make
- Waiting for a six to bring a third token out when two are already close to home. The six is better spent advancing a token that needs it.
- Parking a token one square from the home column and hoping for a one. Move it whenever you can, even if you do not roll the exact number for home, because sitting on the open track is the worst place to wait.
- Ignoring what the computer rolled. Watch where red tokens move. If one just came out of the yard, it is six squares behind your entry point. That is within range of your freshest token.
- Always moving the token furthest ahead. The trailing token needs attention too, and if it gets captured you have lost all its progress.
No data leaves your device
The game runs entirely inside the page. The die is rolled using the random number generator in your browser, the computer opponent thinks in your browser, and no move is sent to a server. There is no account to create and no login required. Your game history is stored on this device only. Close the tab and nothing remains on any server, because nothing was sent to one in the first place.