
Splitting white light to feed three catchers at once
How the prism breaks a beam into three colours, what the mirrors and catchers do, the controls for turning and flipping, and a step-by-step method for solving the bench without wasting turns.
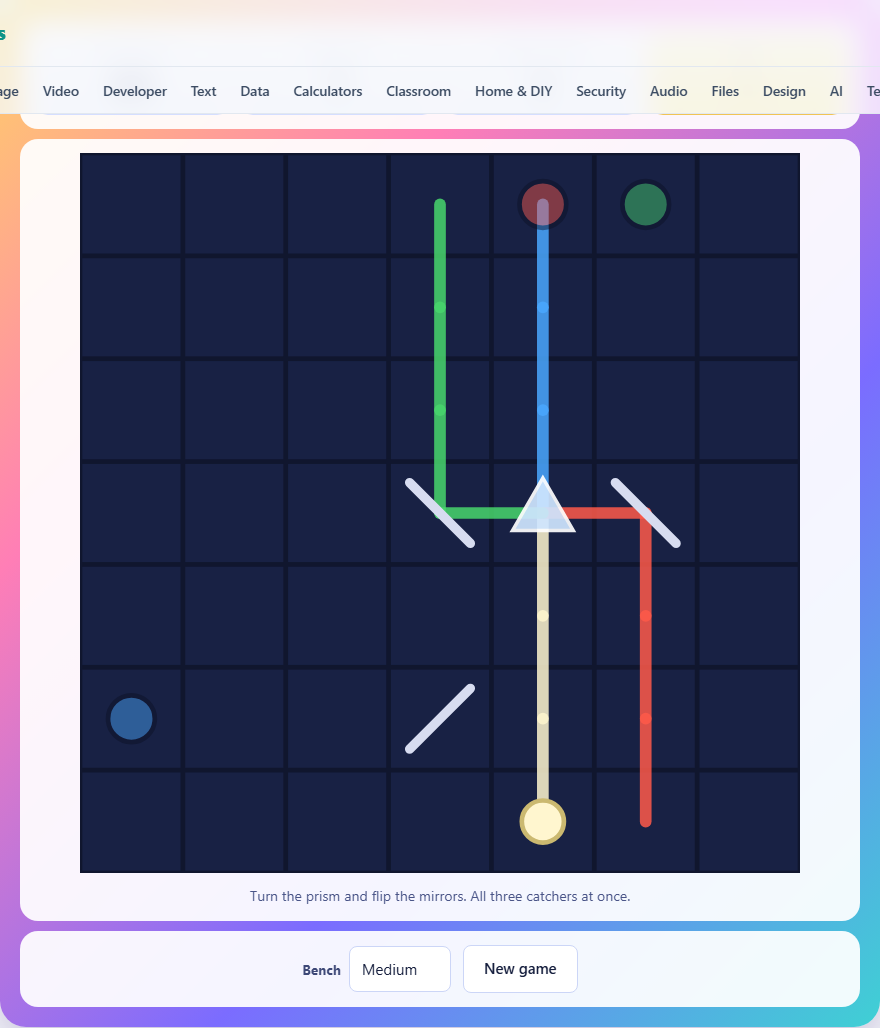
One beam in, three beams out
A lamp on the edge of the board fires a single white beam. The beam travels in a straight line until it hits something. The first important thing it can hit is the prism, drawn as a triangle. When white light reaches the prism, it splits into three separate beams: red, green and blue. Each one leaves the prism in a different direction.
The three exit directions are fixed relative to the prism. They do not change. What does change is which colour takes which exit. Tapping the prism rotates the colour assignment. Red might leave to the right on one setting, but upward on the next. The exits stay still. The colours shuffle between them.
This is the core tension of the puzzle. You cannot steer red independently of green and blue. Moving one moves all three.
What else sits on the bench
Mirrors sit on some squares inside the grid. Each mirror has two states, drawn as / and \. Tapping a mirror flips it to the other state. A mirror bends any beam that hits it by ninety degrees, no matter what colour the beam is. One mirror can serve multiple beams if their paths cross it.
Catchers are coloured circles placed on specific squares. There are exactly three: one red, one green, one blue. Each catcher accepts only its own colour. A red beam reaching the green catcher does nothing useful. A wrong-coloured beam hitting a catcher is simply absorbed.
The lamp, the prism and the catchers cannot be moved or changed. Only the mirrors and the prism rotation are under your control.
Controls and what they cost
Tap or click the prism to rotate it. It cycles through three settings in one direction only. Getting back to where you started costs three taps, not one. That makes prism turns expensive.
Tap or click a mirror to flip it. A flip toggles between / and \. Each flip costs one turn, the same as a prism rotation.
The stats bar shows three numbers. Catchers lit tells you how many of the three are currently fed. Turns left shows your remaining budget. Fewest turns shows the minimum number of taps needed from your starting position to the solution. If you run out of turns, the game ends.
Board sizes and difficulty
A dropdown labelled Bench offers three sizes. Small is a six by six grid with two mirrors. Medium is seven by seven with three mirrors. Large is eight by eight with four mirrors. The New game button builds a fresh bench.
More mirrors means more possible combinations. Two mirrors have four arrangements. Three mirrors have eight. Four mirrors have sixteen. Multiplied by three prism settings, a large board has forty-eight total configurations. Only one of them lights all three catchers.
The starting configuration is deliberately scrambled away from the answer. The game picks a setting that requires at least a few turns to reach the solution, so you always have genuine work to do.
Solve the mirrors before the prism
The mirrors decide where the three exit paths lead. The prism only decides which colour takes which path. That means the mirrors come first.
Look at the three catchers. Trace a path backwards from each one to see which direction a beam would need to arrive from. Then trace from the prism outward along each exit to see where the beam currently goes. Your job with the mirrors is to connect each prism exit to a catcher.
Once the paths are right, rotate the prism until the colours line up. Red to the red catcher, green to the green catcher, blue to the blue catcher. Since there are only three prism settings, this last step is at most two taps.
Working backwards from the hardest catcher
Not every catcher is equally hard to reach. Some sit close to a prism exit with a clear path. Others are tucked in a corner behind two mirrors. Start with the hardest one.
Pick the catcher that seems most awkward. Trace backwards from it: which square does a beam need to come from? Which mirror could send it there? Set that mirror first. Then check what happened to the other two paths.
A mirror that serves two beams is the tricky case. Flipping it to fix one path may break another. When you spot a shared mirror, you need both paths to agree on the same setting. If they cannot, the answer uses a different route entirely. Try the other prism exits.
Why coloured beams cannot be split again
A coloured beam that reaches the prism a second time does not split further. It scatters and is lost. This is an important rule that catches people off guard.
If a mirror sends a red beam back towards the prism, that red beam vanishes. The catcher it was heading for goes dark. When a colour disappears and you cannot figure out why, check whether a mirror is bouncing it into the prism.
The fix is usually to flip the offending mirror so the beam goes somewhere else. Even sending the beam off the edge of the board is better than feeding it back into the prism.
Watching all three at once
A flip that rescues one colour usually spoils another. The catchers-lit counter at the top is the honest score. Going from one lit to two lit is progress. Going from two to one means your last move helped one beam and hurt another.
Before each tap, predict what will happen to all three beams. Follow the trails. If a mirror sits on two beam paths, flipping it changes both at once. The goal is to reach three lit catchers in a single configuration, not to fix them one at a time.
If you find yourself flipping the same mirror back and forth, stop. The answer requires a different combination. Step back, check the prism setting, and try a different approach.
A walk through a small bench
A six by six bench with two mirrors. The lamp is on the left edge. The prism sits near the middle. One mirror is two squares above the prism. Another is in the lower right area. The three catchers sit along the top, bottom and right edges.
Start by following the white beam from the lamp. It crosses the grid and hits the prism. Three coloured beams fan out. One goes upward, one continues to the right, and one goes downward. The upward beam hits the first mirror.
That mirror is currently set to \. The beam bounces to the right and leaves the grid. Nothing is caught. Flip the mirror to /. Now the beam bounces to the left and hits the red catcher. One down.
The rightward beam from the prism goes straight to the blue catcher. That is two. The downward beam hits the second mirror. It is set to / and sends the beam to the left, missing the green catcher by one column. Flip it to \. The beam bounces right and reaches the green catcher. Three lit. But the prism setting might be wrong. If blue is hitting the red catcher and red is hitting the blue, tap the prism once. The colours rotate and each finds its match. Done in three turns.
How each puzzle is checked for a unique answer
The generator does not hope a bench works. It checks. With three prism settings and two states per mirror, the total number of combinations is small enough to test every one. A bench with three mirrors has twenty-four combinations. A bench with four mirrors has forty-eight. The generator walks all of them and counts how many light every catcher.
If more than one combination works, the bench is thrown away and a new one is built. If no combination works, the same thing happens. Only benches with exactly one solution are kept. This means every puzzle you see has a definite answer, and no amount of exploring will find a second one.
Common mistakes and what to do instead
- Turning the prism first. The prism is the last piece to set. Get the paths right with mirrors first, then rotate the prism to assign colours.
- Forgetting the prism only turns one way. Turning past the answer costs three taps to come back around. If you overshoot, you have spent three turns for nothing.
- Ignoring the beam trails. The coloured lines on the board show where every beam goes right now. They update after every tap. Use them.
- Sending a coloured beam back into the prism. The beam vanishes. Check mirror angles before flipping to make sure no exit beam curves back toward the triangle.
- Spending turns without a plan. With a small budget, random tapping runs out fast. Count the minimum turns you need and spend each one with purpose.
Your bench stays on your own device
Every bench is generated and solved inside your browser. No board layout, no move history, and no score leaves your machine. You can disconnect from the network after the page loads and keep playing. There is no server to talk to and no account to make.