
Mixing light on a grid to solve colour puzzles
How additive colour works on the Lantern board, what the mirrors and targets actually do, the full set of controls, and a handful of strategies that cut wasted flips in half.
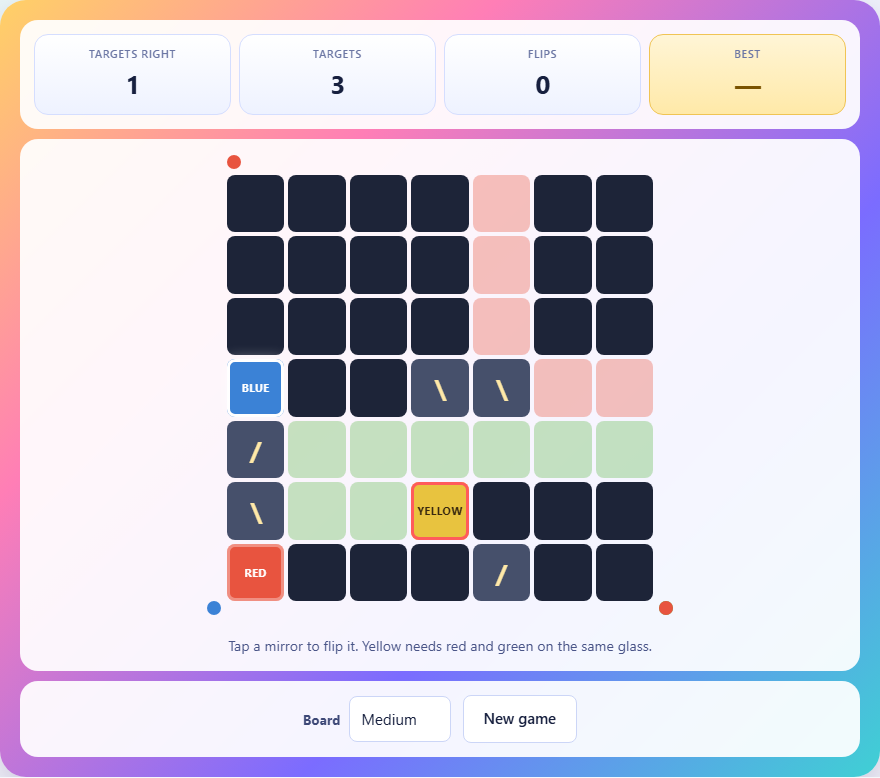
Light mixes differently from paint
Most people learn colour mixing in school with paint. Red and yellow make orange. Blue and yellow make green. That is subtractive mixing, and it has nothing to do with Lantern.
Lantern uses additive mixing, which is how light works. Red light and green light together make yellow. Red and blue make magenta. Green and blue make cyan. All three together make white. There is no yellow lamp anywhere on the board. If a target says yellow, you have to land a red beam and a green beam on the same spot.
That single rule is the whole puzzle. The board gives you three colours of lamp and asks you to deliver mixes that can only be made by steering two or three beams to one place.
What sits on the board
The board is a square grid. Around the outside edge sit coloured dots. Each dot is a lamp. It fires a beam of its own colour straight into the grid. The three lamp colours are red, green and blue.
Inside the grid you will see mirrors and targets. Mirrors are drawn as / or \ characters. Targets are labelled with the colour they need. A target wanting yellow, for example, shows the word yellow and will only count as solved when it receives exactly yellow light.
Faint coloured trails show where each beam currently goes. They update the instant you flip a mirror, so you always see the result of your last move without having to guess.
Controls and board sizes
Tap or click a mirror to flip it. A mirror in the / position swaps to \ and the other way around. That is the only action you have. You cannot move mirrors, add mirrors, or touch the lamps.
A dropdown labelled Board offers three sizes. Small gives you a six by six grid with four mirrors, two targets and three lamps. Medium bumps the grid to seven by seven, with five mirrors, three targets and four lamps. Large is eight by eight, six mirrors, three targets and four lamps.
The New game button generates a fresh puzzle at whatever size you have chosen. The stats bar above the board tracks how many targets are currently right, how many targets there are in total, and how many flips you have used so far.
How beams travel and what stops them
A beam leaves its lamp and travels in a straight line until something happens. If it hits a mirror, it turns ninety degrees. The direction depends on whether the mirror is / or \. A / mirror swaps horizontal and vertical motion. A \ mirror does the same but in the opposite pairing.
If a beam reaches a target, the target absorbs it. The beam does not pass through. This means a beam can only feed one target. If two targets sit in a line, the first one swallows the beam and the second gets nothing.
If a beam leaves the grid without hitting anything, it is gone. Two beams crossing on an empty square pass straight through each other. Colours only combine on a target, never in open space.
Mirrors can form a closed loop. If a beam circles back on itself, the game follows it for a fixed number of steps and then gives up. The beam lights nothing. This is rare, but knowing it exists can save you from chasing a bug that is actually a loop.
Reading the feedback
A target that receives the right colour gets a white edge. That glow is your confirmation. A target that is lit in the wrong colour gets a red edge. A target that has no light at all has no edge at all.
The difference between wrong and unlit matters. A target wanting cyan that receives blue is wrong, not just missing green. The red edge tells you that something is landing on it that should not be, or that the mix is incomplete. You need to either add the missing colour or divert the unwanted one.
The puzzle is solved only when every target glows white-edged at the same time. Fixing one while breaking another does not count.
Start with the mixes, not the primaries
The most useful habit is to work on the mixed-colour targets first. A target wanting yellow needs two beams converging on it. A target wanting plain red needs just one beam and no interference. The single-colour target sounds simpler, but its constraint is actually harder: nothing else may land there either.
Suppose you have a yellow target and a red target. Solve the yellow target first. Get both red and green arriving at the same glass. Then check whether any stray blue is landing on it. If blue also arrives, the target turns white instead of yellow and you have failed.
Once the mixes are right, handle the primaries. A red target that already has a red beam on it only needs you to keep other colours away. That is easier to arrange when you know where the beams are already going.
Working backwards from the target
Flipping mirrors at random and hoping is slow. A faster method is to pick a target and think backwards. Ask yourself: which direction could a beam arrive from? Then trace that path back towards the edge. Which mirror would need to be in the right setting to send a beam that way?
On a small board this often solves the puzzle in two or three mental steps. On a large board the chains are longer, but the principle is the same. Each mirror has only two states, so working backwards narrows the options quickly.
This approach is especially powerful when a mirror sits on two beam paths at once. Flipping it to fix one target may spoil another. Knowing which targets each mirror affects, before you tap, prevents wasted moves.
Keeping beams away is half the job
New players focus on steering beams towards targets. That is half the work. The other half is keeping the wrong beams away.
A yellow target needs red and green but must not have blue. If a blue beam accidentally crosses the same target, red plus green plus blue makes white, and white is not yellow. The target turns red-edged and the puzzle stays unsolved.
Before you celebrate fixing a target, check every beam path that crosses it. One stray colour can undo everything. Sometimes the solution requires a mirror to be set so that a beam leaves the grid entirely. Wasting a beam is a valid and often necessary move.
Common mistakes and how to avoid them
- Flipping every mirror in a row. Each flip changes every beam that touches that mirror. Scatter-shot tapping scrambles the board faster than you can read it. Flip one, check the trails, think, then flip the next.
- Ignoring the beam trails. The faint coloured lines update after every flip. They are not decoration. They tell you exactly where every colour is going right now.
- Forgetting that targets swallow light. If two targets sit in a line, the first absorbs the beam. The second is dark. Rearranging which target the beam hits first can be the whole solution.
- Treating wrong and unlit as the same problem. A wrong target has something landing on it that must be moved away. An unlit target has nothing and needs a beam steered in. The fixes are different.
- Not counting the mirror connections. A mirror that two or three beams pass through cannot be set independently for each beam. Recognise shared mirrors early and plan around them.
Why every puzzle has exactly one answer
Each mirror has two settings. With five mirrors there are thirty-two possible arrangements. With six there are sixty-four. The generator builds a random layout, records the solution, and then checks every single arrangement to confirm that only one of them lights all the targets correctly.
Puzzles that have two or more answers are thrown away. So are puzzles where the starting position already happens to be solved, and puzzles where no target requires a genuine colour mix. This means every board you see is both solvable and unique, and every board uses the colour-mixing rule at least once.
Nothing leaves your device
The puzzle is generated and checked entirely in your browser. No puzzle data, no flip history, and no score is sent anywhere. You can open the page, disconnect from the network, and play as many rounds as you like. The generator runs locally and the board exists only in memory until you close the tab.