
Untangling a rope by choosing where to start
How the Knot puzzle works, what the ring and chord diagram means, why your starting arrow changes everything, and how to count your way to the cheapest solution without wasting a single flip.
A puzzle built on real mathematics
A loop of rope crosses itself several times. At each crossing, one strand passes over the other. The question is whether the tangle is a true knot or just a mess that would pull straight if you tugged it.
There is a theorem from knot theory that gives a clean answer. Pick any point on the rope and walk along it. If every crossing is one where you pass over the other strand the first time you reach it, the diagram is called descending. A descending diagram is never a knot. The rope can always be pulled straight because you can lift each strand off in the order you met it. Nothing is ever trapped under something you have not already peeled away.
That theorem is the entire win condition of this puzzle. Make the diagram descending and the rope pulls straight. The catch is that you get to choose where to start walking, and you only have a few flips to fix the crossings that are wrong.
Reading the diagram
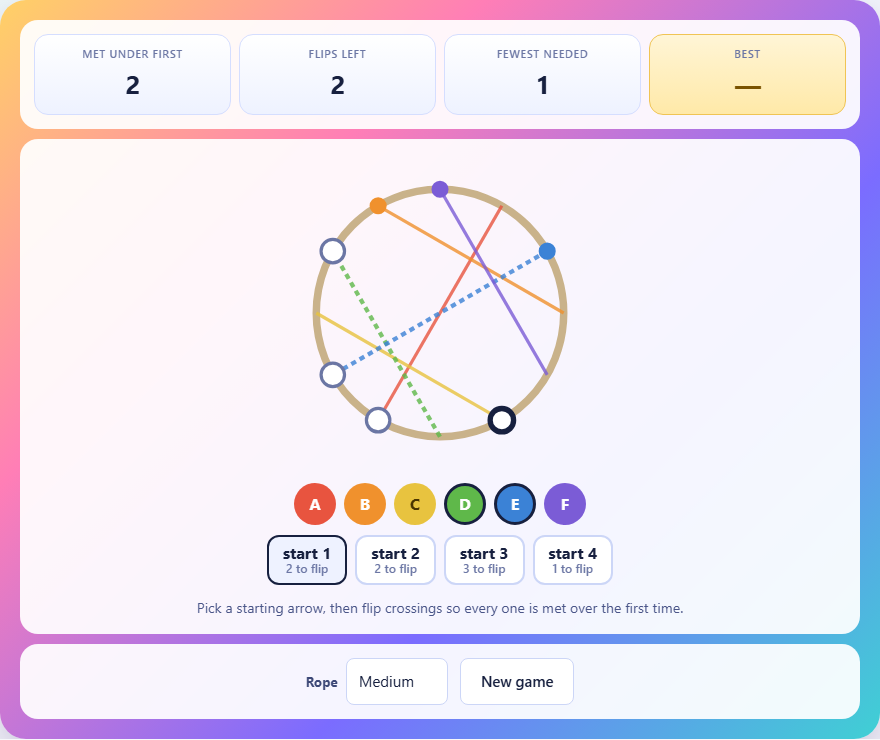
The rope is drawn as a circle. Each crossing is shown as a colored chord connecting two points on the ring. Those two points are the two places where the rope passes through that crossing. A dot sits on one end of each chord, marking the strand that currently lies on top.
This looks nothing like a tangled rope, and that is the point. A drawing of overlapping loops is hard to trace. A ring with straight chords carries the exact same information and is much easier to read. Every crossing appears exactly twice around the ring, once for each time the rope passes through it.
Around the ring you will see several starting arrows. Each one represents a different point where you could begin walking along the rope. Below the diagram, a row of lettered buttons matches the crossings - A, B, C and so on. These are the buttons you press to flip a crossing.
The cost of each starting arrow
Each starting arrow has a number beside it showing how many crossings would need flipping from that position. This number is the cost of that start. The arrows always differ in cost. That difference is the core of the puzzle.
Walking from one arrow, you might meet five crossings over the first time and only need to flip one. Walking from another arrow, the same crossings appear in a different order, and three of them are now met from underneath. Same rope, same crossings, different starting point, different number of flips.
Your flip budget is set to the cost of the cheapest starting arrow, plus a small margin on the larger sizes. So a perfect answer always exists. You do not need to guess. You need to count.
How to play, step by step
First, look at the starting arrows. Each one shows its cost. Compare them all before doing anything. The cheapest start is the one you want, but do not just look for the smallest number. Make sure you understand why it is cheapest.
Tap a starting arrow to select it. The diagram updates to show which crossings are wrong from that starting point. Wrong crossings appear dashed and ringed. The stat bar shows how many are met under first and how many flips you have left.
Now tap the lettered button for each wrong crossing. Flipping a crossing swaps which strand is on top. Each flip fixes exactly one crossing and costs exactly one flip from your budget. When no crossings are met under first, the rope is proved unknotted and the puzzle is solved.
Why crossings are independent
One fact makes this puzzle solvable by counting rather than by trial and error. Flipping a crossing changes only that crossing. It never changes whether any other crossing is met over or under first. The reason is that a flip swaps the dot from one end of the chord to the other, but it does not move the chord around the ring. The order in which you meet crossings stays the same. Only the over-under answer at that one chord changes.
This means the cost shown on each starting arrow is exact. If it says two, you need exactly two flips from that start, not two at best. If it says zero, you could win immediately from that start without flipping anything - though the puzzle is designed so that zero-cost starts do not appear.
This independence also means the order in which you flip does not matter. Flip A then B or B then A and the result is the same.
Picking the cheapest start without flipping
The fastest way to solve the puzzle is to never waste a flip. That means choosing the cheapest starting arrow on your first try. Here is how to do it without guessing.
Look at the cost numbers on all the starting arrows. Pick the smallest one. If two arrows show the same cost, either will work. Tap that arrow, then flip every dashed crossing. You are done.
The puzzle is designed so that the starting arrows always have different costs. There is always one that is clearly cheapest, and at least one that costs noticeably more. If you accidentally pick a more expensive start, you may run out of flips before you can fix every crossing. On the Small rope, there is no margin at all - you must pick the cheapest start. On Medium and Large, you get one extra flip as a cushion, but only one.
Three rope sizes
Small has four crossings and three starting arrows. With only four chords on the ring, the diagram is easy to read and the cost differences between arrows are obvious. There is zero slack in the budget, so the cheapest start is the only one that works.
Medium bumps up to six crossings and four starting arrows. More chords means more to trace, and the cost differences can be subtle. You get one extra flip beyond the minimum, which forgives one mistake but not two.
Large has eight crossings and four starting arrows. The diagram is dense, and tracing which strand is met first at each chord takes real concentration. The one-flip margin is the same as Medium, so accuracy matters just as much on a harder board.
Mistakes and how to avoid them
The most common mistake is flipping before choosing a start. Every flip costs the same whether it helps or not. If you flip a crossing and then switch to a different starting arrow, that crossing might no longer be wrong - which means you wasted a flip and created a new wrong crossing in its place.
- Flipping a crossing that looks wrong without checking which start you are on. Always confirm your starting arrow first.
- Picking a starting arrow because it is nearest to the most chords, rather than because it has the lowest cost. Position on the ring does not predict cost.
- Forgetting that the budget is tight. On Small, there is zero room for error. On Medium and Large, you can afford exactly one extra flip.
- Trying to flip your way to a solution by trial and error. The costs are printed right on the arrows. Read them and pick the cheapest.
A closer look at what descending means
Picture a rope lying flat on a table, crossing over itself several times. Start at one point and trace the rope with your finger. Each time the rope crosses, you are either going over the other strand or passing under it. If you go over every time on the first visit to each crossing, you could peel the rope off the table strand by strand, in the order you met them, and it would never snag. That is a descending diagram.
Not every unknotted loop is descending from every starting point. A loop might be completely untangled and still have crossings that appear under first from certain starting positions. Descending is a guarantee that the rope pulls straight, but it is not the only way. What matters for this puzzle is that finding any starting point that makes the diagram descending is enough to prove it is not a knot.
The puzzle generates its tangles so that the starting arrows always differ in cost and the cheapest one is never free. That way there is always a real choice to make.
Everything runs on your own machine
The puzzle is generated and solved entirely inside your browser. No data is sent anywhere. There is no account and no server keeping score. Your results are stored on your device only, and the page works offline after it loads.
Closing the tab is all you need to do when you are finished.