
Finishing a knight's tour before the clock runs out
What the knight's tour is, how the numbers on the board tell you where to go, why corners are dangerous, and the one rule that nearly always produces a complete tour without any backtracking.
The oldest puzzle on a chessboard
A knight in chess moves in an L shape: two squares in one direction and then one square at a right angle. It is the only chess piece that jumps over others. The knight's tour asks a simple question. Can you move a single knight around the board so that it lands on every square exactly once?
The answer is yes, and mathematicians have known it since at least the ninth century. The number of different complete tours on a standard eight-by-eight board runs into the trillions. But knowing a tour exists and actually finding one under time pressure are very different problems.
This version gives you a board, a clock, and one powerful hint on every square. Your job is to visit every cell before time runs out.
Three board sizes
The Level dropdown offers three choices. Easy gives you a five-by-five board with four minutes on the clock, which means twenty-five squares to cover. Normal is six-by-six with six minutes, for thirty-six squares. Hard is the full eight-by-eight board with ten minutes and sixty-four squares to visit.
A bigger board is harder not because the rules change but because the path is longer and one wrong turn near the end can strand you with no way to reach the last few squares. On a five-by-five board, a mistake costs you a few squares at most. On eight-by-eight, a single bad choice on move fifty can make the remaining fourteen squares unreachable.
The clock starts when the game begins. There is no pause button. If you are new, start on Easy to learn the rhythm, then move up once you can finish five-by-five with time to spare.
How the board tells you where to go
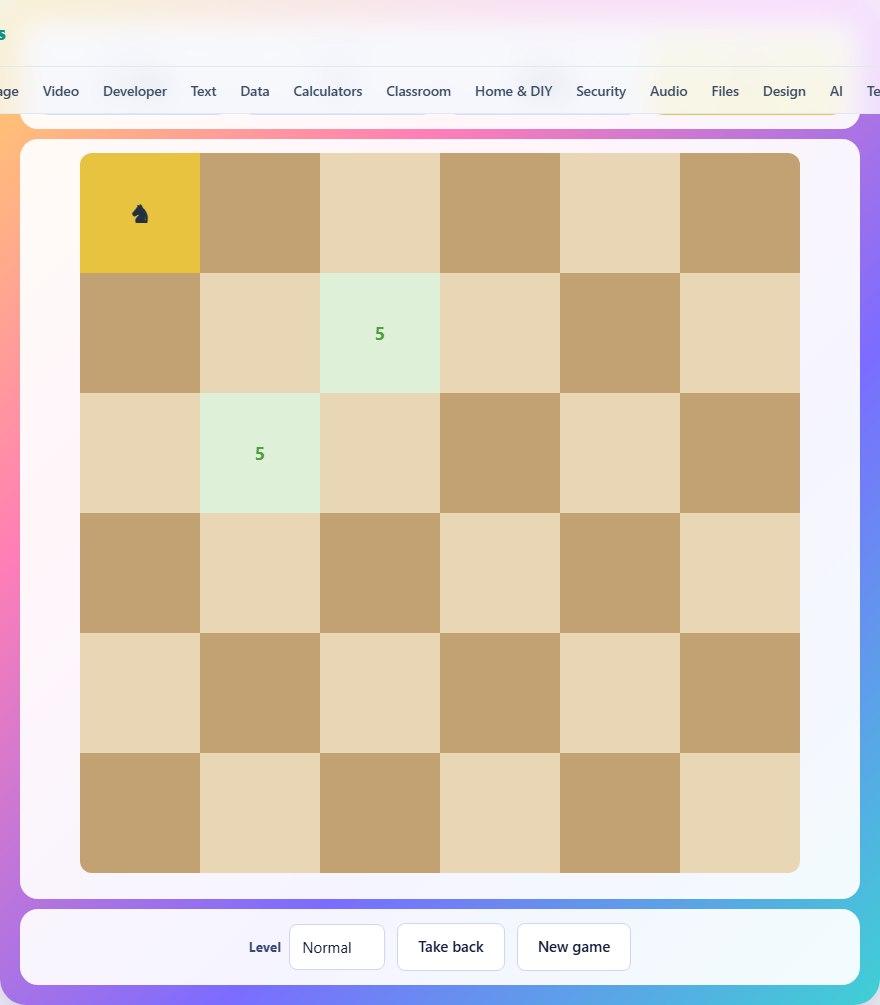
The knight always starts in a corner. From there, the squares it can reach light up in green. Each green square shows a number. That number is how many onward moves you would have if you jumped there. It answers the question: if I go to that square, how many places could I go next?
A green square showing a five means landing there leaves you with five choices for your following move. A green square showing a one means you would have only one way out. A zero would mean a dead end, though the game does not offer moves to dead ends.
This number is recalculated after every jump, because each square you have already visited is removed from the count. So the numbers shrink as the board fills up. Early on, most squares show three or four. Near the end of a tour, you might see only ones and twos.
The rule that nearly always works
Always jump to the square with the fewest onward moves. This is called Warnsdorff's rule, after the German chess player who published it in 1823. It sounds like the wrong thing to do. Why go to the most restricted square when you could go somewhere with plenty of exits?
The reason is that restricted squares are the ones you will never be able to reach later. A corner of the board has only two ways in. An edge square near a corner might have three. If you leave those squares until late in the tour, the knight will have no path back to them and they will be stranded. By visiting them early, you keep the open center available for the later moves when you need flexibility.
Warnsdorff's rule does not guarantee a complete tour on every board, but it succeeds the vast majority of the time. On the three board sizes offered here, following it strictly will finish the tour in nearly every game.
Breaking ties at the edge
Sometimes two or more green squares show the same number. The rule says pick the one with the fewest exits, but what do you do when there is a tie?
The best tiebreaker is to pick the square closer to the edge of the board. Edge and corner squares have fewer ways in and out, so they become unreachable sooner. The center of the board stays connected for much longer because it can be reached from many directions. By favoring the rim when the numbers are equal, you clear the hard-to-reach areas first and leave the easy interior for later.
On a six-by-six board, this tiebreaker rarely matters because ties are uncommon. On eight-by-eight, ties appear more often and choosing wrong can leave you stuck on move fifty-five with nine squares you can no longer touch.
Taking moves back
The Take back button removes your last move and puts the knight back where it was. You can press it as many times as you like, all the way back to the start if needed. The only cost is time. The clock does not pause while you undo.
The stats bar tracks how many moves you have taken back. This is just for your own information. It does not affect whether you win or lose. Only the clock and covering every square matter.
Taking back is especially useful when you get stuck. If the knight lands on a square with no green exits, a message appears saying you are stuck and suggesting you take a move back. Rather than undoing just one move, try going back two or three steps. The wrong turn is often not the last move but the one before it, where you picked the wrong branch.
Reading the board as it fills up
Visited squares change color and show the number of the move that landed on them. Square one was your starting corner, square two was your first jump, and so on. This trail lets you see the path you have taken, which helps when deciding whether to undo.
As the board fills, the green squares become fewer and their numbers drop. When you see a green square with a one on it, that square has only one exit left. If you do not visit it on this move, you might not be able to reach it later. A one is a warning sign. Visit it now unless doing so would strand you immediately.
When every green square shows a one, you are on a chain. Each move leads to exactly one next move. This is the final stretch of a successful tour, and it feels like running downhill. If you reach this point with all squares still available, you have won - just keep clicking.
Common mistakes new players make
The biggest error is jumping to the square with the most exits. It feels safe, like keeping your options open. But it leaves the tight squares for later, and by the time you need them they are cut off. Follow the small numbers, not the large ones.
- Ignoring corners until late in the game. A corner has only two ways in. Once those two squares are visited, the corner is stranded forever.
- Spending too long thinking on easy moves. The clock is real. If three squares all show a two, pick any of them quickly and save your thinking time for the hard spots.
- Undoing one move when the problem is two moves back. A dead end usually means the branch point was earlier. Go back far enough to try a different fork.
- Playing on Hard before finishing Normal. The jump from thirty-six squares to sixty-four is large. Build your intuition on the smaller board first.
What a winning run looks like
Start on Normal. The board is six-by-six and you have six minutes. The knight sits in the top-left corner. Two green squares appear, both showing the number two. Pick either one.
From your second square, three or four options appear. Look for the smallest number. If two squares both show a two, pick the one closer to an edge. Keep doing this for every move.
Around move twenty, the board is mostly filled and the green squares show ones and twos. This is the critical stretch. One wrong pick and the last few squares become unreachable. Follow the ones. If all your options show a one, you are on the final chain and every step is forced.
A completed tour on six-by-six with three or four minutes left on the clock is a clean run. Once that feels routine, switch to Hard and apply the same method on eight-by-eight.
Your scores stay in your browser
The game runs entirely on your own device. Nothing is uploaded, there is no account, and the page works offline once it has loaded. Your best score is saved in your browser's storage on this device only. It will not follow you to a different computer or a different browser.
Closing the tab is all the cleanup there is.