
Solving sliding block puzzles without going in circles
How the sliding blocks puzzle works, what makes each layout different, why the two empty spaces matter more than anything else, and how to stop wasting moves on the big square when you should be moving the small ones.
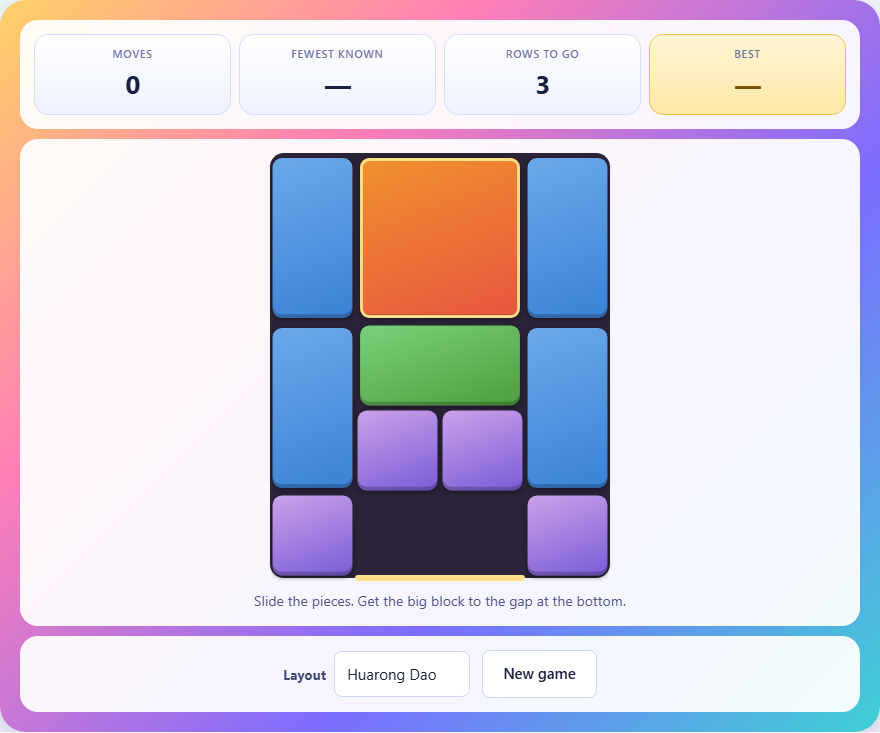
A box with not quite enough room
The board is a box four squares wide and five squares tall. Inside it sits one large square that takes up four cells, several rectangular blocks that are either tall or wide, and a handful of single squares. Two cells are empty. Those two gaps are the only breathing room the whole arrangement has.
Nothing lifts out. Nothing rotates. A tall block stays tall for the entire puzzle. The only thing you can do is slide a piece into an adjacent gap. That single rule - slide into empty space - is what makes the puzzle both simple to learn and surprisingly hard to finish.
The goal is to get the large square out through a gap at the bottom edge of the box. It has to end up centered on the bottom row. Every other piece is just an obstacle that needs to be shuffled out of the way.
Three layouts, three very different challenges
The Layout dropdown offers three starting positions. Each one uses the same box, the same exit, and the same rules. The difference is which pieces fill the box and where they begin.
The Warm-up replaces some of the tall blocks with single squares. Single squares are far easier to rearrange, so this layout can be solved in as few as fifty-eight slides. It is a good place to learn how the controls feel and how pieces interact.
Huarong Dao is the classic. It has four tall blocks, one wide block, and only two single squares. That leaves very little room to maneuver, and the shortest known solution takes a hundred and sixteen individual slides. The name comes from a Chinese story about the warlord Cao Cao escaping through a mountain pass while his enemies block the way. The large block is Cao Cao. The tall blocks are his generals. The small squares are the foot soldiers.
The Pennant is the hardest of the three, needing at least a hundred and thirty-one slides. Its layout puts the blocking pieces in positions that require even more shuffling before the big square can begin to move.
Controls on desktop and on a phone
On a desktop, drag any piece in the direction you want it to go. A short drag - just enough to show direction - is all it takes. The piece moves one square that way if there is room. You can also tap a piece to select it and then press the arrow keys.
On a phone, tap a piece to select it. If you tap the same piece again, it nudges itself toward the nearest available gap. This is the fastest way to play on a small screen because you do not need to aim a precise drag.
The stats bar above the board shows three numbers. Moves counts every slide you have made. Fewest known shows the minimum solution for the current layout. Rows to go tells you how many rows the big square still needs to travel downward to reach the exit.
Why the small squares are worth more than they look
New players almost always grab the big square first. It feels right - that is the piece you want to move, so why not move it? The answer is that the big square is two cells wide and two cells tall, which means it needs two empty cells side by side just to slide one square in any direction. If those gaps are not already lined up next to it, the big square cannot budge.
The single squares are what unlock everything. Each one takes up just one cell, so it can slip into any single gap. Moving a small square to one side creates room for a tall or wide block to shift, and that shift in turn opens a path for the big square. Almost every useful sequence of moves starts with sliding one or both small squares into position.
Think of the small squares as keys. Every door in the puzzle opens with one of them.
Think about where the pair of gaps is going
Because the large square needs two adjacent empty cells, the most useful thing you can track is where the pair of gaps sits right now and where you need it next. One gap on the left side and one on the right side is almost useless. Both gaps together on one side of the big square is a position that lets things happen.
A good habit is to picture the move you want the big square to make, then work backward. If the big square needs to drop one row, you need both gaps directly below it. If it needs to slide left, you need both gaps to its left. Once you know where the pair should end up, moving the small pieces to create that pair becomes a clear job rather than blind shuffling.
When you get stuck, look at where the two gaps are. If they are far apart, your next few moves should bring them together. If they are together but on the wrong side, route them around. This single idea - manage the gap pair - cuts out most of the wasted moves beginners make.
The move counter and what it really measures
Every single-square slide counts as one move. If you drag a piece two squares in the same direction, that is two moves. The counter tracks every slide individually.
Your best score is saved in your browser. It records the fewest moves you have used to solve each layout, not the fastest time. There is no clock at all. You can sit and think for as long as you like, which is exactly what a good attempt looks like.
Comparing your count to the fewest known figure tells you how tight your solution is. On Huarong Dao, finishing in under a hundred and fifty moves on your first try is respectable. Getting below a hundred and thirty means you found a genuinely efficient path. Reaching a hundred and sixteen means you found the shortest one, which is proven by a computer search of every reachable position.
Mistakes that send you in circles
The biggest trap is repeating the same three or four moves without realizing it. You slide a piece left, then something else down, then the first piece right, then the second one back up, and the board looks exactly the same as it did eight moves ago. If your move count is climbing fast without the big square making progress, stop and look at whether you are looping.
Another common mistake is trying to clear a straight vertical path for the big square. The exit is at the bottom center, so beginners often try to push everything to the sides. But the box is only four squares wide, and the big square is two squares wide, so there is no room to stack everything neatly on either side. You have to weave the pieces around each other, not line them up.
- Pushing the big square before the gaps are beside it wastes two moves every time - one to try, one to undo.
- Ignoring the gap pair position leads to random shuffling that goes nowhere.
- Treating tall blocks as stuck walls when they can actually slide up or down with a little setup.
- Resetting too soon. A position that looks hopeless is often only two small-square moves away from a breakthrough.
A worked example on the Warm-up
Start the Warm-up layout. The big square is at the top center. The two tall blocks sit on either side of it. Below the big square is one wide block, and below that are rows of single squares. The two empty cells are at the bottom right.
Your first job is to get the gaps closer to the big square. That means moving the bottom-right single squares out of the way to let the wide block or a tall block shift. Once a tall block slides down, the gap moves up. Once both gaps are near the big square, it can drop one row.
Repeat that pattern: move small pieces to create a gap pair near the big square, slide the big square one step closer to the exit, then reposition the small pieces for the next step. On the Warm-up, this rhythm is easy to feel because there are plenty of small pieces to work with. On Huarong Dao, the same rhythm applies, but you have far fewer small squares, so each cycle takes more moves.
Stepping up to Huarong Dao
The classic layout is harder because four tall blocks take up eight cells and leave you with only two single squares to do all the unlocking. Every move you make with those two small pieces matters more.
A proven approach is to start by moving the small squares to let the right-side tall block shift. This opens a channel for the big square to begin dropping. The general pattern involves cycling the small squares around the edges of the board, creating just enough room for the big square to inch downward one row at a time.
Expect your first successful solution to take well over a hundred and fifty moves. That is fine. Each attempt teaches you which sequences work and which loops waste time. Players who track where the gap pair is from the start tend to cut their count dramatically on the second or third try.
Everything stays on your own device
The puzzle runs entirely in your browser. There is no server involved, no account to create, and no data sent anywhere. Your best scores are stored on your device in your browser's local storage. Closing the tab is all the cleanup there is.
You can load the page, disconnect from the internet, and keep playing. The whole thing works offline, because there was never anything on the other end to begin with.