
Placing heat sources so every pot fires exactly right
How the Kiln puzzle works, why a cold pot is harder than a hot one, how to read the distance rule correctly, and the reasoning that pins down each element's position.
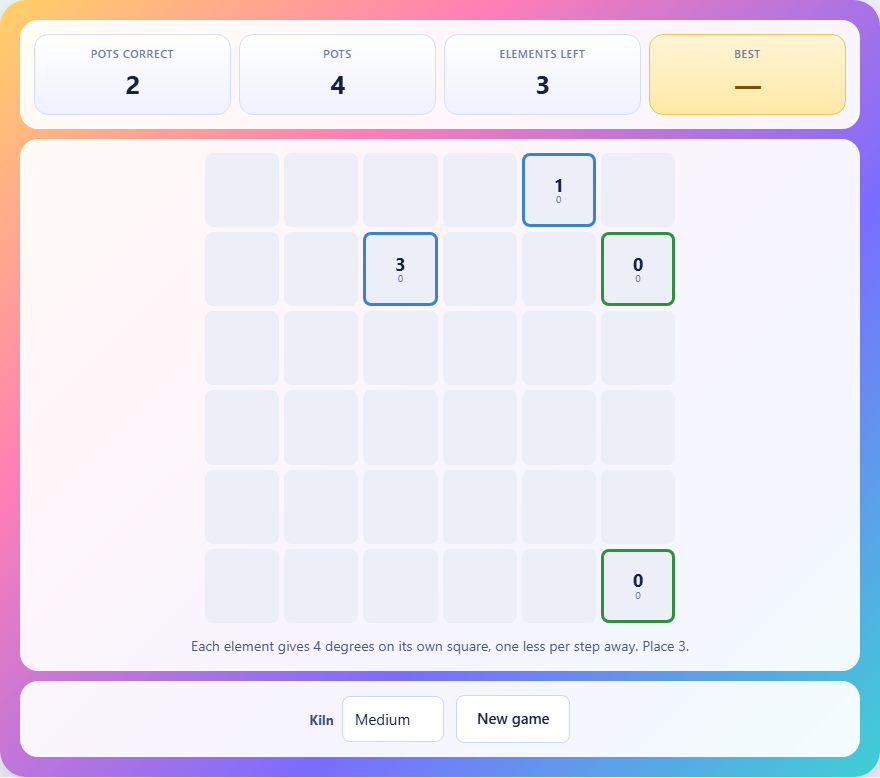
The puzzle at a glance
A grid of squares represents a kiln. Some squares hold pots. Each pot shows the temperature it needs to reach. You are given a handful of heating elements to place on the remaining empty squares. When every pot is receiving exactly its required temperature, the kiln fires.
Not roughly the right temperature. Exactly. A pot that needs 3 must receive exactly 3 degrees. One degree too many is as wrong as one degree too few. Getting every pot on the board to match at the same time is the challenge.
How heat spreads
An element heats its own square by its full strength. For every step you travel away from it, the heat drops by one degree. A step is one square up, down, left, or right. Diagonal movement counts as two steps because you must go across and then up to reach a diagonal neighbour.
On the default settings, each element has a strength of 4. It gives 4 degrees to its own square, 3 to any square one step away, 2 to any square two steps away, 1 to any square three steps away, and nothing beyond that. Its range is three steps. Anything four or more steps away receives no heat from it at all.
When two elements are both in range of the same square, their contributions add together. If one element gives 2 degrees and another gives 1, the square receives 3. There is no cap and no interference. Heat simply stacks.
Distance is steps, not a straight line
This is the detail that catches most players on their first attempt. Distance is measured in grid steps, which mathematicians call Manhattan distance. You count how many squares you move horizontally plus how many you move vertically.
A square that is two columns to the right and two rows down is four steps away, not roughly three. A square that is one column right and one row up is two steps away, not one. The diagonal always costs more than it looks.
When you are judging whether an element can reach a pot, trace the shortest path along the grid lines and count the squares. If the count is greater than or equal to the element's strength, that element contributes nothing to that pot.
Board sizes and difficulty
Small uses a five-by-five grid with two elements and three pots. The elements have a strength of 4. With only twenty-five squares and two elements to place, the possibilities are narrow enough to work through by hand.
Medium grows to six by six with three elements and four pots. Strength stays at 4. Three elements means more overlap to manage, and four pots means more constraints to satisfy at the same time.
Large is a seven-by-seven grid with four elements and five pots. Strength rises to 5, which means each element reaches further. More range sounds easier, but it also means each element affects more pots, and keeping a cold pot out of range of all four elements becomes genuinely hard.
Controls and feedback
Tap any empty square to place an element there. A symbol appears to mark it. Tap the same square again to lift the element off. You cannot place an element on a pot, because pots occupy their squares.
Each pot shows two numbers. The large one is the temperature it needs. The small one underneath is the temperature it is currently receiving from the elements you have placed. A blue edge means the pot is too cold. A red edge means it is too hot. A green edge means it is exactly right.
The stats bar shows how many pots are correct, how many pots there are in total, and how many elements you still have to place. Once every pot turns green, the puzzle is solved.
Start from the hottest pot
A pot that needs a high temperature leaves very few squares where an element could sit. If a pot needs 4 and the elements have a strength of 4, the only square that can supply the full 4 degrees is the pot's immediate neighbour at zero steps. But you cannot place an element on the pot itself. So the element must sit exactly one step away, giving strength minus one, which is 3. That is not enough on its own.
In that case, the pot needs help from a second element. Together, two elements can supply the 4 degrees if they sit at the right distances. The hottest pot on the board has the tightest constraint on where elements can go, so start there.
Once you have placed an element to serve the hottest pot, check what that element does to every other pot it can reach. If it pushes a nearby pot above its target, you have a conflict that tells you the element cannot sit there. That feedback narrows your options fast.
Cold pots are the hardest constraint
A pot that needs zero is not asking to be left alone. It is asking to be completely out of range of every element you place. On a medium board with strength-4 elements, each element reaches three steps in every direction. Keeping a zero-temperature pot safe means every element must sit at least four steps away from it.
On a six-by-six grid, four steps away from a corner pot still cuts off a large chunk of the board. If there are two cold pots, the forbidden zones overlap and the remaining squares for elements shrink further.
Place your cold pots' constraints first, even before the hot ones. Mark the squares that are too close to a cold pot. Then look at the squares that remain. Your elements must all sit within that smaller set, and they must still reach the warm pots from there.
When a pot needs an odd temperature
Each element on its own delivers an even or odd value depending on its distance from the pot. At distance 0 from a strength-4 element, the pot gets 4. At distance 1, it gets 3. At distance 2, it gets 2. At distance 3, it gets 1.
If a pot needs 5 and the strength is 4, no single element can produce 5 at any distance. The pot must be the sum of two elements. One might give 3 (at distance 1) and the other 2 (at distance 2), or one might give 4 (at distance 0 from a strength-4 element) and the other 1 (at distance 3).
Whenever a pot's target is higher than the strength of a single element, it must be served by at least two. Work out which pairs of values can add to the target and what distances those values imply. That gives you a map of where two elements must sit relative to the pot.
Common mistakes and how to avoid them
Forgetting the diagonal penalty is the most frequent error. A square that looks close on the screen is not close in grid steps if it sits diagonally. Two across and one up is three steps, not a short hop.
Placing all elements near the warm pots without checking the cold ones is another. You solve the hot side of the board and then discover that an element is two steps from a pot that needs zero. Moving it to fix the cold pot breaks the warm one.
Treating the puzzle as local is a subtler mistake. Each element affects every pot in range, not just the one you are thinking about. Placing an element to serve one pot often overshoots or undershoots another. Check the whole board after every placement, not just the pot you were focused on.
- Count distance in grid steps: right plus up, never a straight diagonal line.
- Check cold pots first. Their forbidden zones constrain where elements can go.
- When a pot needs more than the element's strength, plan for two elements adding together.
- After placing each element, scan every pot's current reading. One correct pot does not mean the rest are still on track.
Multiple correct answers
Unlike many logic puzzles, a kiln can have more than one valid arrangement. The board is built by placing elements at random, reading the temperatures, and printing those on the pots. If the board is symmetrical, the mirrored arrangement often works too.
The win check does not compare your placement to the original. It checks whether every pot is at exactly its target temperature with the elements where you put them. Any arrangement that passes that test is accepted. Finding the original one is not the point. Finding any correct one is.
Everything runs on your own device
The board, the heat calculation, and the win check all run inside your browser. No puzzle data is sent anywhere. There is no account, and your best result is stored in your browser's local storage on this device only. Once the page loads, you can disconnect from the network and keep solving. The kiln does not need a server to fire.