
Solving a colour theory puzzle on a six-hue wheel
What the six hues are, how the three marks constrain them, why diamond chains are the fastest path to a solution, and the reasoning that keeps every grid solvable without guessing.
Six hues on a circle
The artist's colour wheel arranges six hues in a ring: red, orange, yellow, green, blue and violet. After violet the ring loops back to red. Every square on the grid takes exactly one of these six.
The distances on the wheel matter. Red and orange are one step apart. Red and yellow are two. Red and green are three, which is as far apart as two hues can be on a six-hue wheel. Because the wheel wraps, violet and red are neighbours, not opposites. That wrap is easy to forget and hard to recover from.
The three marks between squares
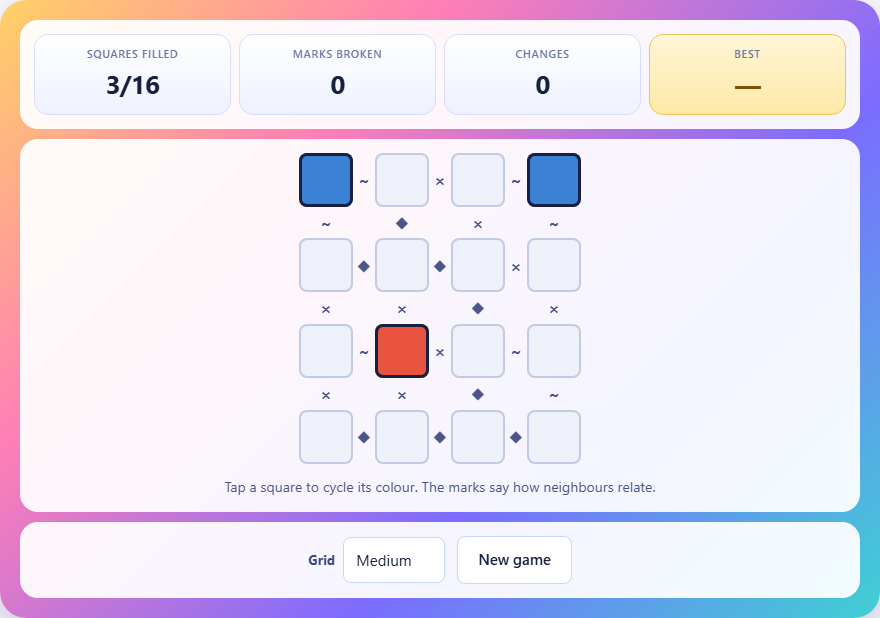
Every pair of adjacent squares has a mark between them. The mark tells you how those two hues must relate on the wheel.
A diamond means opposite. The two hues must be exactly three steps apart. Red and green are opposite. Orange and blue are opposite. Yellow and violet are opposite. Those are the only three pairs, and a diamond pins one hue down completely once you know the other.
A tilde means neighbouring. The two hues must be exactly one step apart on the wheel. Red and orange, orange and yellow, yellow and green, green and blue, blue and violet, violet and red. Each hue has exactly two neighbours, so a tilde leaves two choices instead of one.
A cross means unlike. The two hues must be different, but any difference will do. That rules out just one of the six hues, leaving five possible answers for any square next to a cross. It is the loosest mark and gives you the least information.
How to play
Tap or click a square to cycle its hue. Each tap advances one step round the wheel: red, orange, yellow, green, blue, violet, then back to empty. Squares with a dark border are given and locked in place.
Any mark that is currently broken turns red. A broken mark means the two squares on either side of it do not satisfy the rule. When every square is filled and no mark is red, the puzzle is solved. The stats bar tracks how many squares are filled, how many marks are broken, and how many changes you have made.
The three grid sizes
Small is a three-by-three grid. Nine squares, a handful of marks, and usually two or three given squares to anchor the solution. The grid is small enough to try all six hues in a difficult square without losing track of what you have already tested.
Medium is four by four. Sixteen squares and many more marks. The density of constraints rises because every interior square touches four marks, not just two. Chains of diamonds become longer and more useful.
Large is five by five. Twenty-five squares, a long grid of marks, and often only a few givens. The puzzle demands patience and method. Random cycling through hues will fill the board with broken marks long before you find the answer.
Diamonds first, always
A diamond is the only mark that names a single hue once you know the other side. If a given square shows green and a diamond connects it to its neighbour, that neighbour must be red. No other hue is three steps from green.
Follow chains of diamonds. When a diamond leads to a blank, fill the blank with the opposite hue and look for another diamond on its far side. Two diamonds in a row bring you back to the original hue, so a chain of two diamonds forces the two ends to match. Three diamonds in a row force the far end to be the opposite of the start.
Diamonds are the backbone of every solve. Everything else hangs off them.
Using tildes to narrow the field
Once the diamond chains are done, move to the tildes. A tilde gives you two options: the hue one step clockwise or one step anticlockwise. If you already know the hue on one side, you can try both neighbours and see which one avoids breaking any other mark.
When a tilde square touches two marks, both must hold at the same time. If the mark on the other side is a diamond, the tilde and the diamond together pin the square to a single hue. That intersection is the second fastest way to fill a blank.
If the mark on the other side is a cross, you only need to avoid matching one hue while staying one step from another. That still narrows six choices down to one or two.
Crosses are constraints too
A cross looks weak because it only says the two squares must differ. But on a six-hue wheel, every square already has other marks on it. A cross that forbids green in a square where a diamond already requires green or red means the answer is red.
Crosses become powerful in clusters. When three crosses meet at a single square, that square must differ from three separate neighbours. If two of those neighbours are the same hue, the cross still only eliminates that hue once, leaving five choices. But if all three are different, the square must avoid three hues and has only three left. Combine that with a tilde on the fourth side and you may be down to a single answer.
Why there is always exactly one solution
The generator colours a grid at random, then reads the marks off it. That guarantees at least one valid colouring exists. Next, every square starts as a given. Squares are removed one at a time in a shuffled order. After each removal, a solver counts how many colourings satisfy all the marks. If the count rises above one, the square goes straight back.
The result is the smallest set of given squares that still pins the answer down to a single colouring. No guessing is ever needed. Every blank can be deduced from the givens and the marks using the diamond-tilde-cross reasoning above.
Common mistakes and how to avoid them
The wheel wraps. Violet and red are one step apart, not five. Players who count along the flat list from red to violet get a distance of five and think they cannot be neighbours. They are neighbours on the wheel, and forgetting that is the single most common error.
- Always count the short way round the wheel. The longest distance between any two hues is three, not five.
- Do not start with crosses. They rule out the least and leave too many options open.
- If a square seems impossible, check whether you miscounted the distance to an opposite or a neighbour. The wrap catches everyone.
- Leave corner squares for last. A corner touches only two marks, so it is less constrained than the interior. Settling the middle first gives you more information to work with.
- After filling a square, check every mark around it before moving on. A broken mark on one side is easy to miss if you are focused on the other.
A worked example on a small grid
A three-by-three grid. The top-left square is given as red. A diamond connects it to the square on its right. That square must be green, since green is three steps from red. A tilde connects the top-right square down to the middle-right. Green has two neighbours on the wheel: yellow and blue. Suppose the middle-right square also has a diamond going left to the centre square. Whichever hue the middle-right takes, the centre must be its opposite.
Try blue for the middle-right. The opposite of blue is orange, so the centre is orange. Now check the mark between the top-left (red) and the centre (orange). If that mark is a tilde, red and orange are neighbours on the wheel, and the mark holds. If the mark is a cross, red and orange are different, and that also holds. Each new square either follows from a diamond or from the intersection of a tilde and another mark.
All of it stays on your own machine
The grid, the marks and the solution are built inside your browser. No puzzle is loaded from a server. No move is sent anywhere. There is no account, no cloud save, and no tracking of how you play. Once the page finishes loading, you can turn the network off and the game keeps working. Closing the tab is all the cleanup you need.