
Breeding flowers with real genetics and no luck at all
How dominant and recessive genes work in the flower breeding puzzle, why selfing a carrier is the fastest route to a pure recessive, how to read the seed tray before you sow, and why digging up the wrong plant can make the goal impossible.
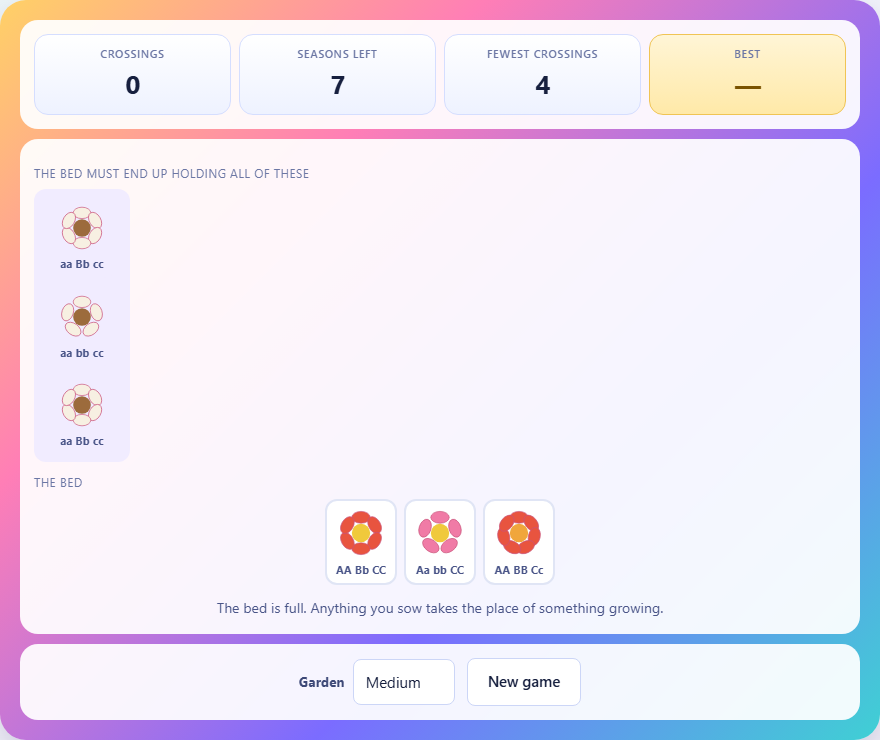
What the letters under each flower mean
Every plant in the bed carries two copies of each gene, written as a pair of letters underneath its picture. A capital letter is the dominant copy. A lowercase letter is the recessive copy. The pair AA means the plant has two dominant copies. The pair Aa means one of each - this plant is called a carrier. The pair aa means two recessive copies.
The first gene controls the flower's colour. The second controls the number of petals. If there is a third gene, it controls the centre of the flower. So two plants that look different on screen also differ in their letters. You can read the genetics from the appearance or from the letters - both tell the same story.
How crossing works
Tap two plants in the bed to cross them. The game then shows every seed that pair can produce, laid out below the bed. Each parent passes on one copy of each gene to the offspring. A plant with AA can only pass on A. A plant with aa can only pass on a. A plant with Aa can pass on either A or a.
For one gene, crossing Aa with Aa can produce AA, Aa, or aa. The seed tray lists all three possibilities. You see the full range and you pick one. There is no dice roll and no hidden outcome. Every seed that could result from the cross is sitting in front of you.
Tap the same plant twice to cross it with itself. This is called selfing, and it is allowed. Selfing a carrier - a plant with Aa - is the only cheap way to produce a pure recessive aa offspring. Any other route needs more crossings to reach the same result.
The bed is full, so something has to go
After you pick a seed, the game asks you to tap a plant in the bed. That plant is dug up and replaced with the seed you chose. The bed never has a spare slot. Every new plant costs you an existing one.
This constraint is where the puzzle lives. If you could hoard plants in extra pots, nearly any goal would be trivial - just cross everything with everything and keep the best. With a full bed, every sowing is a trade. The plant you remove is gone. If it was carrying a recessive copy that no other plant in the bed has, that copy is lost and you may never produce a pure recessive from that gene again.
Reading the goal row
The top of the screen shows the target: a row of plants that the bed must contain when you finish. You do not need to match their positions. The bed just needs to hold all the right genotypes at the same time.
Before you make a single cross, study the target row carefully. Compare each target plant against what the bed already has. Some targets may already be growing in the bed. Those are marked and you do not need to breed them - just do not dig them up by accident. For the targets that are missing, look at which genes need to change and by how much.
A target with all dominant copies, like AA BB, is often easy because dominant copies are common. A target with all recessive copies, like aa bb, is the hardest because recessive copies hide behind carriers and take extra crossings to surface.
Why carriers are the key to everything
A carrier plant, one with Aa for a given gene, looks the same as an AA plant because the dominant copy masks the recessive one. But the carrier can pass on the recessive copy to its offspring. That hidden letter is the only path to producing a pure recessive.
Here is the critical move. Cross a carrier (Aa) with itself. The seed tray will show AA, Aa, and aa. Pick the aa seed. You now have a pure recessive in one crossing. No other combination produces aa in a single step unless both parents already carry a recessive copy.
If the bed has no plant carrying a lowercase letter for a particular gene, no amount of crossing will ever produce one. Capital letters breed capital letters. When you scan the bed at the start, check whether every recessive copy you will need exists somewhere. If it does not, the game gave you a bed where it does exist - look more carefully.
Planning which plant to sacrifice
Every cross costs a season, and you have a limited budget. The fewest possible crossings is shown as par. You are given a few extra seasons beyond par, but not many. Wasting even one crossing on a dead-end line usually means running out of time.
Before you dig anything up, ask two questions. First, does any other plant in the bed carry the same useful genes as this one? If yes, it is safe to remove. Second, is this plant itself a target? If you remove a target that is already in the bed, you have to breed it again, which costs at least one more crossing.
The safest plant to remove is one whose genotype is easy to recreate. A plant with all dominant copies - AA BB CC - can be produced from almost any cross. A plant carrying a rare recessive copy is dangerous to lose. Protect the carriers and sacrifice the common ones.
Working one gene at a time
Each gene is inherited independently. Changing the A gene does not affect the B gene or the C gene. This means you can solve the puzzle one gene at a time without worrying that progress on one front undoes progress on another.
Look at the target row and identify which gene is the hardest to fix. Usually that is the gene where you need a pure recessive and no current plant carries the recessive copy in two doses. Plan your crossings to fix that gene first. The easier genes can be corrected later with fewer crossings because dominant copies are always available.
A worked example with two genes
The bed holds three plants: AA BB, Aa Bb, and AA Bb. The target asks for aa BB, Aa Bb, and AA BB.
The Aa Bb plant is already a target - do not touch it. The AA BB plant is also a target - leave it alone. The only missing target is aa BB.
To get aa, you need two recessive copies of gene A. Only the second plant, Aa Bb, carries a lowercase a. Self it: cross Aa Bb with itself. The seed tray will include aa BB, aa Bb, aa bb, and several others. Pick aa BB and replace the plant you can afford to lose - the AA Bb, since it is not a target. The bed now holds AA BB, Aa Bb, and aa BB. All three targets are present. Solved in one crossing, which matches par.
Mistakes that lose the game
- Digging up the only carrier. If only one plant holds a lowercase letter for a gene you need, removing it makes that recessive copy vanish from the bed forever.
- Ignoring the target row and chasing a single plant. You need the entire row standing at once, not one target followed by another. Breeding a target and then digging it up to make room for the next one wastes two crossings.
- Crossing two pure dominant plants. AA crossed with AA can only make AA. That crossing produces nothing new and burns a season.
- Leaving the hardest target for last. If the hardest target needs two or three crossings, you need those seasons available at the end. Spending your budget on easy targets first can leave you one season short.
- Forgetting that selfing costs a crossing. Crossing a plant with itself is legal and powerful, but it is not free. Count it in your plan.
All the breeding happens on your device
The garden is generated in your browser and the genetics are computed locally. No crossing data, no seed data, and no game state leaves your machine. There is no account, no login, and no server doing the work behind the scenes. Once the page loads, the whole game runs offline.