
Making every number match the block it sits in
A complete walkthrough of the number-equals-block-size puzzle: the rule that two equal blocks can never touch, how to spot forced placements, why 1s are your best starting point, and a step-by-step example of the reasoning that solves a board without guessing.
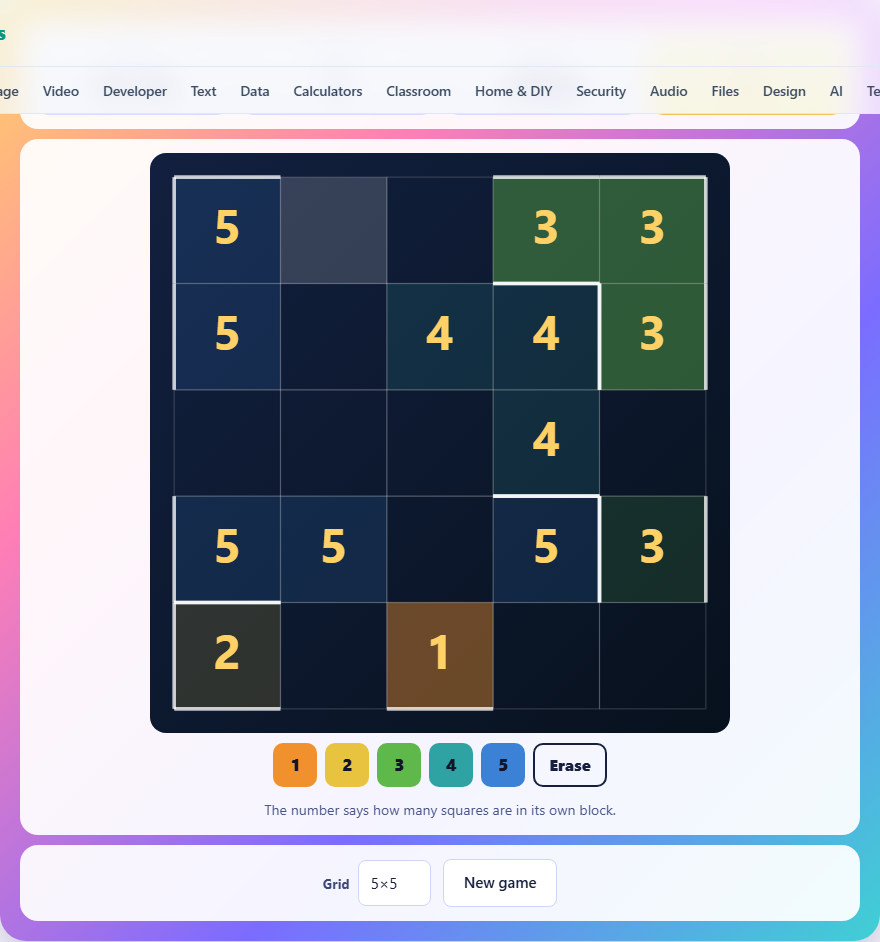
One rule, many consequences
Every square on the grid gets a number from 1 to 5. Squares holding the same number that touch each other edge to edge form a block, and the number inside that block must equal the number of squares it contains. A block of 3s is exactly three squares. A 1 is always a single square standing alone. A 4 must be a connected group of exactly four squares, all holding the number 4.
This single rule generates a second rule for free. Two separate blocks of the same size can never touch each other. If a finished block of three 3s had another 3 next to it along an edge, that 3 would join the block, making it a block of four - but the number inside would still say 3. That contradiction is not allowed, so a completed block acts as a wall against its own number along every edge.
Controls and timing
Tap or click any empty square to select it. Then tap a number button from 1 to 5 to write that number into the cell. The Erase button removes your entry. The yellow numbers were printed when the board was generated and cannot be changed.
Three grid sizes are available: 4 by 4 with 150 seconds, 5 by 5 with 220 seconds, and 6 by 6 with 300 seconds. The score is the number of seconds remaining when you complete the grid correctly, so faster solves earn more. When the clock runs out the game ends.
Why every board has exactly one answer
The generator first carves the grid into blocks and labels each square with the size of its block. Then it removes clues one at a time in a random order. After each removal it checks whether the remaining clues still point to a single solution. If removing a clue would allow two or more valid fillings, the clue is put back. A safety budget caps the search so the page loads quickly, and any board that cannot be proven unique within that budget is thrown away and redrawn.
This guarantee matters because it means pure logic always works. You never have to guess between two equally plausible options. If you can prove a number belongs somewhere, it is correct.
Start every board with the 1s
A 1 is a block on its own. It does not connect to anything. That means none of the four squares directly beside a 1 can also be a 1, because if they were, the two would form a block of size two, but both cells would say 1 instead of 2.
Given 1s are the easiest placements to reason from. Look at a printed 1 on the grid. Every square sharing an edge with it is now barred from holding a 1. If one of those neighbouring squares belongs to a block that has no other options - say it has a 2 on one side and a 3 on another, and the only number left for that block is 1 - then you know that cell cannot be a 1, which may force a different number into it.
On a 4 by 4 grid, placing or finding all the 1s often settles a third of the board in one pass. On a 6 by 6 grid the effect is smaller but still the best opening move.
Growing a block to its target size
When you see a printed 4, you know three more 4s must be attached to it. Those three squares must form a connected group that includes the given clue. Look at the empty cells around the 4 and ask which ones could hold another 4. The block can take any shape - a line, an L, a T, a square - as long as all four cells are joined edge to edge.
A useful trick is to count the open edges. If the given 4 sits in a corner with only two open sides, the block must grow through those two sides and then turn. That leaves very few shapes the block can take, and sometimes only one. Write those 4s in and then look at what the completed block rules out for its neighbours.
Heavy white lines appear on the grid wherever two different blocks meet. As you fill in numbers, watch these lines form. They confirm which cells belong together and which are separated, which helps you verify your work as you go.
The no-touching rule in practice
Once a block reaches its target size, every cell along its outer edge is off-limits for the same number. A completed block of 2s has its own border, and no square along that border can hold a 2. This pushes constraints outward in every direction.
Here is an example. On a 5 by 5 grid, you complete a block of three 3s running vertically down the left edge. The three cells immediately to the right of that block cannot be 3s. If one of those cells is empty and belongs to a block that needs to reach size three, it must reach three by using a different number. That tells you the empty cell holds something other than 3, and depending on its block size, the options may be very narrow.
The same rule stops you from accidentally merging two blocks. If you place a 3 next to an existing 3 that already belongs to a complete block, the game does not reject it immediately - it waits until the grid is full and then flags the error. So you must track block boundaries yourself. The heavy lines help, but only for cells you have already filled in.
Corners and edges close themselves
A square in the corner of the grid has only two neighbours. A square on an edge has three. These cells are the most constrained on the board because their blocks have fewer directions to grow in. A corner cell holding a 3 must grow its block entirely through two open edges, which drastically limits the possible shapes.
When you are stuck, scan the edges and corners of the grid for cells with only one empty neighbour. Whatever block that cell belongs to must reach it through that single opening. If the block is already the right size, the cell must start a new block, which usually means it holds a 1 or the beginning of a new group.
Mistakes to watch for
- Forgetting that touching means edge to edge only. Diagonals do not join blocks in this puzzle. Two 3s that share only a corner are separate blocks.
- Building a block one cell too large. If you write four 3s touching each other, the block is size four but the number says three. The game only flags this when the grid is completely full, so the mistake can hide for a while.
- Ignoring the given numbers when planning block shapes. A printed 2 in the middle of the board already anchors a block of two. The second 2 must be directly beside it, not two cells away.
- Trying to place a number larger than 5. The game caps block sizes at five, so no square can hold a number higher than that. If you find yourself needing a 6, something earlier went wrong.
- Rushing to fill the last few cells without checking whether completed blocks still match their numbers. One wrong cell near the end can cascade into a contradiction that forces you to erase several entries.
Differences between the grid sizes
The 4 by 4 grid has only sixteen cells and tends to contain blocks of size 1 through 3. The puzzles are quick and serve as good practice for learning the logic. The 5 by 5 grid introduces more blocks of size 4 and 5, which makes the no-touching rule more restrictive. The 6 by 6 grid is the hardest, with 36 cells and five minutes on the clock. Larger blocks and more complex shapes demand careful planning from the start.
The extra time on harder grids is not generous - it is just enough if you reason efficiently. Spending thirty seconds identifying the given 1s and completing small blocks before touching anything else will usually save a minute later.
Your data stays here
The puzzle runs entirely in your browser. The board is generated on your own device when you press New game. No data is sent anywhere, and no account is required. Your best score sits in local storage on this machine only, and once the page has finished loading, the game works with no internet connection at all.