
How to solve a beacon puzzle every time
Beacon is a grid puzzle where numbered watchposts tell you how many beacons they can see along their row and column. The twist is that each beacon blocks the view past it, so placing one can lower a count instead of raising it. This guide covers the rules in full, explains every control on the page, and walks through the reasoning that turns a blank grid into a solved one.
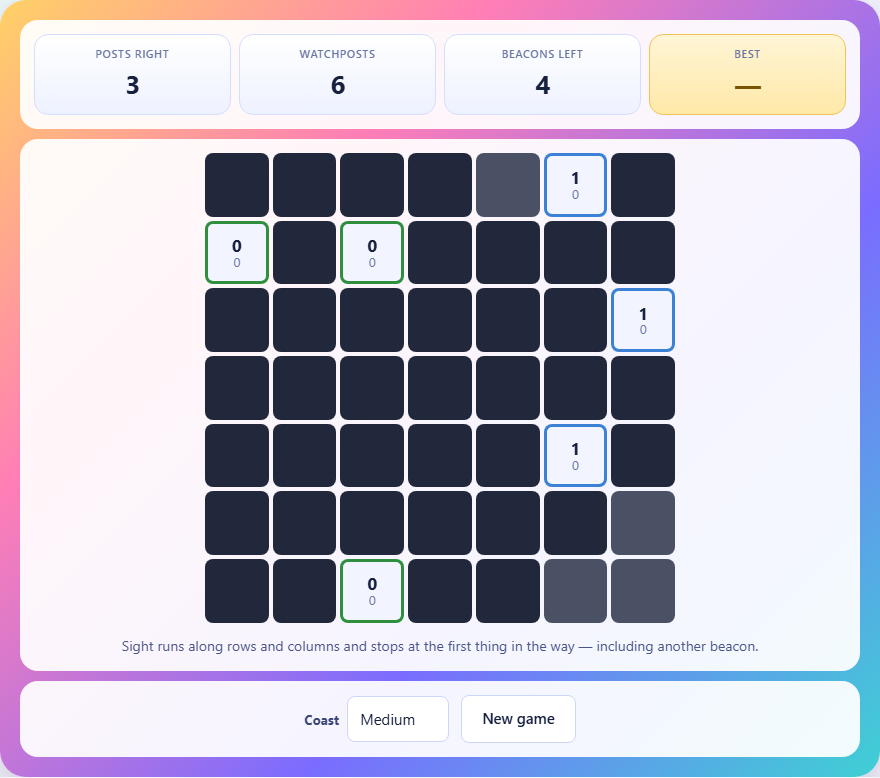
What the board looks like
The board is a square grid made of three kinds of square. Dark squares are empty and waiting for a beacon. Wall squares are solid blocks that nothing can pass through. Watchpost squares carry a number and act as obstacles themselves, just like walls. Your job is to fill certain dark squares with beacons until every watchpost sees exactly the right count.
Each watchpost shows two numbers. The large number is the target, the count it must see when the puzzle is complete. The small number updates as you work and shows what it sees right now. A coloured edge wraps around the post to tell you its state at a glance. Green means the current count matches the target. Blue means the count is still too low. Red means the count has gone too high. When every post on the board is green at the same time, the puzzle is solved.
The rules explained
Sight runs along rows and columns only. A watchpost looks in four directions: up, down, left and right. It never looks along a diagonal. There is no distance limit. A post can see a beacon twenty squares away if the path is clear.
When a post looks along a line, it counts beacons one by one, but the first thing it hits that is not empty stops it. That thing could be a wall, another watchpost or a beacon. A beacon is special because it is counted and then blocks everything behind it. If a post looks right and sees a beacon in column three and another in column seven, it counts one, not two, because the first beacon hides the second.
Walls and other watchposts block sight in the same way, but they are never counted. They simply end the line. This means two watchposts in the same row cannot both see a beacon that sits on the far side of the other.
Why blocking changes everything
In most counting puzzles, adding a piece always raises a total. Beacon breaks that rule. Suppose a post currently sees two beacons to its right, one in column four and one in column eight. If you place a third beacon in column six, between the two, the post now sees the one in column four and then the new one in column six. The beacon in column eight is hidden. The count drops from two to two for this post, but the post in column eight's row may now be wrong. One placement ripples through several counts at once.
This cascading effect is what makes the puzzle interesting. You cannot simply place beacons near each post in turn. You have to think about which posts share a line and how a beacon placed for one post will change the reading of another.
Controls and difficulty
Below the board sits a row of controls. The Coast menu sets the grid size. Small gives a compact board with fewer posts, good for learning the sight rules. Medium is the standard challenge. Large fills the screen with a bigger grid and more posts to satisfy at once.
Tap any dark square to place a beacon on it. Tap the same square again to remove it. You cannot place a beacon on a wall or on a watchpost. The New game button generates a fresh puzzle at the chosen size. The game tracks your time, shown in the stats bar above the board. There is no penalty for placing and removing beacons as many times as you need, so feel free to experiment.
Start from the zeros
A watchpost with a target of zero is the most powerful clue on the board. It tells you that every square in its row and column, up to the nearest wall or post in each direction, must be empty. No beacon can sit in any of those squares. Mark them off mentally and move on. You will often find that zeroing out those squares forces other posts into a single possible arrangement.
After clearing the zeros, look for posts with a target of four. A post can see at most one beacon in each of its four directions, so a target of four means every direction must have exactly one beacon before the first obstruction. That settles four placements in one step. Posts reading three are nearly as decisive when one direction is already blocked by a wall or the edge of the board.
Use the edge of the board
A post sitting in a corner can only look in two directions. Its maximum count is two, and every beacon it needs must lie along those two lines. That narrows the search greatly. A post along the top or bottom row cannot look upward or downward on that side, so it has three directions at most. Whenever you are stuck in the middle of the board, move your attention to the edges where fewer directions means fewer choices.
The board edge also creates forced placements. If a post near the left wall has a target of one and only two empty squares lie between it and the wall, one of those two squares must hold a beacon. If one of those squares is also in the line of a zero-target post, only the other square is possible. This kind of intersection logic solves many cells without trial and error. Posts near corners are often the best second step after clearing zeros, because they have the fewest open lines and the least room for doubt.
Move a beacon instead of adding one
When one post is reading too high and another is reading too low, the natural reaction is to remove a beacon from near the first and add a new one near the second. Often the better answer is to slide a single beacon along its row or column. Moving it further from the over-counting post may place it behind a blocker from that post's point of view, dropping its count by one, while bringing it into view of the under-counting post at the same time.
This move-rather-than-add habit keeps the total number of beacons correct. The puzzle was built with a fixed set of beacons, so the right answer uses all of them and no extras. If you find yourself with leftover beacons you cannot place, or needing more than the board was built for, one of your existing placements is probably in the wrong spot.
Reading the colour signals
The three colours are your main feedback loop, and reading them as a group is faster than checking individual numbers. Scan the board for red posts first. A red post means too many beacons are visible, so at least one beacon in its line needs to move or be removed. Fix the reds before worrying about the blues, because removing a stray beacon often satisfies a blue post somewhere else for free.
Once no red remains, look at the blue posts. Each blue post is still under its target. At this point you are usually adding the last few beacons or nudging existing ones a square or two. When the last blue turns green, the puzzle ends and your time stops.
Common mistakes new players make
The first mistake is thinking diagonally. If a watchpost sits at row three, column five, and a beacon sits at row four, column six, they are diagonal neighbours and cannot see each other at all. Sight only runs along shared rows and shared columns.
The second mistake is forgetting that posts block sight too. Two posts in the same column act like a wall between them. A beacon below the lower post is invisible to the upper one. Players who miss this tend to overcount and end up with too many red posts.
The third mistake is treating every direction as independent. Because beacons block, the order of pieces along a line matters. Solving one direction of a post can change what is possible in the same direction for a post further along. Always recheck neighbours after a placement. A good habit is to glance at every post that shares a row or column with the square you just changed.
Privacy and how the game runs
The puzzle runs entirely inside your browser. Nothing is sent to a server, there is no account, and no data leaves your device. Your best time is saved in local browser storage on this device only. Once the page has loaded, the game works offline.