
Working out boards, joists and screws for a timber deck
How the gap between boards changes the count, why every butt join has to land on a joist, and what the numbers look like for a real four-by-three metre deck.
What the calculator does
A decking calculator turns the size of the deck into a shopping list. It counts how many boards cover the surface, how many joists hold them up, and roughly how many screws fix the boards to the joists. It also works out where the butt joins fall when the deck is longer than a single board.
The key idea is pitch. Pitch is the board width plus the gap between boards. A 144 mm board with a 5 mm gap has a pitch of 149 mm, and that is what each row of decking really occupies. Dividing the deck width by the pitch, not by the board width alone, gives the right number of rows. Dividing by the board width alone leaves you one board short.
Who needs it
Homeowners planning a weekend build in the garden. Landscapers costing a job before writing a quote for a client. Timber merchants checking an order before they load the van. Anyone laying boards over joists benefits from having an accurate count before the credit card comes out.
It counts materials, not structure. Joist depth, post spacing and the depth of footings depend on the span and the soil, and a raised deck may need building control approval. What you get here is the number of boards, joists and screws to buy, not an engineering specification.
Measuring the deck
Two fields define the frame. Deck width is the direction that runs across the boards. Deck length is the direction that runs along the boards. Both are in metres.
Getting width and length the right way round matters because the joins move if you swap them. The boards run along the length. If a board is shorter than the deck length, there will be a butt join in every row, and that join has to sit on a joist. Swap the two dimensions and the join count changes.
If you want to run the boards the other way to avoid joins, try swapping the width and length values and see whether the shorter direction fits within a single board length.
Board size and the gap
Board width is the face width of a single board, in millimetres. The common figure is 144 mm for standard treated softwood. Some composite boards are 140 or 150.
Gap between boards is the space left between them, also in millimetres. Timber swells across the grain when it absorbs moisture. Boards laid tight against each other have nowhere to expand, so they lift or cup. Five millimetres is the usual gap. Some composite boards call for four.
Board length is the length of the stock you buy, in metres. A common size is 3.6 metres. If the deck is longer than a board, the calculator works out where the joins fall and adds the extra boards they need.
Joists and screws
Joist centres is the distance from the centre of one joist to the centre of the next, measured in millimetres. Four hundred millimetres is the standard for 32 mm thick boards laid square to the joists. If you plan a diagonal lay at 45 degrees, the span between supports stretches by roughly half again, so the centres need to come in to 300 mm or the boards will flex underfoot.
The screw count assumes two screws at every point where a board crosses a joist. That is the minimum for a board that will not rock. The actual number may be slightly higher if you use extra screws at the joins, but two per crossing is the figure every timber supplier works from.
Price and currency
Price per board and Currency are optional. Fill them in and the total material cost appears alongside the board count. The price is per individual board at the length you entered, not per metre. If your merchant quotes per metre, multiply by the board length first.
The cost covers boards only. Joists, screws, joist hangers, weed membrane and concrete for the posts are separate purchases, so treat the figure as a floor, not a ceiling.
A real deck, step by step
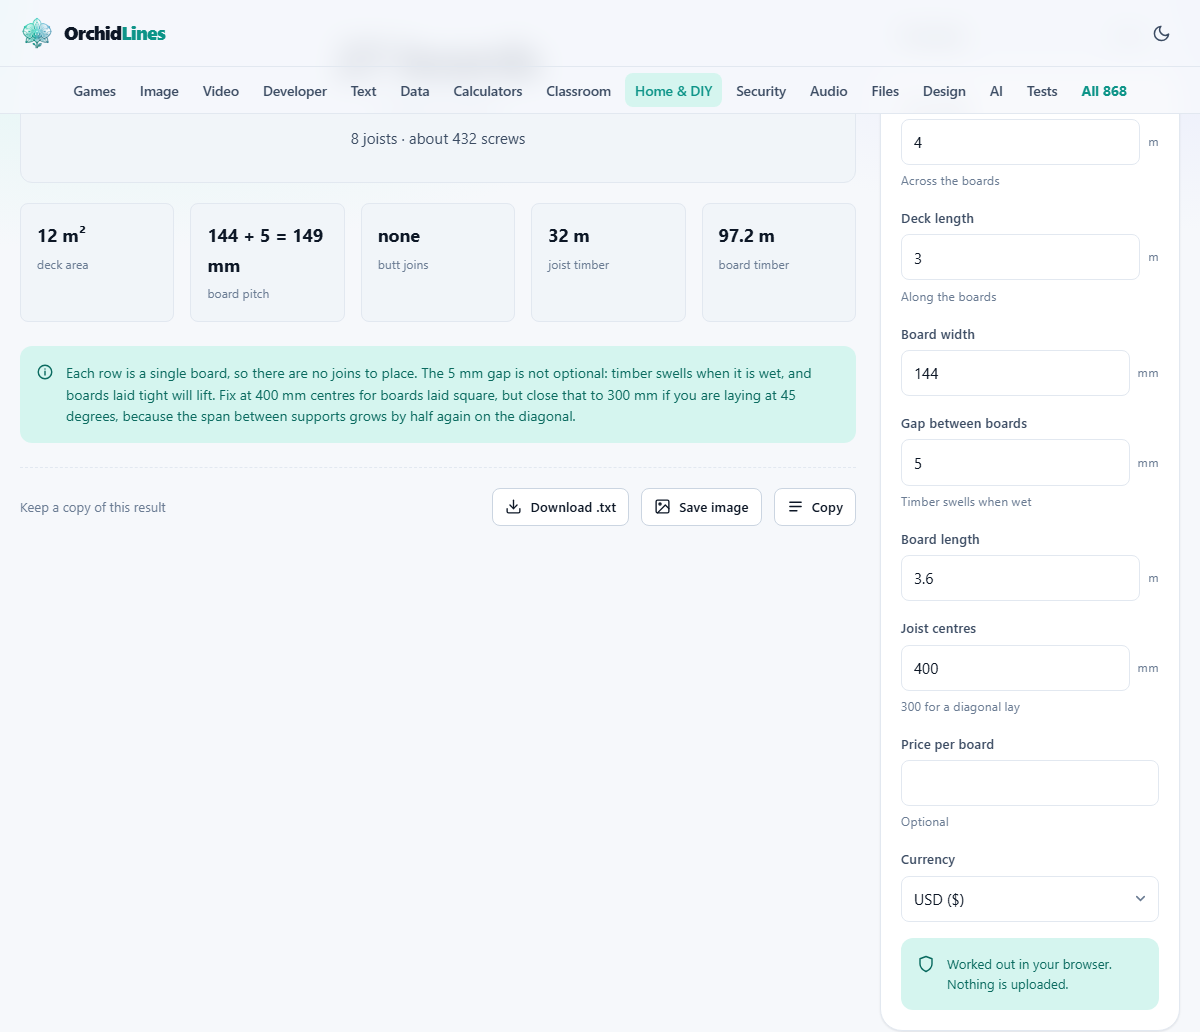
A garden deck measures 4 metres wide and 3 metres long. The boards are 144 mm wide, 3.6 metres long, with a 5 mm gap. Joist centres are 400 mm.
The pitch is 149 mm. Divide 4000 mm by 149 and round up to get 27 rows of boards. Each board is 3.6 metres and the deck length is 3 metres, so every board fits in one piece with no butt join needed. Twenty-seven boards in total.
The joists run the 4 metre width. At 400 mm centres across a 3 metre depth that gives 8 joists, each 4 metres long. Two screws per board per joist crossing means 27 times 8 times 2, which is 432 screws.
If the deck were 5 metres long instead of 3, the 3.6 metre boards would not reach. Each row would need a join, and that join would have to sit on a joist. The calculator adds the extra boards and the extra joist under each join line.
Why the gap costs you a board
Five millimetres per gap sounds like nothing, but it adds up across the entire deck. Over a 4 metre width that is roughly 27 gaps at 5 mm each, totalling 135 mm. That is very nearly the width of one more board. Drop the gap from the count and the last board will not fit.
This is the classic mistake on a Saturday build. Everything is measured by the board width, the boards are cut, and the last one will not go in because the gaps were never accounted for. Using pitch instead of width is the whole point of the tool.
The gap serves a real purpose beyond looks. Timber absorbs rainwater and expands across its grain. A 144 mm board can grow by two or three millimetres after a soaking. If the boards are tight, they push against each other and either cup upwards or lift off the screws. Five millimetres gives them somewhere to go.
Running boards in the other direction
Most people lay boards across the shorter span so each row is one unbroken piece. But there is no rule that says you have to. If the deck is 3 metres wide and 4 metres long, running the boards along the 3 metre width means no joins at all on a 3.6 metre board.
To see what this costs, swap the Deck width and Deck length values. The board count will change because the pitch now divides a different dimension. The joist count changes too, because the joists always run at right angles to the boards. Try both layouts and pick the one that uses fewer boards or avoids joins.
Mistakes that send you back to the merchant
- Ignoring the gap in the board count. Pitch, not width, is what each row occupies. Leave the gap out and the last row will not fit.
- Letting a butt join sit between joists. Two board ends meeting in mid-air will bounce underfoot. Every join must land on a joist, and the calculator places them there.
- Lining the joins up across rows. If every row has its join in the same place, it reads as a seam across the deck. Stagger them by at least one joist bay.
- Using 400 mm joist centres on a diagonal lay. The effective span is longer at 45 degrees. Bring the centres in to 300 mm or the boards will flex.
- Buying boards in two batches. Treated timber varies by batch. Boards from different runs can look a different shade once they weather, so order everything at once.
When a different page suits the job
- For cutting timber, pipe or trim from stock lengths, the Cut List Optimiser packs parts onto boards with minimal waste.
- For fence posts and panels along a boundary, the Fencing Calculator counts bays, posts and concrete.
- For laminate or engineered flooring indoors, the Flooring Calculator handles planks, packs and the expansion gap.
- For curtain fabric measured against a pattern repeat, the Curtain Measuring Calculator works out widths and drops.
Everything stays in your browser
The deck dimensions, the board sizes and any prices you enter are never sent to a server. The arithmetic runs entirely on your own device, inside the browser tab you already have open. There is no upload, no account and no waiting for a result to come back.
You can test this by loading the page and then turning off your internet connection. Type in new measurements and the board count, joist count and screw total still appear, because there is nothing on the other end to talk to. Close the tab when you are done and every number goes with it.