
Numbered tickets and vouchers you can print at home
This guide covers making a run of tickets on this page: the wording, the running numbers, the tear-off stub and the barcode, and how they land on a sheet of paper. It names every box and menu you will meet, works through a full raffle example with real numbers, and lists the errors that ruin a batch.
What a run of tickets is really for
A ticket is a small promise on paper. It says a seat is held, a prize draw is entered, or a discount is owed. For that to hold up later, each one has to be different from the next, and that is the hard part to do by hand.
This page makes a whole batch at once, each with its own number, so the promise can be checked. A school fair selling a raffle, a club holding a gig, a shop handing out vouchers, a market stall with a loyalty coupon: all of them need the same thing, and none of them want a card printer in the back room. Type the details, set the count, and print.
Setting the wording
The Type menu comes first, and it shifts the emphasis of the layout. Event ticket and Raffle ticket lead with the name of the thing. Gift voucher puts the value up front in large figures. Discount coupon reads like a shop offer. Pick the one that matches what you are handing out.
Under that sit the text boxes. Heading is the main line, such as the event or the shop. Line underneath is a short subtitle. Detail line one and Detail line two hold the date, the time, and the place. Price or value takes whatever you charge, in any currency symbol you type. Small print is the fine wording along the foot, and Issued by names the group behind it. Leave any box empty and that line simply drops out.
The running numbers
The Numbering panel is what turns one design into a unique batch. Start at is the first number. How many sets the size of the run, up to five hundred in one go. Prefix is a few letters printed before the digits, so a batch reads as a set. Pad to fixes how many digits each number shows, filling the front with zeros.
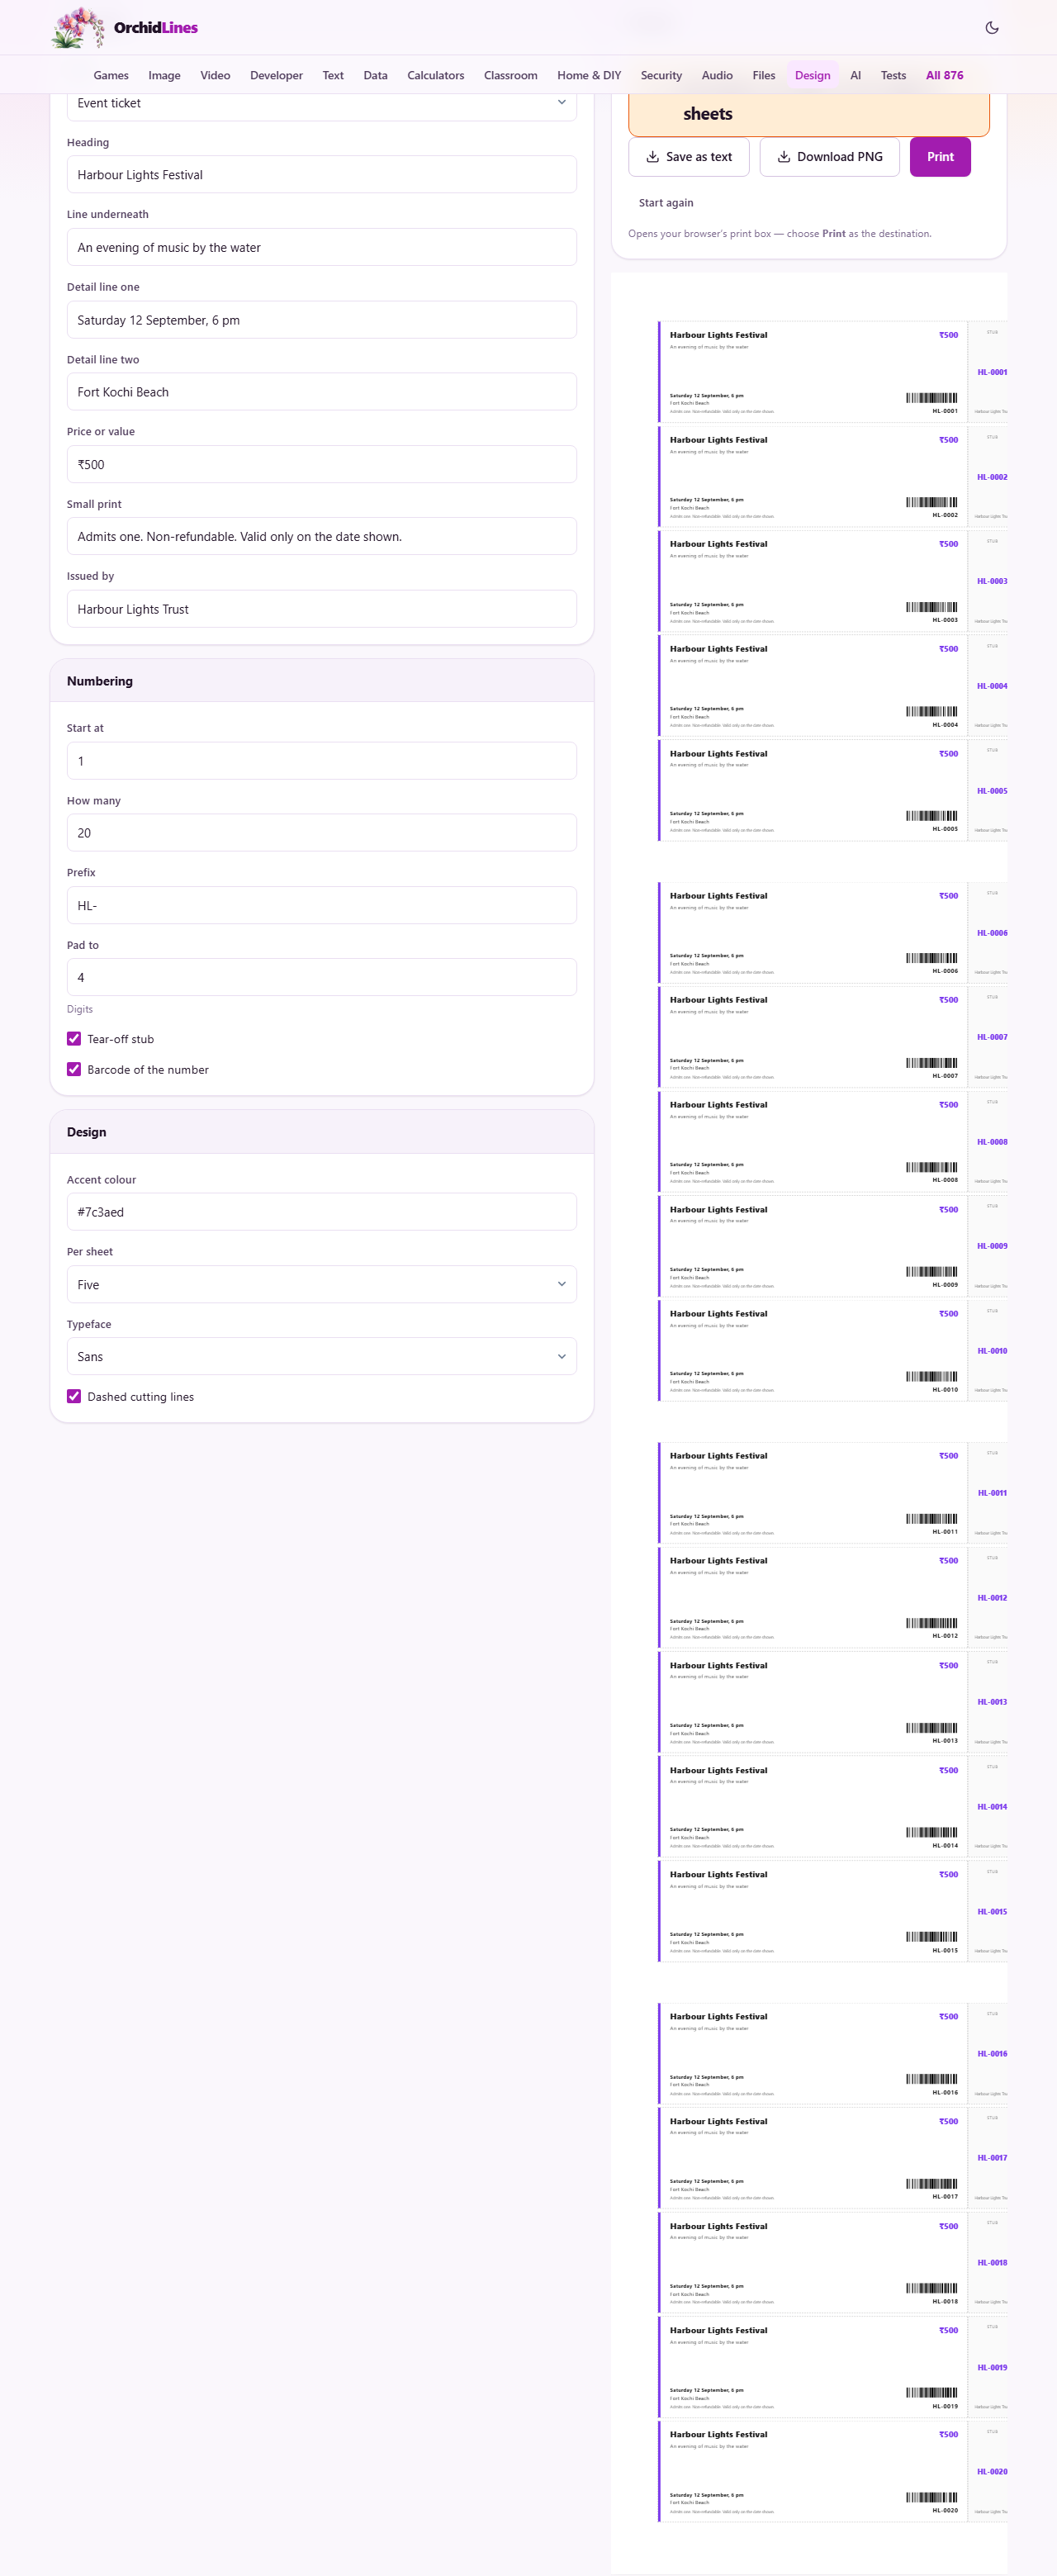
Put together, a prefix of HL- with four padded digits, starting at one, gives you HL-0001, HL-0002, and on upward. Padding matters more than it looks: without it, ticket 9 and ticket 90 sort into the wrong order and look untidy in a pile. With it, every number is the same width and the stack stays neat.
The stub and the barcode
Tear-off stub adds a narrow strip down one side, split off by a dashed line. It carries the same number as the main ticket. The idea is old and simple: the buyer keeps the big half, you keep the stub, and the winning number matches one against the other. On a raffle the stub is even labelled keep this half, so nobody throws away the part that wins.
Barcode of the number prints a stripe code built from the ticket number. It uses Code 128, a plain stripe format that any ordinary scanner reads with no setup. The number is also printed as plain figures just below, so a person can read it even when a scanner is not to hand. Together they let you check tickets at a door quickly, without any system behind it.
Look and layout
The Design panel handles the look. Accent colour paints a bar down the left edge of every ticket and colours the price and the stub number. Type it as a hex code, the short code that starts with a hash. Typeface switches between a plain Sans and a more formal Serif.
Per sheet decides how many tickets share one page: five, four, eight, or two large ones. The tickets are laid out as full-width strips stacked down an A4 page, so more per sheet means shorter strips. Dashed cutting lines draws a faint dashed border around each ticket, showing exactly where the scissors or blade should go.
What a finished ticket shows
It helps to picture where each field lands. The heading sits top left in bold, with the price or value beside it on the right, picked out in your accent colour. The subtitle runs just under the heading in a lighter grey.
Down at the foot, the two detail lines sit on the left, with the small print in tiny grey type beneath them. On the right of the foot are the barcode and, under it, the number in plain figures. A coloured bar runs down the far left edge of every ticket. When the stub is on, it stands at the very side, walled off by the dashed line, and repeats the label, the number in colour, and the name of the group that issued the ticket.
Paper, card and cutting
A ticket has to last in a pocket or a purse until the day, so the paper is worth a thought. Print on card rather than plain paper wherever you can. It holds up far better and feels more like the real thing in the hand.
Feed it through the straightest paper path your printer offers, so thick stock does not jam. Cut with a knife against a metal ruler for clean edges, since scissors tend to wander off the line. To help the stub tear away neatly, run the back of a blade along the dashed line first to score it. Keep the print at full size, with no shrink-to-fit, so each strip stays the width the layout expects.
Printing the batch
A short readout above the buttons reports what you are about to make: how many tickets, the first and last numbers, and how many sheets that fills. Read it before you commit. Press Print and your browser's own print box opens; choose your printer as the destination and send it.
A reminder appears telling you to print one page first and check it. That advice is worth taking. Two hundred tickets carrying the wrong date is a wasted evening and a stack of paper for the bin. There is also a plain-text export of the wording if you want a copy of the details on their own.
A worked example: a charity raffle
A community trust is raffling a hamper and needs two hundred tickets. In the Type menu they choose Raffle ticket. For the Heading they type the trust's name, and underneath, Christmas hamper draw. Detail line one reads Drawn 20 December, 7 pm. Price or value shows five pounds.
In the Numbering panel they set Start at to 1 and How many to 200. The prefix is HAMP- and Pad to is set to three, so the numbers run from HAMP-001 to HAMP-200. Both Tear-off stub and Barcode of the number are ticked.
In the Design panel they set a deep green accent, leave the typeface on Sans, choose five per sheet, and keep the dashed lines on. The readout confirms two hundred tickets, HAMP-001 to HAMP-200, across forty sheets. They print page one, check the date and the number, then print the rest on card and cut along the dashed lines. Every stub matches its ticket, so the draw is settled by simply reading a number aloud.
On the night, sellers tear each ticket in two at the dashed line. The buyer keeps the large half, and the matching stub goes into a box. When the hamper is drawn, the number pulled out points to exactly one ticket in the room. Nothing more complicated than that is needed.
Common mistakes
A few slips undo the whole point of numbered tickets.
- Two batches both start at one. Now two people hold number 47 and the draw cannot be settled. Start the second batch where the first left off, and write down where you stopped.
- The numbers sort oddly in a pile. Padding was left too low, so 9 and 90 line up wrongly. Raise Pad to enough digits for the highest number.
- The wrong date printed on the whole run. The test page would have caught it. Always print one first.
- Ordinary paper tickets fall apart in a pocket. Print on card so they survive until the event.
- The accent colour box is empty or mistyped. Give it a proper hex code so the bar and the price show their colour.
When another page fits better, and where this runs
This tool is built for a run of near-identical numbered tickets. If you want a staff badge with a photo, the ID Card Maker is the right page. For a printed award, the Certificate Maker suits better. If all you need is the stripe code on its own, at any size, the Barcode Generator gives you just that.
Whichever you use, the work stays with you. The names, prices and details you type are turned into pages inside this browser and never sent anywhere. That matters for tickets, because the list of who bought which number is yours alone, and it never leaves your computer for a server you cannot see.