
Turn your own pictures into a print-and-cut sticker sheet
This guide covers the sticker sheet maker from dropping in your first picture to saving the two files a cutting machine needs. You will learn what bleed does, how the outline around each sticker is found, what every setting changes, and how to read the warnings when a picture will not trace cleanly.
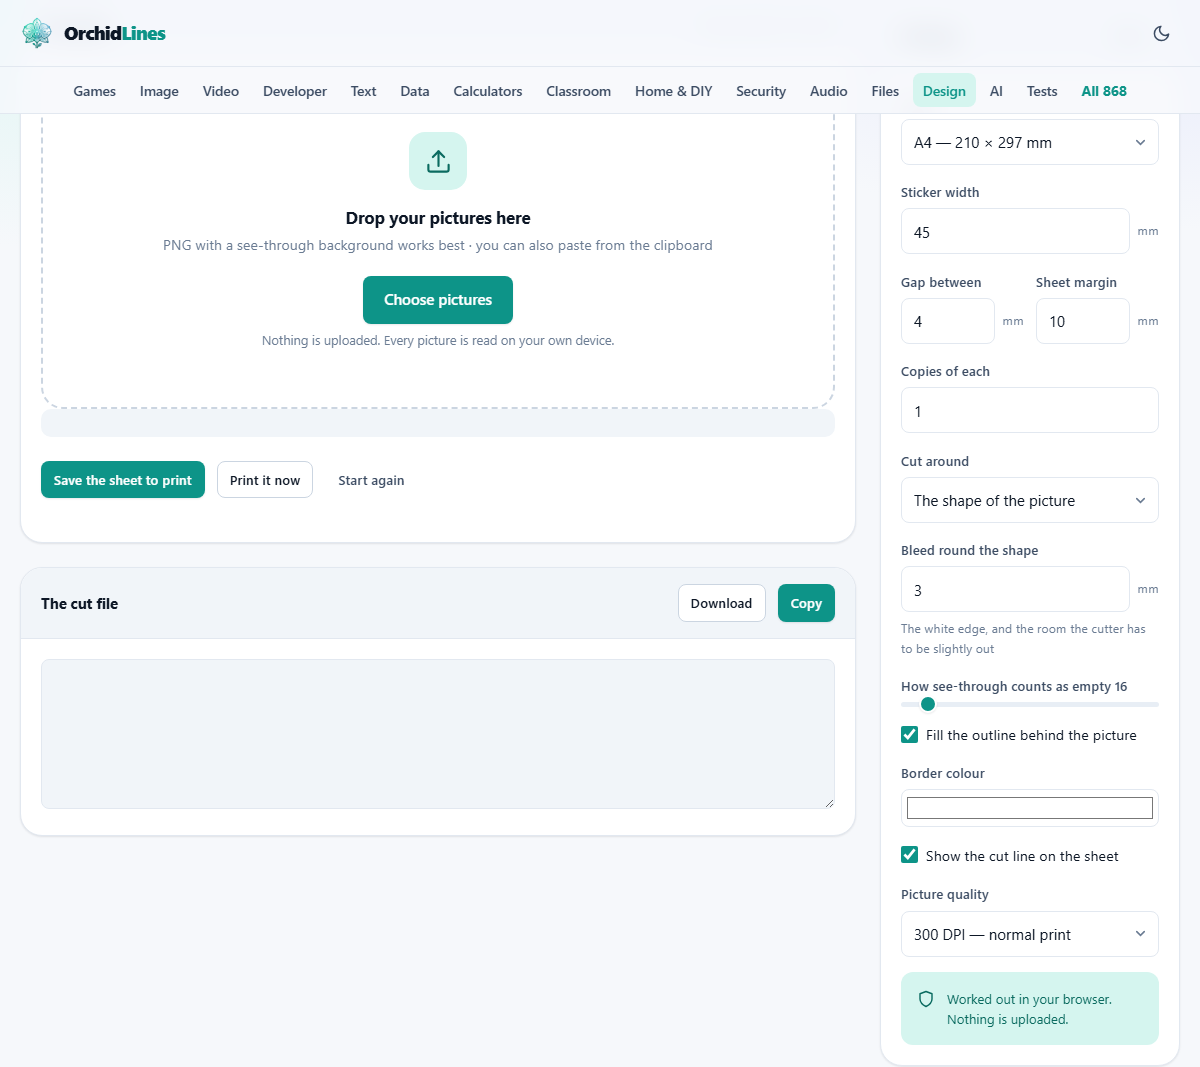
What it makes and who it helps
A print-and-cut sticker sheet is really two things that have to agree with each other. One is a sheet you print. The other is a set of outlines that a machine follows to cut around each sticker. This tool builds both from the same numbers in a single pass, so the cuts land where the pictures are.
It helps anyone with a home cutting machine who wants tidy stickers with a die-cut edge, and who would rather not juggle two separate programs to get them. Small shops, crafters, and people making labels, name tags or badges are the usual crowd.
You can also skip the machine altogether. With the cut line shown on the sheet, you can print the page and cut around each sticker with a pair of scissors, which is plenty for a small batch.
Getting your pictures in
Drop your pictures onto the box at the top of the page, or click it to choose them from your files. You can also paste an image straight from the clipboard. Quite a few pictures can go on at once, so a whole set of designs can load in one go.
The tool is built for PNG files that have a see-through background. That clear area is how it works out the shape of each sticker. A picture on a solid white background has no shape to find, and it falls back to a plain rounded rectangle instead.
If you loaded the wrong set, the Start again button empties the sheet so you can begin with a fresh batch.
Size, spacing and copies
The settings panel on the right controls the sizes. Sheet chooses the paper, with A4, Letter, A3, A5 and a square option to pick from. Sticker width sets how wide each sticker is in millimetres, and the height then follows the shape of the picture.
Gap between is the space left around each sticker so they do not touch. Sheet margin is the clear border around the whole page. Leave a decent margin, because home printers cannot print right to the edge, and a cutting machine needs a strip of blank paper to grip.
Copies of each repeats every picture a set number of times. Turn it up and a single design will fill a whole sheet, which is how you print forty of the same logo without loading it forty times.
The cut shape and the bleed
Cut around decides the outline. The shape of the picture traces the true edge of your artwork, which is what gives a sticker that hugs the design. The other choices, a rounded rectangle, a circle or a square, ignore the artwork and cut a plain shape at the size you set.
Bleed round the shape is the white border that sits just outside your artwork. A small amount is normal. It gives the sticker its clean white edge, and it also gives the cutter room to be a touch off without slicing into the picture itself.
How see-through counts as empty is a slider that sets where the tool draws the line between solid and clear. If a soft shadow is being chopped off, or a faint edge is being swallowed, nudge this until the outline looks right. This slider only appears when you are tracing the shape of the picture.
How the printed sheet looks
A few settings change the look of the print rather than the cut. Fill the outline behind the picture paints the sticker shape in a solid colour first, and the picture sits on top of it. That painted shape is what becomes the white die-cut border. Border colour sets which colour it uses.
Show the cut line on the sheet draws a dashed line around each sticker on the printed page. It is a useful guide when you plan to cut by hand, and you can switch it off for a clean sheet when a machine will do the cutting.
Picture quality sets the detail of the saved sheet. There is a normal print setting, a finer one for small detail, and a lighter one for a quick draft. The number is dots per inch, so a higher figure is sharper but makes a larger file.
The two files that come out
Save the sheet to print saves the printed side as a picture, with the quality written into the file name so you know what you have. Print it now sends the same sheet straight to your printer through the browser, and a PDF is one of the destinations there if you would rather keep a file.
The cut file shows up in its own panel as code you can read. Download saves it as sticker-cut-file.svg, and Copy places it on your clipboard. This is the file you load into the cutting machine so it knows where to cut.
Both files carry four black squares in the corners, sitting in exactly the same places. These are registration marks. The machine hunts for them to work out where the printed sheet is lying, so that the blade follows the printed shapes rather than missing them.
A worked example
Suppose you have six cartoon designs, each saved as a PNG with a clear background. You drop all six in, set the width to a small badge size, leave the bleed at the usual small amount, and set Copies of each to two. That gives twelve stickers in all.
You keep the shape set to the shape of the picture, leave the white fill switched on, and keep the cut line showing so you can eyeball it. The preview neatly packs the twelve stickers onto an A4 sheet with room to spare.
You save the sheet as a picture and download the cut file. You print the picture at full size, then load the paper and the cut file into your machine, which cuts around every shape. Had you no machine at all, you would simply cut along the dashed lines by hand.
Reading the report and warnings
Under the sheet, a short report lists how many stickers fit, the sheet size, and the size of the print in pixels. Three warnings can show up when something needs your attention.
If some stickers did not fit, the report says how many were left off. Make them smaller, drop the number of copies, or choose a bigger sheet. If a picture has no see-through background, it says so and cuts that one as a rounded rectangle, so remove its background and save it as a PNG to get a proper outline.
If an outline came out too small to be useful, almost all of that picture is being read as empty. Lower the setting that decides what counts as empty until the real shape comes back into view.
Common mistakes and how to avoid them
A print-and-cut job goes wrong in a few predictable ways. Watching for these saves a wasted sheet.
- Printing scaled. Never let the printer shrink the page to fit. That shifts the stickers away from the cut lines. Always print at full size.
- A stray dot in a corner. One faint speck joins the shape and pulls the outline out to meet it. The tool keeps only the largest piece, but a soft shadow may need the empty setting raised.
- Too little bleed on a cut-through job. A cut that goes through the backing paper too can wander further, so give it a more generous white edge than a peel-off sheet needs.
- Moving or cropping the corner marks. They must stay put on both files. Crop them off and the machine can no longer line the cut up with the print.
Kiss cut or cut through
There are two ways a machine can cut a sticker, and they change how much bleed you want. A kiss cut goes through the sticker but stops at the backing, so the stickers peel off a whole sheet. A cut through goes through everything and leaves you loose stickers.
The file is the same either way, since which one you get is a setting on the machine. The bleed is the part that differs. A kiss cut is forgiving, so a small white edge looks neat. A cut through can drift further, so be more generous. When in doubt, print one sheet, cut it, and measure how far off the machine was before you commit to fifty.
When a different tool fits
This tool lays out and traces pictures you already have. It does not draw the artwork for you, so if you still need to make an image or clean one up, use a drawing tool or a background remover first, then bring the finished picture here.
For a single sticker rather than a full sheet, or a design with no machine cutting in mind, a plain image tool may be simpler. Reach for this one when you want a batch of stickers arranged and traced together, ready to send to a cutter.
Your pictures never leave your device
Every picture you add is read straight from your own disk and traced by your own computer. Nothing is uploaded, and no copy is kept anywhere else. The small note that appears after you drop pictures in says exactly that, on purpose.
Because all the work is local, it is both quick and private. When you close the tab the pictures are gone from the page, so save your two files before you leave if you want to keep them.