
Make a clean signature image for your documents
This guide explains how to turn your signature into a small image with a see-through background, ready to place on a contract, form or letter. It covers drawing and typing, the ink settings, saving the file, and how to drop the result onto a page.
Why a signature image is handy
Plenty of documents arrive as files now and never touch paper. Printing one only to sign it and scan it back is slow, and it leaves you with a grey, crooked photo of your name. A signature saved as a clean image skips all of that.
You sign once here, save the picture, and then drop it onto anything that needs it. A contract, a school form, a letter, a delivery note. The same small file works again and again, so the effort is a one-off.
It is built to work on a phone as happily as on a computer. That matters, because signing with a finger on a touchscreen usually looks more like your real hand than dragging a mouse across a desk ever will.
Think of the times a signature holds up a simple task. A landlord waiting on a signed tenancy. A club needing a consent slip back. A supplier who cannot send the goods until the order is signed. In each case, a ready-made image turns a chore into a few taps.
Keeping a copy for next time
You will often need the same signature more than once. Rather than drawing it fresh every time, save the file somewhere you can find it again, such as a folder named for your documents or a private note on your phone.
With the image kept, future signings are almost instant. You open the document, insert the picture you already have, and drag it into place. The one careful signing you did here goes on paying off for months.
Draw it or type it
At the top you choose how to make the signature. The two options are Draw it and Type it. Drawing gives you your own real signature, loops and all. Typing is faster and gives you something that simply looks like a signature, which is fine for a casual note.
The two modes do not mix. Switching from one to the other clears the box first, because a typed name sitting on top of a hand-drawn scribble is never what anyone is trying to make.
Drawing a good signature
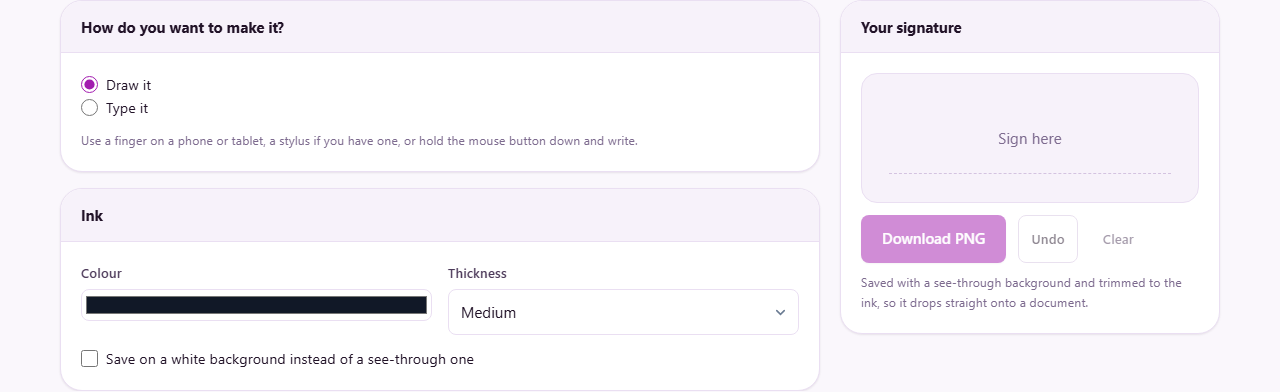
In Draw mode you write straight into the box. Use a finger on a phone or tablet, a stylus if you own one, or hold the mouse button down and sign. The line is smoothed as you draw, so it does not come out jagged and stiff.
One trick makes a real difference. Sign bigger than feels natural, using the full width of the box. A large signature is shrunk down when you save it, and shrinking hides small wobbles. A tiny signature blown up does the opposite and looks shaky.
If a stroke goes wrong you do not have to wipe everything, as the next section explains. Take your time on the first letter or two, since those set the rhythm for the rest.
Typing a signature instead
Pick Type it and a Your name box appears. Type your name there. Below it sits a Handwriting style menu with four looks to choose from: Flowing, Formal, Casual and Plain.
Flowing is the most script-like of the four. Formal is a steadier, more upright face. Casual is rounder and friendlier, and Plain is a simple typed style with no flourish at all.
The name is drawn on a slight slant and shrinks to fit if it is long, so even a long double-barrelled name will not run off the edge. This route is quick when you just need a signature that reads well and do not mind that it was typed rather than drawn.
Drawn or typed: which to choose
It is worth a moment to decide which mode fits the job in front of you. A drawn signature is personal, and it is hard for anyone else to copy by hand, so it is the better choice for anything that carries weight, such as an agreement or a formal letter.
A typed signature is quicker and always comes out neat. It suits a friendly email, an internal note, or any place where you simply want a name to look signed rather than plainly typed. If you are unsure, draw it. The extra few seconds buy a mark that is genuinely your own.
The ink settings
Two controls set how the ink looks, and they work in both Draw and Type mode. Colour opens a colour picker and starts on a near-black. Many people switch it to a dark blue, because blue reads as real ink rather than printed text.
Thickness offers three widths: Fine, Medium and Bold. Fine suits a small, neat hand, while Bold gives a confident, heavy line that stands out on a busy page.
There is also a tick box marked Save on a white background instead of a see-through one. Leave it clear and the saved picture is transparent, which is what you want most of the time. Turn it on only if the program you are pasting into cannot handle transparency.
Undo, clear and saving the file
Three buttons sit under the box. Undo removes just your last stroke, so a single slip does not send you back to the start. Clear wipes the whole box so you can begin again. Both stay greyed out until there is something on the pad to act on.
The Download PNG button saves the image as a file called signature.png. It is trimmed tightly to the ink, with no wide empty border, and unless you asked for white it keeps a see-through background.
That see-through edge is the whole point. It means the signature drops onto a page with no white rectangle boxed around it, sitting on the paper as if written there. A short message confirms the size of the file you just saved.
A worked example
Alex needs to sign a rental agreement that arrived as a PDF. On a phone, Alex leaves the mode on Draw it, opens the colour picker and chooses a dark blue, then sets the thickness to Medium.
Alex signs with a finger across the full width of the box, then taps Undo once after a wobbly first go. The second attempt looks right. A tap on Download PNG saves signature.png to the phone in a moment.
Alex opens the rental PDF, adds the image, and drags it onto the signature line. Because the background is see-through, the printed line still shows through the gaps in the letters. Start to finish, the job takes under a minute and no printer is involved.
Putting the image into a document
In most word processors and PDF tools you add the signature the same way you add any picture. Insert it as an image. Then set its wrapping so it floats in front of the text, which lets you drag it freely over the signature line.
Because the file is cropped right down to the ink, it drops into place without a lot of fiddling. If it comes in too big or too small, drag a corner handle to resize it so it keeps its shape rather than stretching.
One more tip helps on printed forms. If the signature looks too faint once it is on the page, go back to the tool and save a fresh copy with the thickness set to Bold, or with a darker colour. Making a new image is quicker than fighting the settings inside the document.
Fixes for common problems
Most trouble with a signature image comes down to a handful of causes, and each has a simple answer.
- A shaky line usually means the signature was drawn small, or drawn with a mouse. Sign large and let the tool shrink it down for you.
- A black box around the letters in older software means that program cannot handle transparency. Tick the white background box and save the file again.
- Nothing saves because the box is empty. Draw or type something first. The save button only switches on once there is ink to save.
- Guard the file like your real signature. Anyone who has it can paste your name onto anything, so keep it somewhere private and think twice before sending it by email.
When another tool suits better
This makes the picture of a signature, not a legal signing service. In many countries an electronic signature can be valid, but the rules differ a great deal, and some documents still need a witness or a formal signing provider. For anything weighty, check what your particular document requires before you rely on an image.
If you need to fill in a whole form, adding dates and initials in several places, a dedicated PDF form filler will serve you better. Reach for this tool when the one thing you are missing is a clean, tidy picture of your name.
Your signature stays with you
The drawing happens entirely inside this page, and the file saves straight to your device. Your signature is never sent to us, and we never see it. You can prove that to yourself by switching off your internet and using the tool anyway, since it carries on working with no connection at all.
Nothing is stored once you close the tab. When you leave the page, the signature is gone from it, so save your file first if you want to keep the image for later.