
Plan a quilt and get the numbers right
Drawing a quilt is the fun part. The hard part is working out what size to cut every piece, how many to cut, and how much fabric to buy. This page does that maths for you. You pick a block and a layout, and it gives you a full cutting list, the fabric to buy, and the binding. This guide explains each setting and works through a real quilt.
Where the extra seven-eighths on a triangle comes from
Four rules make every size in the cutting list, and each one adds a number of seam allowances to the finished size. A plain square, a rail or any rectangle gets two seam allowances added to both measurements. A half-square triangle starts life as a square that gets 3.4142 of them, which is 2 plus the square root of two. The large square in the no-waste geese method gets 4.8284, which is 2 plus twice the square root of two.
The square root of two turns up because those seams sit on a diagonal. Draw the diagonal on a square of side X. Sew a seam either side of that line, then cut along it. Each half opens out into a small square whose side is X less one seam allowance times the square root of two. That opened square has to match the unfinished size, which is the finished size plus two seam allowances. Rearrange it, and X is the finished size plus 3.4142 seam allowances.
With the usual quarter inch seam, 3.4142 seam allowances come to 0.8536 in. Cut sizes are then always rounded up, never down, since rounding down would eat into the seam. In inches the step is an eighth. In centimetres it is half a centimetre. So 0.8536 becomes the seven-eighths that printed charts use. The spare 1/48 in is welcome, because it lets you trim the sewn unit true. A 6 in finished triangle square works out at 6.8536 and is listed as 6-7/8 in. A goose finishing 4 by 2 in gives a 5-1/4 in large square and 2-7/8 in small ones. Both agree with the standard charts.
Here is what each block asks for, using the built-in 12 in block and quarter inch seam.
Two of the blocks can argue back. A log cabin grows two logs at a time, so the block size less the centre has to divide by the log width into an even whole number, and there must be at least two logs. When your numbers fail that test, the tool stops and offers the centres that do work. It tries one to twelve rounds, takes two log widths off the block for each round, and keeps any centre at least one log wide. For a 12 in block with 2 in logs that leaves a centre of 8 in or 4 in, and nothing else.
Flying geese has its own test, and it is a strict one. The no-waste method is used only when two geese fill the block exactly, which makes each goose twice as wide as it is tall. Ask for three geese in a 12 in block and the plan drops to stitch and flip: three rectangles cut 12-1/2 by 4-1/2 in, and six corner squares cut 4-1/2 in. The note above the tables says which method it used, and it names the shape it found, here geese 3 times as wide as they are tall.
- Nine-patch: nine squares finishing 4 in, all cut 4-1/2 in. Five come from fabric A and four from fabric B.
- Four-patch: four squares finishing 6 in, cut 6-1/2 in, two from each fabric.
- Pinwheel: two squares of each fabric cut 6-7/8 in. Sewn either side of the diagonal and cut apart, they give triangle squares finishing 6 in, trimmed to 6-1/2 in first.
- Rail fence: rails can be 2 to 8, and 4 is the start. Four rails in a 12 in block finish 3 in wide, so each is cut 3-1/2 by 12-1/2 in. The fabrics run A, B, C, D and repeat.
- Log cabin: the 4 in centre is cut 4-1/2 in. With 2 in logs, the four logs are cut 2-1/2 in wide and 4-1/2, 6-1/2, 6-1/2 and 8-1/2 in long. The fabric swaps every second log, so the light and dark halves meet corner to corner.
- Flying geese: geese can be 2 to 8, and 2 is the start. Two geese in a 12 in block each finish 12 by 6 in, so one 13-1/4 in square and four 6-7/8 in squares give four geese, which is two blocks.
Counting strips, and what the plan leaves out
Fabric is totalled one cut size at a time, and each size is tried both ways round. The tool works out how many whole pieces fit along the usable width of your cloth, then how many strips that many pieces need, then the length of cloth those strips use. It repeats that with the piece given a quarter turn, and keeps whichever way uses less length. The lengths for each fabric are then added together.
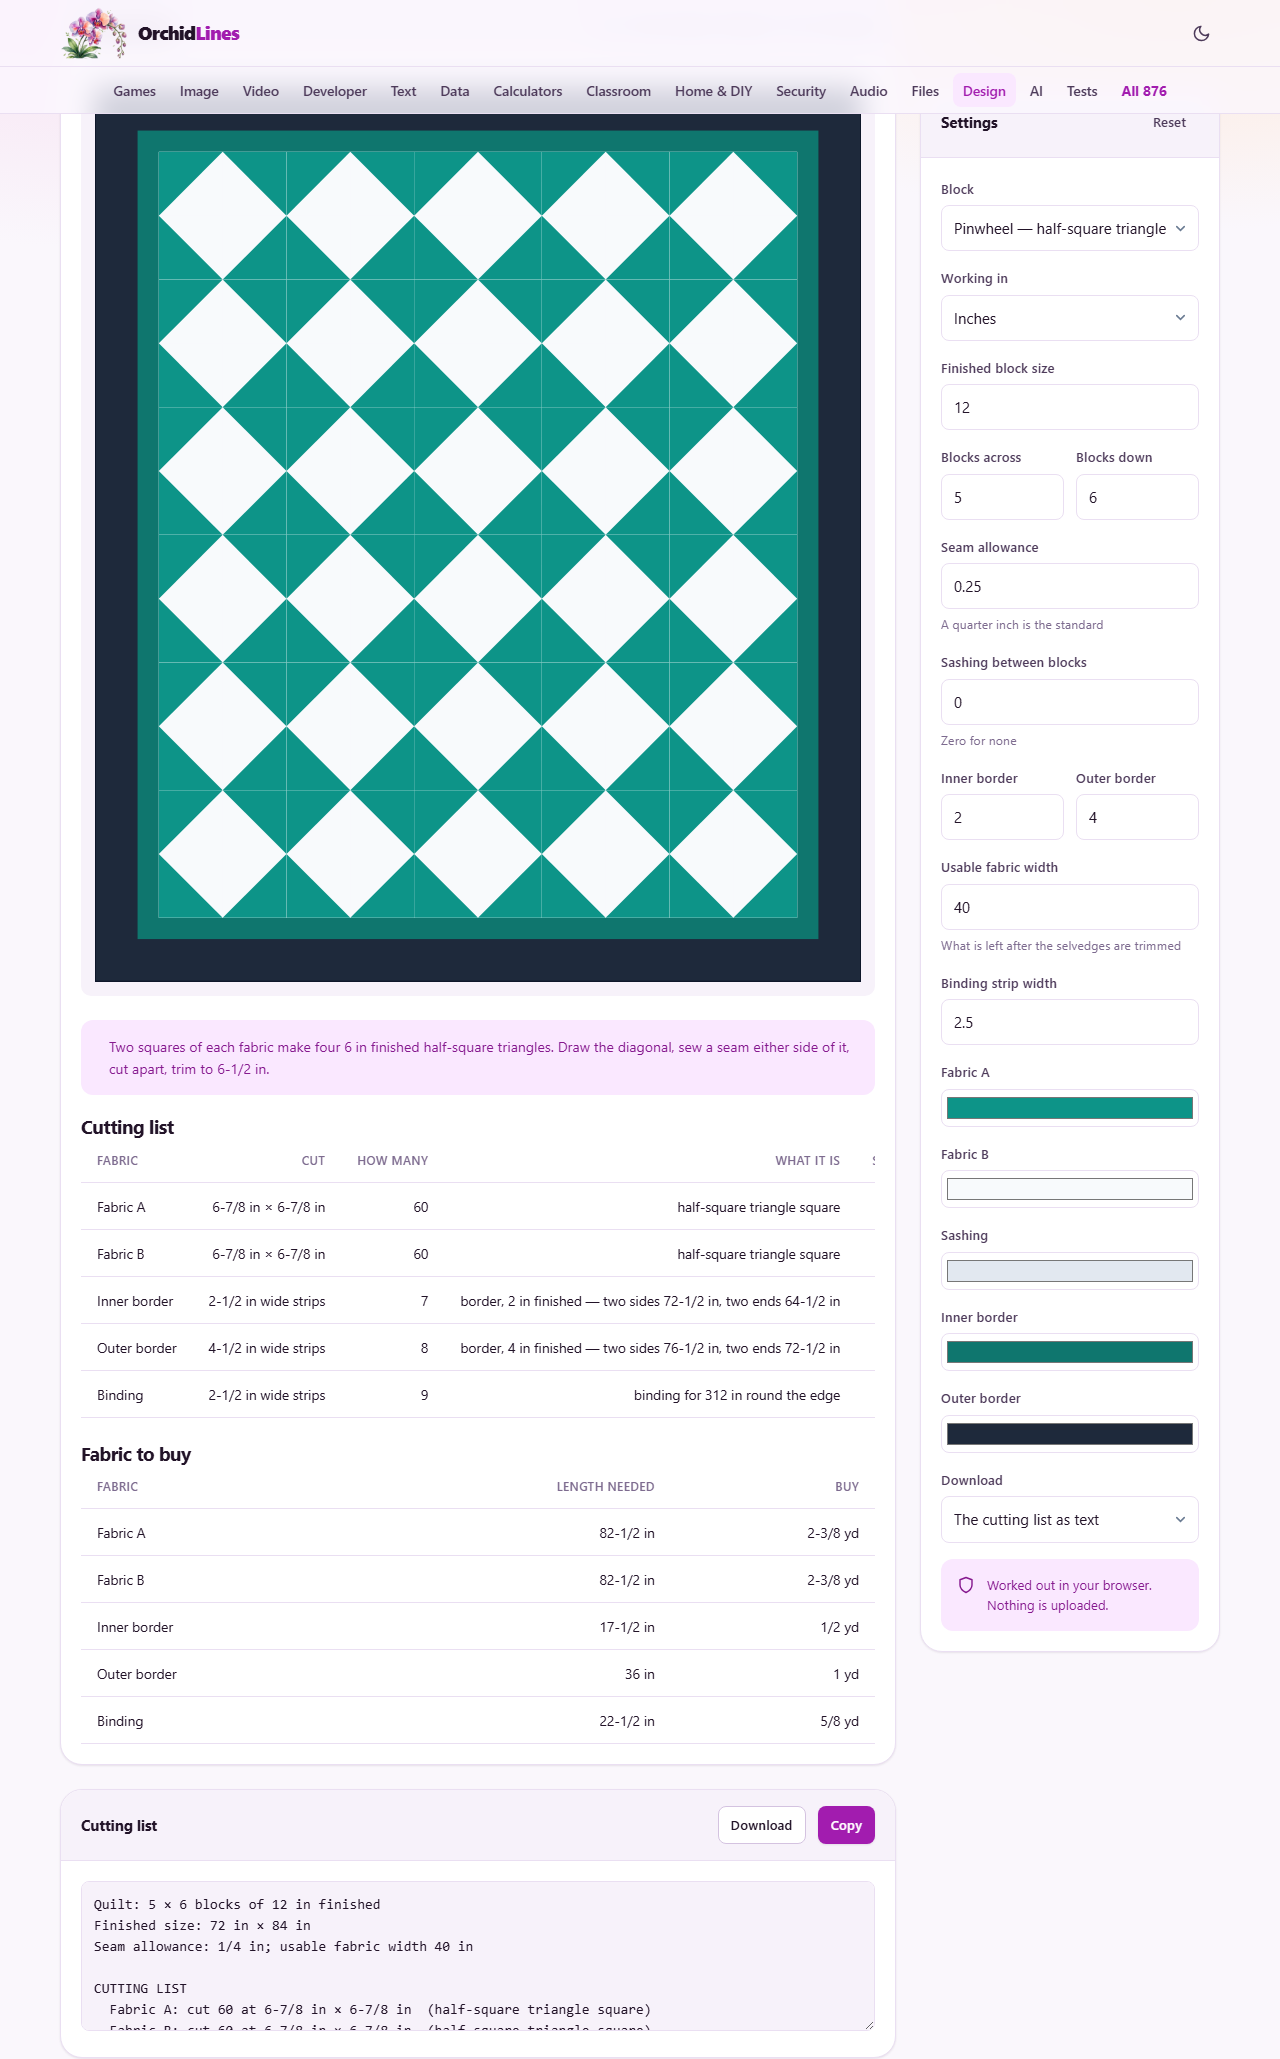
Take the starting settings: a pinwheel, 12 in blocks, 5 across and 6 down, a quarter inch seam and 40 in of usable width. That is 30 blocks, and each block wants two 6-7/8 in squares of each fabric, so 60 squares each. Now 40 divided by 6.875 is 5.8, so 5 fit along a strip. Sixty squares therefore need 12 strips. Twelve strips 6.875 in deep use 82.5 in of cloth, which is 2.29 yards. Rounded up to the next eighth of a yard that is 2-3/8 yd of fabric A, and the same again of fabric B.
Turning the piece round is not idle work. Take 30 rail fence rails cut 3-1/2 by 12-1/2 in. Cut strips 3-1/2 in deep and chop 12-1/2 in lengths off them, and three fit along the 40 in width, so 30 rails need 10 strips and 35 in of cloth. Cut strips 12-1/2 in deep and chop 3-1/2 in lengths instead, and eleven fit across, so 3 strips do it, but they eat 37.5 in. The tool takes the 35 in and reports 10 strips at three per strip.
Borders are measured as a running length: twice the height, plus twice the width with the border width added at each end. Sides go on first and the ends cover them. On a 60 by 72 in top the 2 in inner border runs 272 in, which is 7 strips of a 40 in width, cut 2-1/2 in wide, two sides 72-1/2 in and two ends 64-1/2 in. The top is 64 by 76 in by then, so the 4 in outer border runs 296 in, or 8 strips cut 4-1/2 in wide. The quilt finishes 72 by 84 in. Its edge measures 312 in, and 12 in is added for the diagonal joins before dividing by 40, so binding comes to 9 strips at 2-1/2 in. In centimetres that join allowance is 30. The saved text file also asks for backing 8 in bigger each way, 80 by 92 in, since quilting draws the top in. Metric adds 20 cm there instead.
The sums are exact, but they describe a tidy world. These are the things they do not cover.
- A strip is counted whole even when the last one is barely touched, and offcuts are never carried from one cut size to another. That part leans generous.
- Border strip counts use finished lengths only. Nothing is added for the seams where border strips are joined end to end. Binding is the one place a join allowance goes in.
- Sashing is always planned with cornerstones: upright strips between blocks, flat strips between rows, and small squares where they meet. A full length sashing row is never offered, since it would be longer than the cloth is wide.
- The log cabin list stops short of the block size. It counts one log for each log width across the block, yet each pair of logs widens the block by only one log width. So the pieces listed sew up to halfway between the centre and the block size. A 12 in block with a 4 in centre and 2 in logs gives four logs, and they make an 8 in block. The drawing shows plain fabric filling the rest.
- Any row with fewer than one piece is dropped from the cutting table. One flying geese block on its own uses half a large square, so that row disappears, though the fabric total still rounds it up to a whole square.
- If a piece is wider than your usable width both ways round, it gets no strip count, and a warning shows under the tables.
- Grain, print direction, fussy cutting, shrinkage and the bulk of the seams are all outside the model. Nothing is rounded down, but nothing is padded either.
What the planner is for
A quilt top is made of repeated squares of patchwork called blocks. Before you can sew, you need to cut many small pieces to exact sizes. Get one size wrong and the whole top will not lie flat.
This tool takes the guesswork out. You describe the quilt you want, and it lists every piece to cut, tells you how many, and adds up the fabric. It suits a beginner who wants to avoid a costly mistake, and a seasoned quilter who would rather not do the sums by hand.
Finished size against cut size
This is the idea the whole tool rests on. The finished size is what you see once a piece is sewn in. The cut size is bigger, because a strip of fabric along each edge is swallowed by the stitching. That swallowed strip is called the seam allowance.
So every number in the cutting list is larger than the finished size by the seams that vanish into the joins. You never have to add that on yourself. You tell the tool the finished sizes you want, and it hands back the sizes to cut.
Choosing a block
The Block menu offers six classic patterns. Each one is drawn for you as soon as you pick it, so you can see the shape before you commit.
- Nine-patch and four-patch, which are grids of plain squares.
- Pinwheel, made from half-square triangles, where each square is split corner to corner into two triangles.
- Rail fence, made of straight strips laid side by side.
- Log cabin, a small centre square wrapped in strips that grow outward.
- Flying geese, a row of triangle units that look like birds in flight.
The layout and the block size
Finished block size sets how big one block is when sewn. Blocks across and Blocks down set how many blocks make the quilt, side to side and top to bottom. Multiply those two and you have the number of blocks in the whole top.
Change any of these and the entire plan shifts with it. A wider layout needs more pieces and more fabric, and the tool updates every figure at once. There is no need to redo anything by hand.
Seam allowance and fabric width
Seam allowance is the width of fabric taken up by each seam. A quarter of an inch is the standard for patchwork, and that is the starting value. Cut sizes are built on this number, so it must match how you sew.
Usable fabric width is how wide your cloth is once the tight woven edges, called selvedges, are trimmed off. Cloth sold as forty-two inches wide gives about forty once trimmed, and forty is the starting figure. The tool uses it to work out how many pieces fit across a strip.
Sashing, borders, and binding
Sashing is a set of narrow strips sewn between the blocks, like grout between tiles. Set it to zero for none, or give it a width to space the blocks out. Inner border and Outer border are frames of fabric added around the whole top, and you can set each to any width or leave it at zero.
Binding is the strip that wraps the raw outer edge to finish it. Binding strip width sets how wide you cut that strip. From your layout, borders, and binding, the tool works out the finished size of the quilt and the length of binding you need to go all the way round.
Settings that belong to one block
Some blocks need an extra detail, and those boxes appear only when that block is chosen. Rail fence has Rails per block, which sets how many strips make up each block. Log cabin has a centre size and a log width, which set the middle square and the strips around it.
Flying geese has a geese per block box. With two geese in a block, the tool can use a clever cutting method that wastes almost no fabric. Ask for more geese in a block and it switches to a slower method that uses more cloth, because the fast one only works when each goose is twice as wide as it is tall. The tool tells you which method it used and why.
Colours and the drawing
A row of colour swatches lets you set the shade of each fabric in the block, plus the sashing and the two borders. As you change them, the picture of the quilt top redraws so you can judge how the colours sit together.
This picture is a planning aid, not just decoration. It shows how the blocks tile, how the sashing frames them, and how the borders sit around the edge. It is an easy way to spot a colour clash before you buy a single metre of cloth.
Reading the cutting list
The cutting list is the heart of the output. It is a table with a row for each kind of piece. It names the fabric, the size to cut, how many to cut, what the piece is for, and how many strips that comes to across the width of your cloth.
Below it sits a second table of fabric to buy. For each fabric it totals the length you need and rounds it up to a sensible amount to purchase, to the next eighth of a yard, or the next tenth of a metre in metric. You can work straight down the cutting list at the table, and take the fabric table to the shop.
Saving the plan
Two buttons above the list let you keep it. A Download menu chooses what you save: the cutting list as a plain text file, or the picture of the quilt top as a scalable image. Download then saves the chosen file with a matching name.
Copy puts the text list on your clipboard, ready to paste into a note or a message to a sewing friend. A Reset button clears the settings back to the start if you want to begin a new plan from scratch.
A quilt worked all the way through
Take the starting settings: a pinwheel block, twelve inches finished, five blocks across and six down, with a two inch inner border and a four inch outer border. That is thirty blocks in all. The picture shows the pinwheels spinning in a grid, framed by the two borders.
The cutting list tells you to cut the pinwheel squares at six and seven eighths of an inch, sixty in the first fabric and sixty in the second. It also lists the border strips and the binding strips, each with its width and how many to cut. The note under the picture reads seventy-two inches by eighty-four inches finished, thirty blocks, and the length of binding to cut.
The fabric table then adds up how much of each colour to buy. You cut to the list, sew the pieces in the order the block wants, and the top comes together at the size the tool promised. Nothing is left to a guess at the cutting table.
The triangle trap, and buying enough
The most common quilting mistake lives in the triangles. A plain square is cut half an inch bigger than finished. A half-square triangle must be cut seven eighths bigger, because its seam runs along the diagonal, which is longer than a straight edge. Use the square rule on a triangle and every unit comes out too small.
The tool already applies the right rule, so you are safe there. The one thing to add yourself is a little extra fabric. The amounts are exact arithmetic, with no room for a slip of the scissors, a wash that shrinks, or a pattern that must line up. Buy about a tenth more than the figure says, and more again for a busy print.
Working in centimetres
The Working in menu switches the whole tool between inches and centimetres. When you move to centimetres, the starting sizes change to sensible metric ones, so you are not left with an inch sized block measured in the wrong unit.
In metric, cut sizes round up to the next half centimetre, and the usual seam is a little under a centimetre. Fabric to buy rounds up to the next tenth of a metre. Everything else works exactly as it does in inches.
Your design stays in this browser
The whole plan is worked out on your own device as you change the settings. None of your choices are sent to us, and no server sees your quilt. The picture and the sums are all made in the page in front of you.
So that you can come back to a plan, the tool remembers your last settings in this browser's own local storage. That memory lives on your machine alone. Close the tab and open it again later, and your quilt is still there, waiting where you left it.